
Introduction
This manual provides detailed instructions for the installation, operation, and maintenance of your Swann CONVR-B83MP-US 8 Channel 3MP HD NVR Security System. This system offers 1080p high-definition live viewing, playback, and 3-megapixel recording capabilities across all 8 channels. It is designed to provide comprehensive surveillance with clear detail, including license plates, faces, and clothing colors, from various distances.
Please read this manual thoroughly before using the product to ensure proper setup and functionality.
Safety Information
- Ensure the NVR is placed on a stable, level surface to prevent damage from falls.
- Do not expose the NVR to water, moisture, or extreme temperatures.
- Use only the power adapter supplied with the unit. Using unauthorized power adapters may cause damage or fire.
- Do not open the NVR casing. Refer all servicing to qualified personnel.
- Keep ventilation openings clear to prevent overheating.
- Disconnect power before cleaning or performing any maintenance.
Package Contents
Before proceeding with installation, verify that all items are present in your package:
- Swann CONVR-B83MP-US 8 Channel NVR Unit
- Power Adapter
- USB Mouse
- Ethernet Cable
- HDMI Cable
- Mounting Screws and Plugs
- Quick Start Guide (this manual)
Product Overview
The Swann CONVR-B83MP-US NVR is a compact unit designed for efficient video surveillance. Below is an image of the NVR unit, highlighting its general appearance.
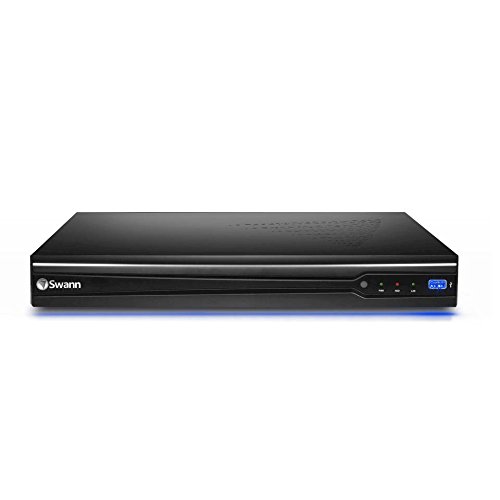
Image: Front view of the Swann CONVR-B83MP-US NVR unit. The unit is black with a sleek design, featuring a blue LED light strip along the bottom front edge and the Swann logo. Ventilation grilles are visible on the sides.
The NVR features various ports on its rear panel for connecting cameras, a monitor, network, and power. The front panel typically includes status indicators and USB ports for mouse and backup devices.
Front Panel Indicators:
- Power LED: Indicates the NVR is powered on.
- HDD LED: Flashes when the hard drive is active (reading/writing data).
- Network LED: Indicates network activity.
Rear Panel Ports:
- Power Input: Connects to the supplied power adapter.
- Ethernet Ports (PoE): Connects IP cameras and provides power over Ethernet.
- LAN Port: Connects the NVR to your local network/router.
- HDMI Output: Connects to an HDTV or monitor for high-definition video output.
- VGA Output: Connects to a monitor for video output.
- USB Ports: For connecting the USB mouse and external storage devices for backup.
Setup
Follow these steps to set up your Swann NVR system:
1. Physical Connection
- Connect Cameras: Connect your Swann IP cameras to the NVR's Ethernet ports using the provided CAT5E Ethernet cables. These ports supply power to the cameras (PoE).
- Connect Monitor: Connect an HDTV or monitor to the NVR using either the HDMI or VGA output port.
- Connect Mouse: Plug the USB mouse into one of the NVR's USB ports.
- Connect to Network: Connect the NVR's LAN port to your router or network switch using an Ethernet cable. This enables remote viewing and internet access.
- Connect Power: Plug the supplied power adapter into the NVR's power input and then into a wall outlet. The NVR will power on automatically.
2. Initial Configuration
Upon first boot, the NVR will guide you through an initial setup wizard. This typically includes:
- Setting up an administrator password.
- Configuring date and time settings.
- Network settings (DHCP is usually enabled by default).
- Hard drive initialization (if required).
Follow the on-screen prompts to complete the setup. Ensure your network connection is active for remote access features.
3. Smartphone Connectivity (SwannLink P2P)
To view your security system remotely on a smartphone:
- Download the official Swann Security app from your device's app store.
- Create an account or log in.
- Add your NVR device using the SwannLink Peer-to-Peer (P2P) technology, typically by scanning a QR code displayed on your NVR's monitor or entering the device ID manually.
- Follow the app's instructions to complete the connection.
Operating the NVR
Live Viewing
Once the NVR is set up, you will see the live view of all connected cameras on your monitor. You can switch between single-camera view, multi-camera grids, and customize display settings through the NVR's on-screen interface using the USB mouse.
- The system supports 1080p high-definition live viewing in real-time (30 frames per second per channel).
- Access the main menu by right-clicking on the live view screen.
Recording
The NVR is configured to record continuously by default. You can customize recording settings:
- Continuous Recording: Records 24/7. The 2TB hard drive can store approximately 45 days of continuous footage from 8 channels. Storage can be expanded up to 4TB.
- Motion Detection Recording: Records only when motion is detected in the camera's field of view. This conserves hard drive space and extends recording duration. Configure motion detection zones and sensitivity in the NVR's menu.
- Scheduled Recording: Set specific times for recording.
Access recording settings via the NVR's main menu under "Record" or "Schedule".
Playback
To review recorded footage:
- From the live view, right-click and select "Playback" from the menu.
- Select the desired date and camera channel(s).
- Use the timeline to navigate through recorded events. You can fast-forward, rewind, and pause playback.
- Export specific video clips to a USB drive for backup if needed.
Remote Access
Access your NVR remotely via the Swann Security app on your smartphone or through a web browser on a computer. This allows you to:
- View live camera feeds.
- Play back recorded footage.
- Receive push notifications for motion detection events.
- Adjust certain NVR settings.
Ensure your NVR has a stable internet connection for reliable remote access.
Maintenance
Hard Drive Management
The NVR automatically overwrites the oldest footage when the hard drive is full. To ensure optimal performance:
- Regularly back up important footage to an external USB drive or network storage.
- Check the hard drive status periodically in the NVR's menu to ensure it is functioning correctly.
- If you experience issues, consider formatting the hard drive (this will erase all recorded data).
Firmware Updates
Swann periodically releases firmware updates to improve system performance, add features, or address security vulnerabilities. Check the Swann support website for the latest firmware for your model. Follow the instructions provided with the firmware update carefully.
Cleaning
To clean the NVR unit:
- Disconnect power before cleaning.
- Use a soft, dry cloth to wipe the exterior of the NVR.
- Do not use liquid cleaners or aerosol sprays directly on the unit.
- Ensure ventilation openings are free from dust and debris.
Troubleshooting
This section addresses common issues you might encounter with your NVR system.
No Video Output to Monitor
- Check if the NVR is powered on and the Power LED is illuminated.
- Verify that the HDMI or VGA cable is securely connected to both the NVR and the monitor.
- Ensure the monitor is powered on and set to the correct input source (HDMI/VGA).
- Try a different HDMI/VGA cable or monitor if possible.
Cameras Not Displaying
- Ensure cameras are properly connected to the NVR's PoE ports.
- Check the Ethernet cables for damage. Try a different cable.
- Verify that the cameras are compatible with your Swann NVR (e.g., Swann NHD-835 Cameras).
- Restart the NVR.
No Remote Access
- Confirm the NVR is connected to your router via the LAN port and has internet access. The Network LED should be active.
- Check your router's internet connection.
- Ensure the Swann Security app is updated to the latest version.
- Verify that the NVR is correctly added to your Swann Security app account.
- Restart both the NVR and your router.
Hard Drive Not Recording
- Check the HDD LED on the front panel; it should flash during activity.
- Access the NVR's menu to check the hard drive status. It may need to be initialized or formatted.
- Ensure recording schedules are correctly configured.
- If the hard drive is full, older footage will be overwritten. Back up important data.
Specifications
| Feature | Detail |
|---|---|
| Model Number | CONVR-B83MP-US |
| Channels | 8 |
| Recording Resolution | 3 Megapixel (3MP) |
| Live Viewing Resolution | 1080p Full HD |
| Frame Rate | 30fps per channel (real-time) |
| Hard Disk Drive (HDD) | 2TB (expandable to 4TB) |
| Connectivity | Ethernet (PoE), HDMI, VGA |
| Compatible Devices | Swann NHD-835 Cameras, Smartphone |
| Product Dimensions | 19.1 x 15.45 x 5.25 inches |
| Item Weight | 9.38 pounds |
| Manufacturer | Swann |
Warranty and Support
Your Swann CONVR-B83MP-US NVR Security System is covered by a limited warranty. Please refer to the warranty card included in your package or visit the official Swann website for detailed warranty terms and conditions.
For technical support, troubleshooting assistance, or to download the latest firmware and software, please visit the Swann support website or contact their customer service department. Contact information can typically be found on the Swann website or in your product packaging.
Swann Support Website: www.swann.com/support