
1. Introduction
This manual provides essential information for the safe and efficient operation of your NEC X555UNS 55-inch 1080p LED TV. Please read these instructions thoroughly before installation and use, and retain them for future reference.
The NEC X555UNS is designed for professional signage applications, particularly for building video walls, offering superior off-angle viewing and minimal color shift due to its S-IPS panel technology. It supports 24/7 operation with advanced heat management and localized dimming for improved brightness uniformity.

Image: The NEC X555UNS 55-inch LED TV displaying vibrant, colorful content, showcasing its high-quality visual output.
2. Safety Information
Always observe the following safety precautions to prevent damage to the product and ensure user safety:
- Ensure the product is installed by qualified personnel.
- Do not block ventilation openings.
- Avoid exposing the unit to rain or moisture.
- Use only the power cord supplied with the unit or a suitable replacement.
- Disconnect power before cleaning or servicing.
- Do not attempt to repair the unit yourself. Refer all servicing to qualified service personnel.
3. Package Contents
Verify that all items are present in the package:
- NEC X555UNS 55-inch LED TV Unit
- Stand
- Power Cord
- Remote Control
- Instruction Manual (this document)

Image: Front view of the NEC X555UNS 55-inch LED TV, showing its sleek, dark display panel when powered off.
4. Setup and Installation
4.1 Physical Installation
The NEC X555UNS is designed for video wall applications. Ensure proper mounting hardware is used for secure installation. The unit weighs approximately 81 pounds (36.7 kg).
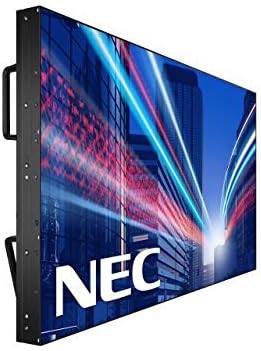
Image: Side view of the NEC X555UNS 55-inch LED TV, highlighting its robust construction and integrated handles for easier installation in video wall configurations.
4.2 Connectivity
Connect your video sources and network cables to the appropriate ports on the display. The X555UNS offers various connectivity options:
- HDMI: For high-definition video and audio input.
- DVI-D: For digital video input.
- LAN: For network control and content distribution.
- DisplayPort: Supports UHD pass-through for daisy-chaining multiple displays in a video wall setup.
- OPS Slot: Allows for integration of single board computers.
For video wall configurations, utilize the DisplayPort for UHD daisy-chaining to achieve a high-resolution display across the entire wall.
4.3 Initial Power On
- Connect the power cord to the display and a suitable power outlet.
- Press the power button on the display or remote control.
- The display will power on and show the NEC logo.
- Use the on-screen menu to configure initial settings such as language, input source, and display mode.
The Auto ID feature can simplify installation time, especially in multi-display setups, by reducing configuration steps to a single button press.
5. Operating Instructions
5.1 Basic Operation
Use the remote control or the buttons on the display to navigate the on-screen menu (OSD). Adjust settings such as brightness, contrast, color temperature, and input source.
5.2 Display Features
- S-IPS Panel Technology: Provides excellent off-angle viewing and minimizes color shift, making it ideal for public viewing and video walls.
- Direct LED Backlighting with Localized Dimming: Enhances brightness uniformity and achieves a higher dynamic contrast ratio.
- 24/7 Operation: Designed for continuous use with advanced thermal protection, internal temperature sensors, and fan-based cooling.
- 700 cd/m² Brightness: Ensures clear visibility even in brightly lit environments.
6. Maintenance
6.1 Cleaning the Display
To clean the screen, gently wipe it with a soft, lint-free cloth. For stubborn marks, dampen the cloth slightly with water or a mild, non-abrasive screen cleaner. Do not spray liquid directly onto the screen.
6.2 General Care
- Keep the display in a well-ventilated area to prevent overheating.
- Avoid placing heavy objects on the display.
- Regularly check cable connections to ensure they are secure.
7. Troubleshooting
If you encounter issues with your NEC X555UNS, refer to the following common problems and solutions:
| Problem | Possible Cause | Solution |
|---|---|---|
| No Power | Power cord disconnected; Power outlet faulty. | Check power cord connection; Test power outlet with another device. |
| No Image | Incorrect input source selected; Video cable loose or faulty. | Select correct input source; Check video cable connections. |
| Poor Picture Quality | Resolution mismatch; Display settings incorrect. | Adjust resolution on source device; Calibrate display settings (brightness, contrast). |
If the problem persists, contact NEC customer support.
8. Specifications
| Feature | Detail |
|---|---|
| Model Name | X555UNS |
| Screen Size | 55 Inches |
| Display Technology | LED, S-IPS Panel |
| Resolution | 1080p (Full HD) |
| Aspect Ratio | 16:9 |
| Refresh Rate | 60 Hz |
| Brightness | 700 cd/m² (nits) |
| Connectivity | HDMI, DVI-D, LAN, DisplayPort |
| Special Features | Flat, S-IPS Panel, Auto ID, UHD Daisy Chain, OPS Slot, 24/7 Operation, Advanced Thermal Protection |
| Product Dimensions | 54 x 12 x 34 inches (approx.) |
| Item Weight | 81 pounds (approx.) |
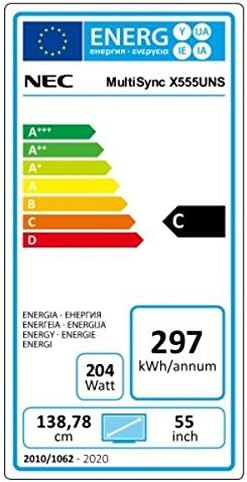
Image: Energy efficiency label for the NEC MultiSync X555UNS, showing energy consumption details and efficiency class.
9. Warranty and Support
For warranty information and technical support, please refer to the official NEC website or contact your local NEC representative. Keep your purchase receipt as proof of purchase.
Online Resources: Visit www.necdisplay.com for product documentation, drivers, and support contact information.
Customer Support: For direct assistance, please contact NEC customer service.


