1. Introduction
Thank you for purchasing the ELECOM M-XGM10DBBK Wireless 5-Button BlueLED Mouse. This mouse is designed for comfort and precision, featuring an ergonomic shape that fits naturally in your hand and BlueLED technology for reliable tracking on various surfaces. This manual provides essential information for proper setup, operation, and maintenance of your device.
2. Product Overview
The M-XGM10DBBK mouse is part of the "EX-G" series, known for its ergonomic design and comfortable grip. It features five buttons, including dedicated back and forward buttons, to enhance productivity.
Key Features:
- Ergonomic Design: Shaped to fit the hand for ultimate grip comfort.
- BlueLED Sensor: Provides precise tracking on a wide range of surfaces, including glass and fabric.
- 5-Button Functionality: Includes left, right, scroll wheel, and dedicated back/forward buttons.
- 2.4GHz Wireless Connection: Offers a stable connection with a range of approximately 10 meters (3 meters on steel desks).
- Customizable Buttons: Button functions can be re-assigned using the free "ELECOM Mouse Assistant" software (Windows/Mac only).
- Battery Indicator: A lamp indicates remaining battery life.
Components:
Familiarize yourself with the mouse components:

Figure 2.1: Top view of the mouse, highlighting the main buttons.
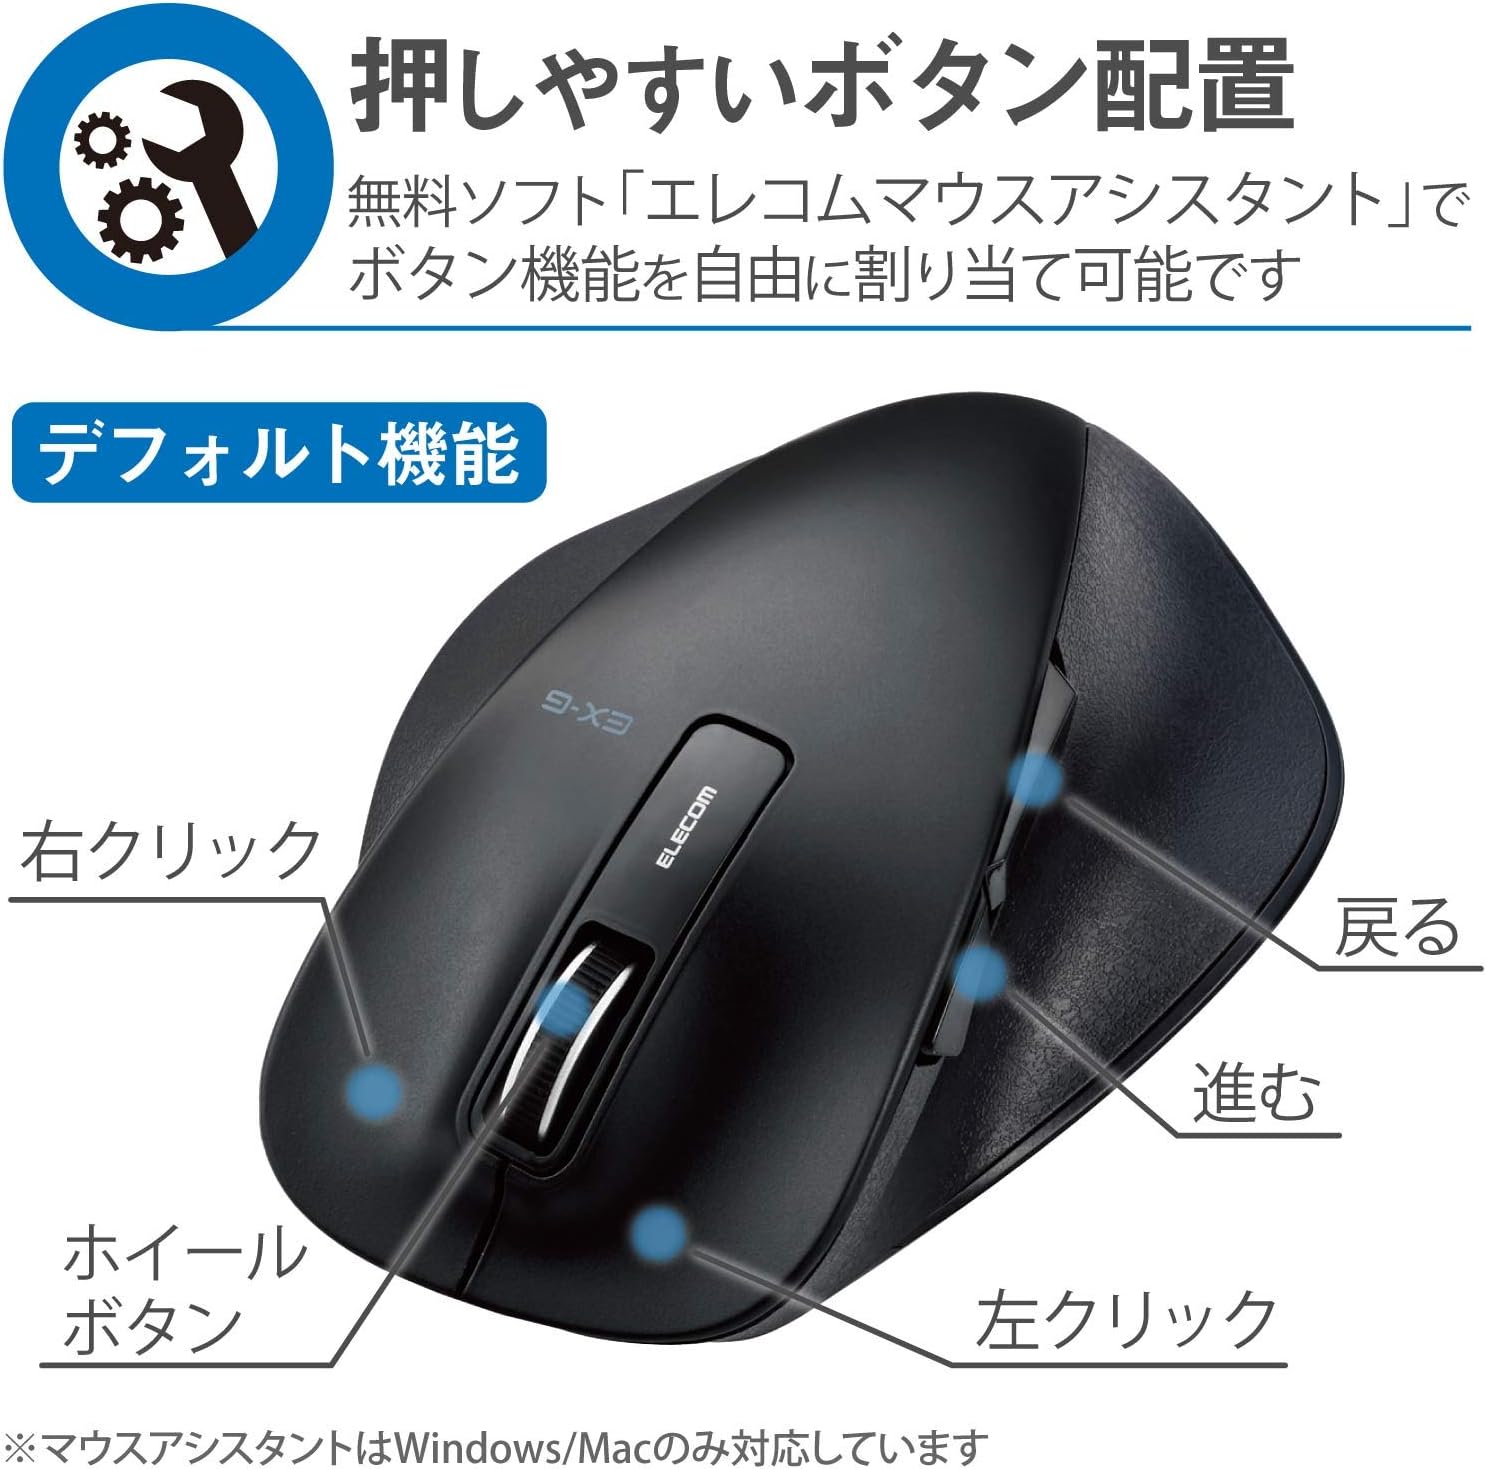
Figure 2.2: Side view of the mouse, showing the back and forward buttons.
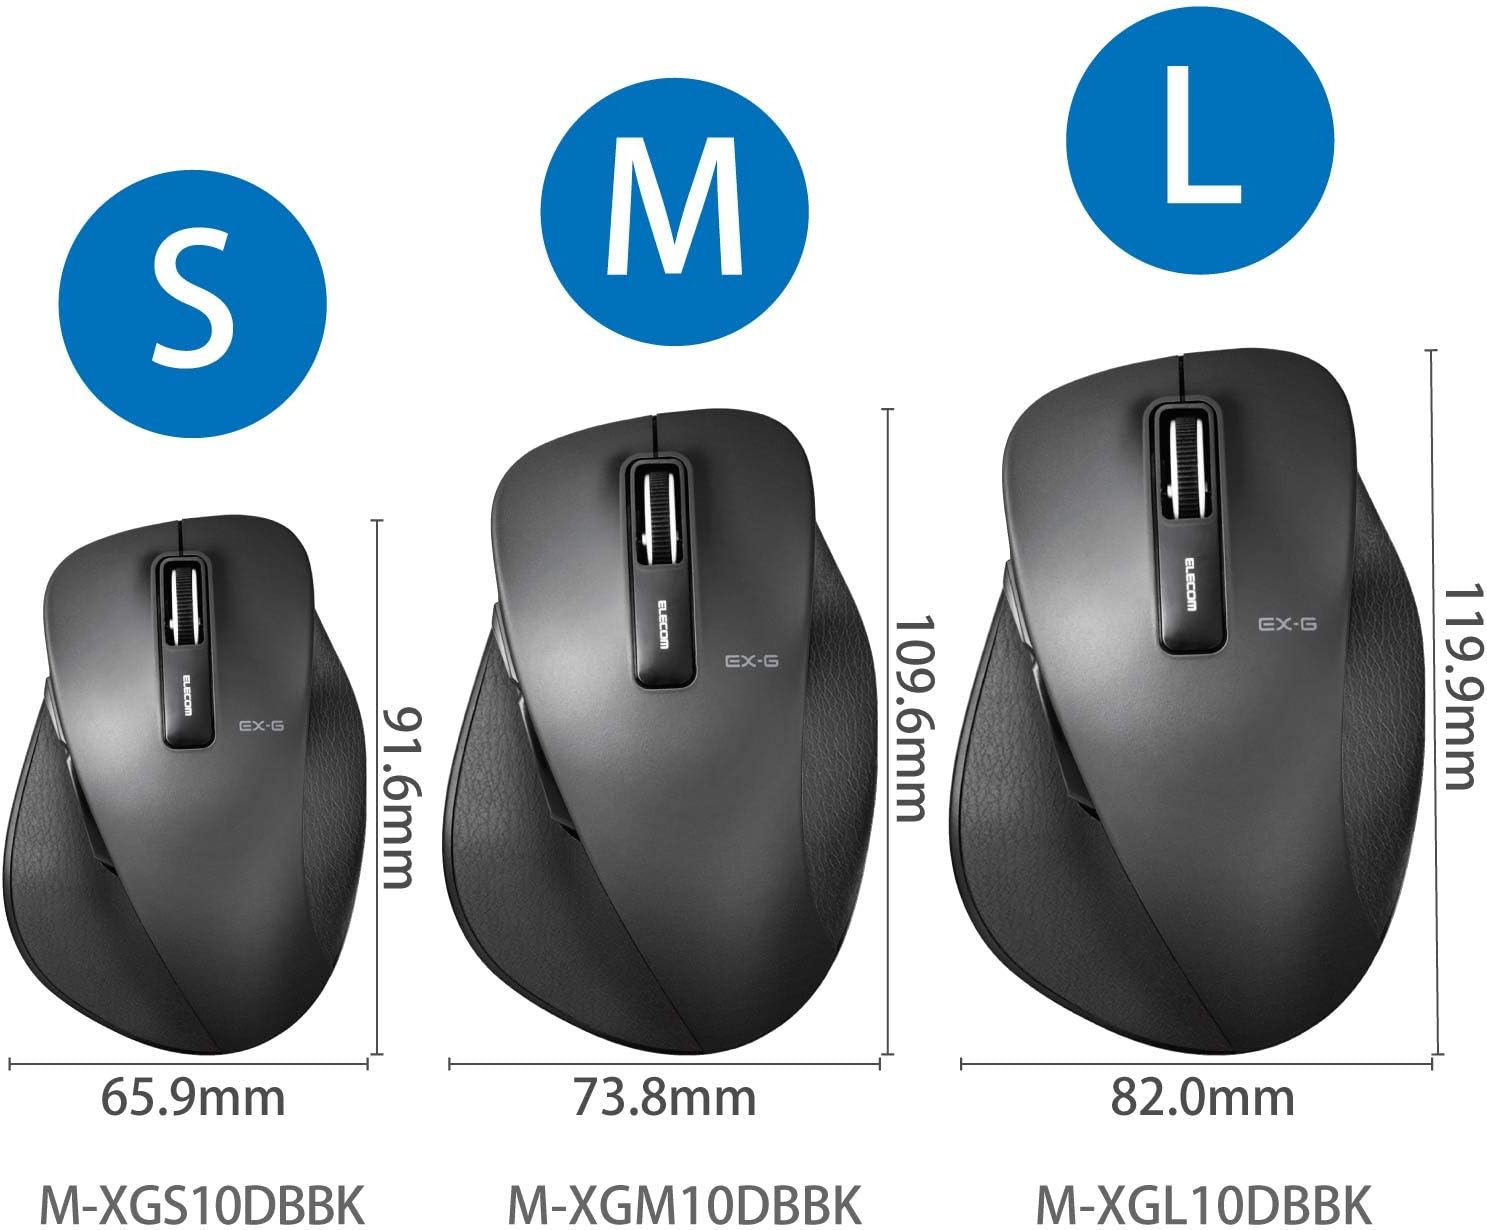
Figure 2.3: Size comparison of EX-G mice (S, M, L). The M-XGM10DBBK is the M size.

Figure 2.4: Bottom view of the mouse, indicating the optical sensor, power switch, and receiver storage compartment.

Figure 2.5: Illustration of the durable Omron switches used for the left and right click buttons.
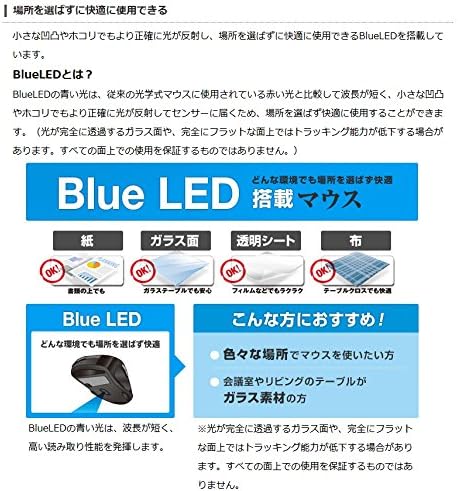
Figure 2.6: Explanation of BlueLED technology, demonstrating its versatility on different surfaces. Note: Tracking performance may decrease on completely transparent or perfectly flat surfaces.

Figure 2.7: Details on 2.4GHz wireless, battery indicator, and 2000 DPI resolution for smooth operation.

Figure 2.8: The ELECOM M-XGM10DBBK mouse is certified to work with Chromebooks.
3. Setup
3.1 Battery Installation
- Locate the battery cover on the bottom of the mouse.
- Slide the cover open.
- Insert one AA alkaline, manganese, or nickel-metal hydride battery, ensuring correct polarity (+/-).
- Close the battery cover securely.
3.2 Receiver Connection
- Remove the USB receiver from its storage compartment on the bottom of the mouse.
- Plug the USB receiver into an available USB-A port on your computer.
- Your computer should automatically detect and install the necessary drivers. This may take a few moments.
3.3 Powering On
- Slide the power switch on the bottom of the mouse to the "ON" position.
- The mouse is now ready for use.
4. Operating Instructions
4.1 Basic Functions
- Left Click: Primary selection and activation.
- Right Click: Opens context menus.
- Scroll Wheel: Scrolls documents and web pages vertically. Can also be clicked for middle-click functionality.
4.2 Back/Forward Buttons
The dedicated back and forward buttons located on the side of the mouse allow for quick navigation in web browsers and file explorers.
- Press the Back button to go to the previous page or folder.
- Press the Forward button to go to the next page or folder.
4.3 Customizing Buttons (ELECOM Mouse Assistant)
For advanced customization, download the free "ELECOM Mouse Assistant" software from the official ELECOM website. This software allows you to re-assign functions to the mouse buttons according to your preferences. Please note that this software is compatible with Windows and macOS only.
5. Maintenance
5.1 Cleaning
To maintain optimal performance and hygiene, regularly clean your mouse:
- Turn off the mouse using the power switch.
- Use a soft, dry cloth to wipe the surface of the mouse.
- For stubborn dirt, slightly dampen the cloth with water or a mild cleaning solution, then wipe dry immediately.
- Avoid using harsh chemicals, abrasives, or solvents.
- Gently clean the optical sensor area on the bottom of the mouse with a cotton swab if tracking issues occur.
5.2 Battery Replacement
When the battery indicator lamp flashes or the mouse performance degrades, replace the battery:
- Turn off the mouse.
- Open the battery cover.
- Remove the old battery and dispose of it according to local regulations.
- Insert a new AA battery, ensuring correct polarity.
- Close the battery cover and turn the mouse back on.
6. Troubleshooting
If you encounter issues with your mouse, refer to the following common problems and solutions:
| Problem | Possible Cause | Solution |
|---|---|---|
| Mouse not responding | Low battery; Power switch off; Receiver not connected; Receiver interference. | Replace battery; Turn power switch ON; Ensure receiver is firmly plugged in; Try a different USB port; Move closer to the receiver. |
| Erratic cursor movement | Dirty optical sensor; Unsuitable surface; Interference. | Clean optical sensor; Use on a suitable mouse pad or surface; Reduce interference from other wireless devices. |
| Buttons not working | Software conflict; Driver issue. | Restart computer; Reinstall mouse drivers; Check for conflicting software. |
| Wireless connection issues | Distance too far; Obstructions; Interference. | Ensure mouse is within range (10m); Remove obstructions between mouse and receiver; Avoid using near other 2.4GHz devices. |
7. Specifications
| Feature | Detail |
|---|---|
| Model Number | M-XGM10DBBK |
| Connection Method | 2.4GHz Wireless (USB-A Receiver) |
| Sensor Type | BlueLED Optical |
| Buttons | 5 buttons (Left, Right, Scroll Wheel, Back, Forward) |
| Resolution | 2000 DPI |
| Dimensions (W x D x H) | 73.8 x 109.6 x 40.8 mm (M Size) |
| Weight | Approx. 151.95 g (including battery) |
| Power Source | 1 x AA battery (Alkaline, Manganese, or Ni-MH) |
| Estimated Battery Life | Approx. 722 days (based on typical usage) |
| Compatible OS | Windows 11, 10, RT8.1, 8.1, 7, Vista; macOS High Sierra 10.13, OS X 10.10; Chrome OS |
| Color | Black |
8. Warranty and Support
8.1 Warranty Information
This product comes with a 6-month warranty from the date of purchase. Please retain your proof of purchase for warranty claims. The warranty covers manufacturing defects under normal use. It does not cover damage caused by misuse, accidents, unauthorized modifications, or normal wear and tear.
8.2 Customer Support
For technical assistance, troubleshooting, or warranty inquiries, please visit the official ELECOM website or contact ELECOM customer support. Contact details can typically be found on the ELECOM website under the 'Support' or 'Contact Us' section.


