Introduction
The Lux LTX100E is a versatile programmable thermostat designed to provide efficient and comfortable temperature control for your home. It offers flexible programming options, including 7-day or 5/2-day schedules, with the ability to program each day separately with 2 or 4 periods. Key features include a lighted display for easy viewing, a keypad lockout for security, and options for manual temperature hold and temporary override. This dual-powered thermostat also allows for adjustable temperature differential, user temperature calibration, and heat/cool set temperature limit stops, ensuring precise climate management.

Front view of the Lux LTX100E Programmable Thermostat, showing the display and control buttons.
Product Features
- Easy Scheduling: Set your home comfort level with convenient 7-day or 5/2-day program settings.
- Adjustable Temperature Limits: Customize heating and cooling temperature limits for optimal comfort.
- Keypad Lockout: Prevents unauthorized use, maintaining your desired settings.
- Flexible Programming Periods: Choose between 2 or 4 periods per day to suit your schedule.
- Easy-to-Read Display: Features a backlit display for clear visibility in various lighting conditions.
- Dual Power Options: Can be powered by batteries or connected to a 24V system.
- Temperature Display: Selectable Fahrenheit or Celsius temperature display.
- Adjustable Differential: Allows fine-tuning of temperature swing for consistent comfort.

Overview of key features including battery power, 3-year warranty, and 1 heat/1 cool compatibility.
What's in the Box
Upon opening your Lux LTX100E package, you should find the following components:
- LTX100E Thermostat Unit
- Instruction Manual (this document)
- Wiring Label
- 2 Mounting Screws
- 2 Wall Anchors
- Jumper Wire (pre-installed for RH-RC connection)

Visual representation of the items included in the product packaging.
Installation
System Compatibility
The Lux LTX100E thermostat is designed for use with most 24V heating and A/C systems. Please review the compatibility chart below to ensure your system is supported before installation.

Detailed chart showing compatible and non-compatible HVAC systems for the LTX100E.
Wiring Diagrams
Proper wiring is crucial for the correct operation of your thermostat. Always turn off power to your HVAC system at the circuit breaker before beginning any wiring work. Refer to the diagrams below that match your existing wiring configuration.
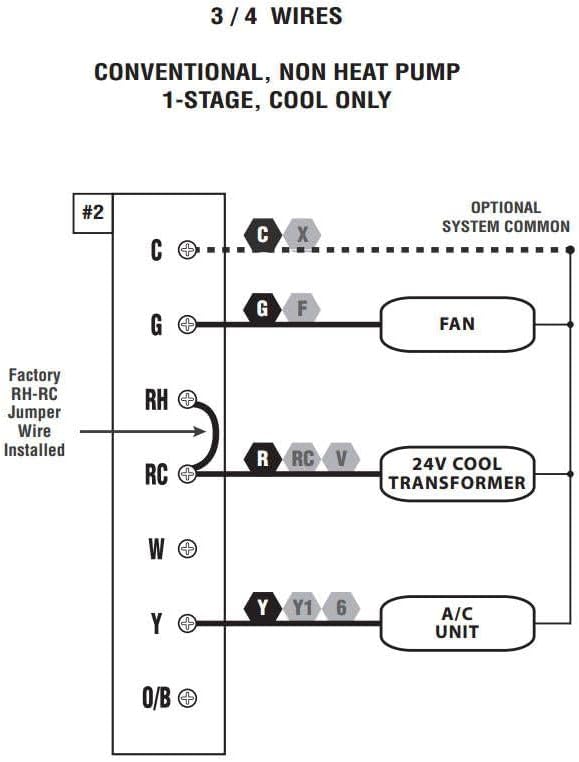
Wiring diagram for 3 or 4 wire conventional systems with 1-stage cooling only.

Wiring diagram for 4 or 5 wire conventional systems with 1-stage heating and 1-stage cooling.

Wiring diagram for 5 or 6 wire conventional systems with 1-heat/1-cool and two transformers.
Note: If you are unsure about your wiring configuration or installation process, it is recommended to consult a qualified HVAC technician.
Operating Instructions
Control Panel Overview
Familiarize yourself with the thermostat's control panel for easy operation.

Diagram illustrating the LCD Display Screen, Fan Mode Switch, System Mode Switch, SET, NEXT, HOLD buttons, and UP/DOWN buttons.
- LCD Display Screen: Shows current temperature, time, day, and system status.
- Fan Mode Switch: Controls fan operation (Auto, On).
- System Mode Switch: Selects system mode (Heat, Off, Cool).
- SET Button: Used to enter programming mode and confirm selections.
- NEXT Button: Navigates through programming options.
- HOLD Button: Maintains a set temperature indefinitely, overriding the program.
- UP/DOWN Buttons: Adjust temperature settings and navigate through options.
Setting Time and Day
- Press the SET button once. The time will flash.
- Use the UP or DOWN buttons to adjust the hour. Press NEXT to switch to minutes.
- Adjust minutes with UP or DOWN. Press NEXT to switch to day of the week.
- Adjust the day with UP or DOWN.
- Press SET to save and exit, or wait for 10 seconds for it to save automatically.
Programming Your Schedule (7-Day or 5/2-Day)
The LTX100E allows for flexible programming. You can choose between 7-day programming (each day unique) or 5/2-day programming (weekdays together, weekend together). You can also select 2 or 4 periods per day.
- Ensure the System Mode Switch is set to HEAT or COOL.
- Press and hold the SET button for 3 seconds to enter programming mode. The display will show the first program period (e.g., "MORN").
- Use UP or DOWN to adjust the start time for the current period.
- Press NEXT to move to the temperature setting for that period. Adjust with UP or DOWN.
- Press NEXT to advance to the next period (e.g., "DAY", "EVE", "NITE") and repeat steps 3 and 4.
- After setting all periods for the current day/group, press NEXT to move to the next day/group.
- Once all desired programming is complete, press SET to save and exit, or wait for 10 seconds for automatic saving.
Using Hold and Temporary Override
- Temporary Override: While in normal operation, press UP or DOWN to adjust the temperature. This temporary setting will remain active until the next programmed period begins.
- Manual Hold: Press the HOLD button. The current temperature will be maintained indefinitely, overriding all programmed settings. To cancel HOLD, press HOLD again.
Keypad Lockout
To prevent unauthorized changes to your settings, you can activate the keypad lockout feature. Refer to the full user manual (link in Support section) for detailed instructions on enabling and disabling this feature.
Maintenance
Battery Replacement
The Lux LTX100E thermostat is battery-powered (or dual-powered). When the battery indicator appears on the display, it's time to replace the batteries. It uses AA batteries.
- Gently pull the thermostat unit straight off the wall plate.
- Locate the battery compartment on the back of the unit.
- Remove the old batteries and insert new AA alkaline batteries, ensuring correct polarity (+/-).
- Align the thermostat unit with the wall plate and gently push it back into place until it clicks securely.
Note: Replacing batteries typically does not erase your programmed settings, but it's good practice to verify them after replacement.
Troubleshooting
If you encounter issues with your Lux LTX100E thermostat, try the following common troubleshooting steps:
- No Display or Blank Screen: Check if the batteries are installed correctly and are fresh. If dual-powered, ensure the 24V power supply is active.
- "ER" Code on Display: This typically indicates an internal error. Try removing the thermostat from the wall plate, waiting 30 seconds, and reattaching it. If the error persists, contact customer support.
- System Not Responding (No Heat/Cool):
- Verify the System Mode Switch is set to the desired mode (Heat or Cool).
- Check the circuit breaker for your HVAC system.
- Ensure wiring connections are secure at both the thermostat and the HVAC unit.
- Confirm the set temperature is above (for heat) or below (for cool) the ambient temperature.
- Inaccurate Temperature Reading: The thermostat has a user temperature calibration feature. Refer to the full user manual for instructions on how to calibrate the temperature sensor if you suspect it is inaccurate.
- Frequent Cycling (Short Cycling): The LTX100E allows for adjustable temperature differential (swing). Adjusting this setting can help prevent frequent on/off cycles. Consult the full user manual for details.
For more detailed troubleshooting steps, please refer to the complete user manual available in the Support section.
Specifications
| Attribute | Detail |
|---|---|
| Brand | LUX |
| Model Name | LTX100E-A04 |
| Controller Type | Keypad |
| Special Feature | Low Voltage |
| Color | White |
| Temperature Control Type | Programmable (7-day, 5/2-day) |
| Power Source | Battery Powered (AA) |
| Voltage | 24 Volts |
| Display Type | Manual (Backlit LCD) |
| Mounting Type | Wall Mount |
| Item Weight | 8.8 ounces |
| Product Dimensions | 7.1 x 1.38 x 10.9 inches |
| UPC | 785971653935, 021079141005, 756655970969 |
Warranty and Support
Warranty Information
The Lux LTX100E Thermostat comes with a 3-year limited warranty from the date of purchase. This warranty covers defects in materials and workmanship under normal use. Please retain your proof of purchase for warranty claims.
Additional Support
For comprehensive instructions, advanced settings, or further assistance, please refer to the official User Manual PDF:
Download Full User Manual (PDF)
You can also visit the official LUX website or contact their customer service for direct support.


