3PLUS HFSNSP 2-in-1 Pneumatic Flooring Nailer/Stapler User Manual
Model: HFSNSP
Product Overview
The 3PLUS HFSNSP is a versatile 2-in-1 pneumatic flooring nailer and stapler designed for efficient installation of hardwood and engineered flooring. This tool is capable of driving both 15-1/2 gauge staples and 16 gauge L-cleats, accommodating lengths from 1-1/2 inches to 2 inches.

Figure 1: The 3PLUS HFSNSP 2-in-1 Pneumatic Flooring Nailer/Stapler.
Key features include:
- Dual Fastener Compatibility: Uses 15-1/2 gauge staples and 16 gauge L-cleats, ranging from 1-1/2" to 2" in length.
- Interchangeable Flooring Plates: Includes plates for various flooring thicknesses, specifically 3/4" flooring and 1/2" & 5/8" flooring.
- Removable Long Reach Handle: Provides ergonomic comfort and extended reach during operation.
- Included Mallet: A white rubber mallet is provided for striking the tool to drive fasteners.
- Pneumatic Driving Action: Ensures consistent and powerful fastener insertion for hardwood and engineered flooring.

Figure 2: The flooring nailer/stapler shown with its included accessories, such as the mallet and oil bottle.
Safety Information
Always read and understand all safety warnings and instructions before operating this tool. Failure to follow the warnings and instructions may result in serious injury.
- Wear appropriate personal protective equipment (PPE), including safety glasses with side shields, hearing protection, and gloves.
- Ensure the air compressor is set to the correct operating pressure (60-100 PSI) and is disconnected when not in use or during maintenance.
- Never point the tool at yourself or others.
- Keep hands and body parts clear of the fastener discharge area.
- Use only the specified fasteners for this tool.
Setup
1. Attaching the Handle
The long reach handle can be attached to the main body of the tool for comfortable operation. Secure it firmly using the provided hardware.

Figure 3: Hex keys for assembly and adjustments are conveniently stored on the tool's handle.
2. Connecting to Air Supply
Connect the tool to an air compressor using a suitable air hose. Ensure the operating pressure is set between 60-100 PSI for optimal performance.
3. Loading Fasteners
The tool supports both 16GA L-cleats and 15.5GA 1/2" crown flooring staples. To load, pull back the magazine follower, insert the fasteners into the magazine, and release the follower to secure them.

Figure 4: Loading 16GA L-cleats into the tool's magazine. The nail head should be inserted into the designated slot.

Figure 5: Loading 15.5GA 1/2" crown flooring staples into the tool's magazine.
4. Selecting and Replacing Flooring Plates
The tool comes with two interchangeable flooring plates to accommodate different flooring thicknesses: one for 3/4" flooring and another for 1/2" & 5/8" flooring. To replace a plate, remove the screws securing the current plate, align the new plate, and fasten it with the screws.

Figure 6: Diagram illustrating the correct 'UP' position for the shoe plate installation.
Video 1: This video demonstrates the process of connecting the air hose, loading fasteners, and replacing the interchangeable flooring plates for different flooring thicknesses.
Operating the Tool
Once the tool is set up and connected to an air supply, position the tool firmly against the flooring plank, ensuring the shoe plate is flush with the surface. Strike the tool's striking cap with the included mallet to activate the pneumatic driving action and insert the fastener.

Figure 7: The flooring nailer/stapler in use, demonstrating proper positioning for driving fasteners into a hardwood plank.
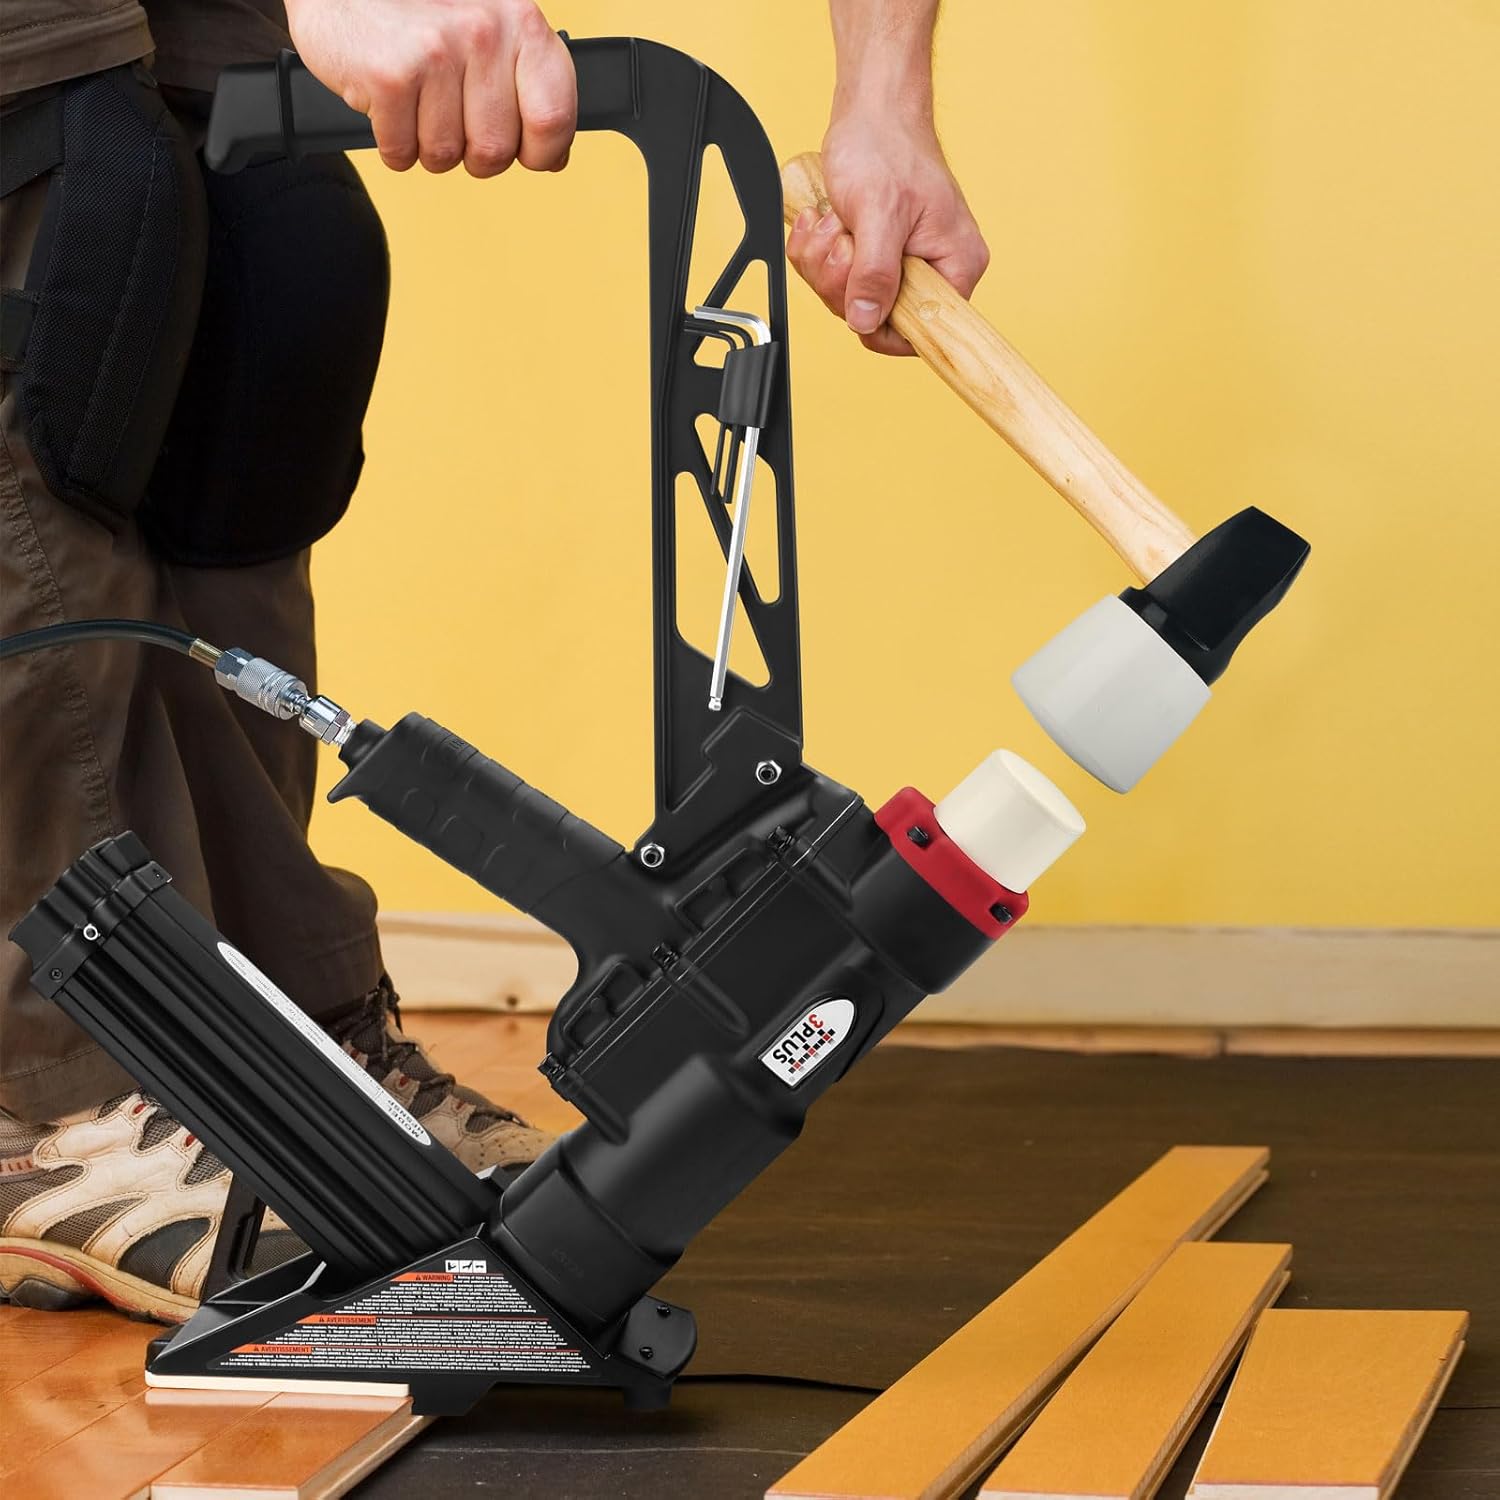
Figure 8: A user striking the tool's cap with the mallet to drive a fastener, illustrating the pneumatic operation.
Ensure a firm and direct strike with the mallet to prevent misfires or incomplete fastener insertion. Maintain consistent air pressure within the recommended range for reliable performance.
Maintenance
Regular maintenance ensures the longevity and optimal performance of your 3PLUS HFSNSP tool.
- Lubrication: Apply a few drops of pneumatic tool oil (included) into the air inlet before each use or after extended periods of operation. This lubricates internal components and prevents wear.
- Cleaning: Keep the tool clean and free of debris. Periodically clean the magazine and nosepiece to prevent fastener jams.
- Fastener Path Inspection: Regularly inspect the fastener path for any obstructions or damage.
- Air Filter: Check and clean the air filter on your compressor regularly to ensure clean air supply to the tool.
Troubleshooting
| Problem | Possible Cause | Solution |
|---|---|---|
| Tool not firing or weak firing | Low air pressure; Insufficient air volume; Fastener jam; Worn O-rings. | Check air compressor pressure (ensure 70-90 PSI); Use a larger air hose; Clear any fastener jams; Lubricate tool or replace O-rings if necessary. |
| Fasteners not fully driven | Low air pressure; Incorrect striking force; Wrong fastener length for material. | Increase air pressure; Ensure a firm, direct strike with the mallet; Verify fastener length is appropriate for flooring thickness. |
| Fastener jams frequently | Incorrect fasteners; Damaged fasteners; Debris in magazine; Worn driver blade. | Use only specified fasteners; Inspect fasteners for damage before loading; Clean magazine and nosepiece; Contact service for driver blade replacement. |
Specifications
| Manufacturer | 3PLUS |
| Model Number | HFSNSP |
| Part Number | HFSNSP |
| Item Weight | 7.2 pounds |
| Package Dimensions | 23 x 18.5 x 4 inches |
| Color | Black and Red |
| Material | Alloy Steel, Aluminum, Rubber |
| Power Source | Air-powered |
| Fastener Capacity | 15-1/2 gauge staples and 16 gauge L-cleats, 1.5 inches to 2 inches in length |
| Batteries Required? | No |
Warranty and Support
For warranty information, technical support, or replacement parts, please contact 3PLUS customer service directly. Keep your purchase receipt as proof of purchase for any warranty claims.
You can visit the official 3PLUS store for more information: 3PLUS Store on Amazon


