1. Introduction
This user manual provides comprehensive instructions for the safe and efficient operation of the Tonghui TH2512B DC Low-Ohm Meter. The TH2512B is an intelligent DC low-ohm meter designed for precise measurement of low resistance values, ranging from 0.001mΩ to 19.999kΩ. It is suitable for various applications including measuring resistance of transformers, inductance windings, relays, switches, connector contacts, leads, soldering points, PCB tracks and holes, and metal detection.
The device features wide measurement range, high accuracy, and includes HANDLER and optional GPIB interfaces for automated production line testing with PASS/FAIL signal output.
2. Safety Information
Always observe the following safety precautions to prevent injury and damage to the instrument:
- Read and understand all instructions before operating the meter.
- Ensure the power supply voltage matches the meter's requirements.
- Do not operate the meter in wet or damp conditions.
- Avoid exposing the meter to extreme temperatures or direct sunlight.
- Disconnect power before cleaning or servicing the instrument.
- Only qualified personnel should perform repairs or maintenance.
- Use only specified accessories and probes with the meter.
3. Product Features
The Tonghui TH2512B DC Low-Ohm Meter offers a range of features designed for high-precision resistance measurement:
- Wide measurement range: 0.001mΩ to 19.999kΩ.
- High measurement accuracy suitable for critical applications.
- Capable of measuring resistance in various components including transformers, inductance windings, relays, switches, and PCB tracks.
- Equipped with HANDLER and optional GPIB interfaces for integration into automated test systems.
- Supports PASS/FAIL signal output for efficient production line testing.
- Fast and slow measurement speeds for flexibility.
- Built-in comparator with beeper alarm for sorting results (HIGH, LOW, PASS).
- Auto and Hold range modes.
4. Components and Controls
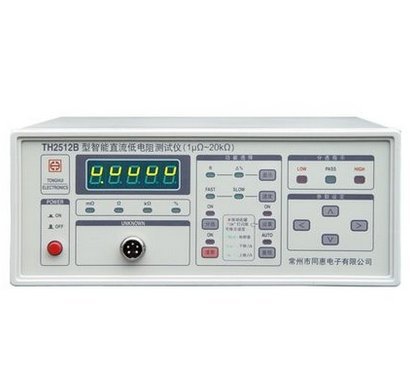
Figure 4.1: Front Panel Overview
This image displays the front panel of the TH2512B meter, showing the digital display, power button, measurement range selection buttons (mΩ, Ω, kΩ, %), unknown input port, and various function and navigation buttons on the right side, including HIGH, LOW, PASS indicators.
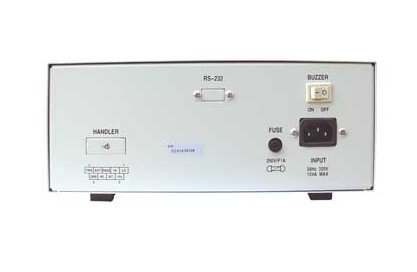
Figure 4.2: Rear Panel Overview
This image shows the rear panel of the TH2512B meter. Key components visible include the RS-232 serial port for communication, a buzzer ON/OFF switch, the main power input socket, a fuse holder, and the HANDLER interface connector for automated system integration.
4.1 Front Panel Controls
- Digital Display: Shows measurement readings and settings.
- Power Button: Toggles the instrument on and off.
- Range Selection Buttons: Allows manual selection of measurement ranges (mΩ, Ω, kΩ, %).
- UNKNOWN Input Port: Connector for test leads to the device under test.
- Function Buttons: Control various settings such as measurement speed (FAST/SLOW), range mode (AUTO/HOLD), and comparator settings (HIGH/LOW/PASS).
4.2 Rear Panel Connections
- RS-232 Port: For connecting the meter to a computer for data logging or remote control.
- Buzzer Switch: Toggles the audible alarm for comparator results.
- Power Input: Connects the AC power cord.
- Fuse Holder: Contains the protective fuse for the power supply.
- HANDLER Interface: Multi-pin connector for external control and output of PASS/FAIL signals in automated test environments.
5. Setup
- Unpacking: Carefully remove the TH2512B meter and all accessories from its packaging. Inspect for any signs of damage.
- Power Connection: Ensure the meter is switched off. Connect the provided power cord to the power input socket on the rear panel and then to a suitable AC power outlet. Verify the power source voltage matches the meter's requirements (e.g., 220V 50Hz).
- Probe Connection: Connect the test leads to the "UNKNOWN" input port on the front panel. Ensure a secure connection for accurate measurements.
- Optional Connections: If using for automated testing, connect the HANDLER interface cable to the rear panel and to your control system. For remote control or data logging, connect an RS-232 cable to the corresponding port.
- Initial Power On: Press the power button on the front panel to turn on the meter. The display should illuminate and perform a self-test.
6. Operating Instructions
6.1 Basic Measurement
- Power On: Turn on the TH2512B meter using the front panel power button.
- Connect DUT: Connect the device under test (DUT) to the test leads, ensuring good contact.
- Select Range Mode: Choose between "AUTO" or "HOLD" range mode. "AUTO" automatically selects the optimal measurement range, while "HOLD" fixes the current range.
- Select Measurement Speed: Press the FAST/SLOW button to select the desired measurement speed. FAST provides quicker readings, while SLOW offers higher accuracy.
- Read Measurement: The resistance value will be displayed on the digital screen.
6.2 Using the Comparator Function
The comparator function allows for quick sorting of components based on predefined resistance limits.
- Set Limits: Access the comparator settings menu (refer to the full manual for detailed steps) to set the upper (HIGH) and lower (LOW) resistance limits for your application.
- Enable Comparator: Activate the comparator function.
- Test and Sort: As you measure, the meter will indicate if the DUT's resistance is HIGH (above upper limit), LOW (below lower limit), or PASS (within limits). An audible alarm can be enabled via the rear panel buzzer switch.
7. Maintenance
- Cleaning: Disconnect the power cord before cleaning. Use a soft, dry cloth to wipe the exterior of the meter. Do not use abrasive cleaners or solvents.
- Storage: Store the meter in a clean, dry environment away from direct sunlight and extreme temperatures.
- Fuse Replacement: If the meter does not power on, check the fuse located on the rear panel. Replace it with a fuse of the same type and rating (e.g., 250V/1A MAX).
- Calibration: For continued accuracy, periodic calibration by a qualified service center is recommended.
8. Troubleshooting
| Problem | Possible Cause | Solution |
|---|---|---|
| Meter does not power on. | No power supply; Blown fuse; Faulty power cord. | Check power connection; Replace fuse; Try a different power cord. |
| Inaccurate readings. | Poor probe contact; Incorrect range selection; Environmental interference; Needs calibration. | Ensure secure probe connection; Select appropriate range (AUTO mode recommended); Relocate meter away from interference; Contact service for calibration. |
| Display shows "OVERLOAD" or "OL". | Resistance value exceeds selected range; Open circuit. | Switch to a higher range or AUTO mode; Check for open circuit in the DUT or test leads. |
9. Specifications

Figure 9.1: Key Performance Specifications
This image provides a summary table of the TH2512B's core technical specifications, including accuracy, test current, measurement range, resolution, speed, comparator functions, and range modes.
9.1 Performance Specifications
| Parameter | Value |
|---|---|
| Basic Accuracy | 0.1% of reading + 2 counts |
| Test Current | 1A/100/10/1mA/100µA |
| Range | 20/200mΩ/2/20/200Ω/2/20kΩ |
| Max. Resolution | 1µΩ |
| Measuring Speed (meas/sec) | Fast: 10, Slow: 2.5 |
| Comparator | HIGH, LOW and PASS (with beeper alarm) sorting result indications |
| Range Mode | Auto, Hold |
9.2 General Specifications
- Brand: C.N.
- Model: TH2512B
- Power Input: 220V 50Hz, 12VA MAX
- Manufacturer: CN
- ASIN: B015PRL00Q
- UPC: 601116132748
- Date First Available: September 23, 2015
10. Warranty and Support
For detailed warranty information, technical support, or service inquiries, please contact the original seller or the manufacturer, C.N. (Tonghui Electronics). Please have your product model (TH2512B) and serial number ready when contacting support.
It is recommended to retain your proof of purchase for warranty claims.


