
Introduction
The Singer 1507 Sewing Machine is designed for ease of use, making it an excellent choice for beginners and those seeking a reliable machine for simple sewing projects. This manual provides detailed instructions for setting up, operating, maintaining, and troubleshooting your machine to ensure optimal performance and longevity.
Key features of your Singer 1507 include 8 built-in stitches with 24 stitch functions, an automatic 4-step buttonholer, quick and easy threading, and a heavy-duty metal frame for durability. The machine also offers adjustable stitch length and zigzag width, a handy free arm, and convenient on-board accessory storage.
Important Safety Instructions
When using an electrical appliance, basic safety precautions should always be followed, including the following:
- Always unplug the sewing machine from the electrical outlet immediately after using and before cleaning, removing covers, lubricating, or making any other user servicing adjustments.
- Do not allow to be used as a toy. Close attention is necessary when this appliance is used by or near children.
- Use this appliance only for its intended use as described in this manual. Use only attachments recommended by the manufacturer as contained in this manual.
- Never operate this appliance if it has a damaged cord or plug, if it is not working properly, if it has been dropped or damaged, or dropped into water.
- Never drop or insert any object into any opening.
- Keep fingers away from all moving parts. Special care is required around the sewing machine needle.
- Always use the proper needle plate. The wrong plate can cause the needle to break.
- Do not pull or push fabric while stitching. This may deflect the needle causing it to break.
- Always turn the sewing machine off when making any adjustments in the needle area, such as threading the needle, changing the needle, threading the bobbin, or changing the presser foot.
Product Overview and Components
Familiarize yourself with the main parts of your Singer 1507 Sewing Machine.

Figure 1: Singer 1507 Sewing Machine, front view. This image shows the Singer 1507 Sewing Machine from the front, highlighting its compact design and stitch selection dial.
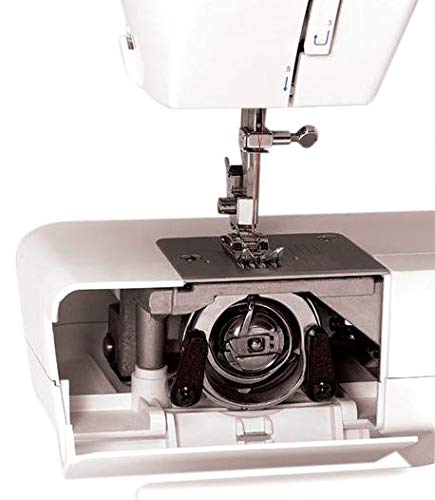
Figure 2: Front-loading bobbin area. A close-up view of the front-loading bobbin area, illustrating where the bobbin is inserted for operation.
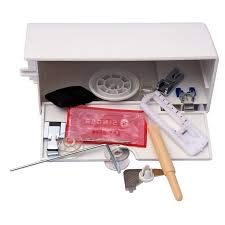
Figure 3: Included accessories. Various accessories such as bobbins, needles, and presser feet are shown, which are stored in the machine's accessory compartment.

Figure 4: Machine with accessory box. The Singer 1507 Sewing Machine is displayed alongside an open accessory box containing various sewing threads and tools, demonstrating the machine's portability and accessory storage.

Figure 5: Snap-on presser foot. The Singer 1507 Sewing Machine is shown with one of its snap-on presser feet detached, illustrating the ease of changing feet.
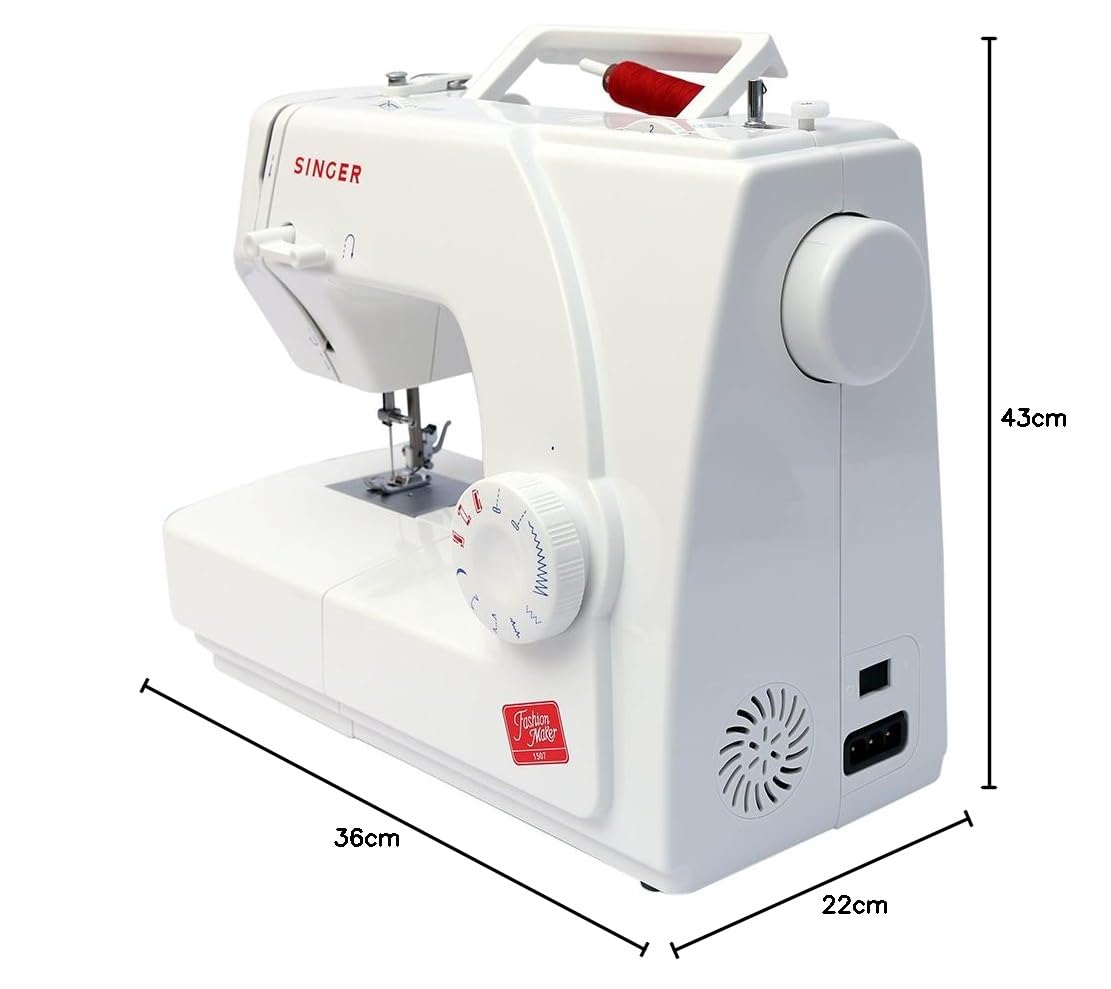
Figure 6: Machine dimensions. This image provides the key dimensions of the Singer 1507 Sewing Machine: 36 cm length, 22 cm width, and 43 cm height, indicating its compact size.
Initial Setup
Unpacking
- Carefully remove the machine from its packaging.
- Remove all packing materials, including any tape or protective films.
- Check that all included accessories are present as listed in the packaging.
Power Connection
Connect the power cord to the machine and then to a suitable electrical outlet. Ensure the machine is placed on a stable, flat surface.
Bobbin Winding
The Singer 1507 features an automatic bobbin winding clutch. To wind a bobbin:
- Place a spool of thread on the spool pin.
- Guide the thread through the bobbin winding tension disc.
- Place an empty bobbin onto the bobbin winder spindle.
- Wrap the thread around the bobbin a few times, then push the bobbin winder spindle to the right.
- Press the foot controller to start winding. The needle bar automatically disengages for safety.
- Stop winding when the bobbin is full and cut the thread.
Threading the Machine
Threading the Singer 1507 is quick and easy. Simply follow the numbered arrows and guides on the machine:
- Raise the take-up lever to its highest position.
- Place the spool of thread on the spool pin.
- Guide the thread through the upper thread guide.
- Follow the numbered path down the right channel, around the tension discs, and up the left channel to the take-up lever.
- Thread the take-up lever from right to left.
- Guide the thread down to the needle bar thread guide.
- Thread the needle from front to back.
- Insert the wound bobbin into the bobbin case, ensuring the thread unwinds in the correct direction.
- Close the bobbin cover.
Operating Your Sewing Machine
Stitch Selection
Your Singer 1507 offers 8 built-in stitches and 24 stitch functions. To select a stitch, simply turn the stitch selector dial to the desired stitch pattern. Options include straight stitch, zigzag, blind hem, and various decorative stitches.
Adjusting Stitch Length and Zigzag Width
The adjustable stitch length and zigzag width allow you to customize your stitches for different fabrics and project requirements. This helps ensure strong seams and prevents fabric bunching. The zigzag width can be set for a maximum of 5mm for bolder stitches.
Automatic Four-Step Buttonhole
Creating buttonholes is simplified with the automatic four-step buttonhole feature. Follow the instructions in the full manual for precise, professional-looking buttonholes without guesswork.
Using the Free Arm
The free arm provides easy access for sewing cuffs, collars, pant hems, and other small, circular, or difficult-to-reach areas. Simply remove the accessory storage compartment to expose the free arm.
Changing Presser Feet
The machine comes with four snap-on presser feet, allowing for effortless changes without the need for screwdrivers. To change a presser foot, raise the presser foot lifter, press the release button on the back of the foot holder, and snap the new foot into place.
Adjusting Tension
Adjust the needle tension to ensure stable stitch quality on any type of fabric. The tension dial is located on the front of the machine. Refer to the full manual for specific tension settings for various fabrics and threads.
Using the Extra-High Presser Foot Lifter
The extra-high presser foot lifter offers more clearance, making it easier to place multiple layers of bulky fabric under the presser foot for sewing.
Variable Needle Position
The needle position can be changed for individual projects, which is useful for tasks such as inserting zippers, cording, and topstitching.
Maintenance and Care
Cleaning
Regular cleaning helps maintain your machine's performance. Use a small brush to remove lint and dust from the bobbin area and feed dogs. Periodically wipe down the exterior of the machine with a soft, dry cloth.
Storage
When not in use, store your Singer 1507 in a clean, dry place. The included bonus canvas cover helps keep the machine free of dust and debris, protecting it from environmental elements.
Troubleshooting Common Issues
| Problem | Possible Cause | Solution |
|---|---|---|
| Skipped Stitches | Incorrect needle size or type; needle inserted incorrectly; improper threading; incorrect tension. | Ensure correct needle for fabric; re-insert needle correctly; re-thread machine; adjust tension. |
| Thread Breaking | Improper threading; tension too tight; bent or dull needle; poor quality thread; bobbin wound unevenly. | Re-thread machine; loosen tension; replace needle; use good quality thread; re-wind bobbin. |
| Fabric Not Feeding | Feed dogs lowered; presser foot pressure too low; lint under needle plate. | Raise feed dogs; increase presser foot pressure; clean under needle plate. |
| Machine Jamming | Tangled thread in bobbin area; improper bobbin insertion; needle striking bobbin case. | Remove bobbin and clean bobbin area; re-insert bobbin correctly; check for bent needle. |
Technical Specifications
| Manufacturer | Singer |
| Model Number | 1507 |
| Product Dimensions (LxWxH) | 36 x 22 x 43 cm |
| Item Weight | 6 kg |
| Built-in Stitches | 8 |
| Stitch Functions | 24 |
| Buttonhole Type | Automatic 4-step |
| Frame Material | Heavy Duty Metal |
| Included Components | Foot Attachments, Other Sewing Accessories, Soft Cover |
Warranty and Customer Support
Your Singer 1507 Sewing Machine is backed by Singer's commitment to quality. For specific warranty details, please refer to the warranty card included with your product or contact Singer customer service.
Should you require technical assistance, spare parts, or have any questions regarding the operation or maintenance of your machine, please contact Singer customer support. You can also find more information and resources by visiting the official SINGER store:


