1. Product Overview
The Nextion Basic Display NX3224T024 is a 2.4-inch Human Machine Interface (HMI) display module designed for various embedded projects. It features a 320x240 resolution TFT resistive touch screen and communicates via UART, making it compatible with microcontrollers like Arduino, Raspberry Pi, and ESP8266.

Image 1.1: Front view of the Nextion Basic Display 2.4-inch module, showing the screen and mounting holes.
2. Key Features
- 2.4-inch TFT Resistive Touch Screen
- 320x240 Resolution
- UART Serial Interface
- Integrated HMI solution for rapid development
- Compatible with popular microcontrollers such as Arduino, Raspberry Pi, and ESP8266
3. Package Contents
Verify that all items are present in your package:
- 1x Nextion Basic Display Module (NX3224T024)
- 1x 4-pin connection cable
- 1x USB to 2-pin connector for power supply
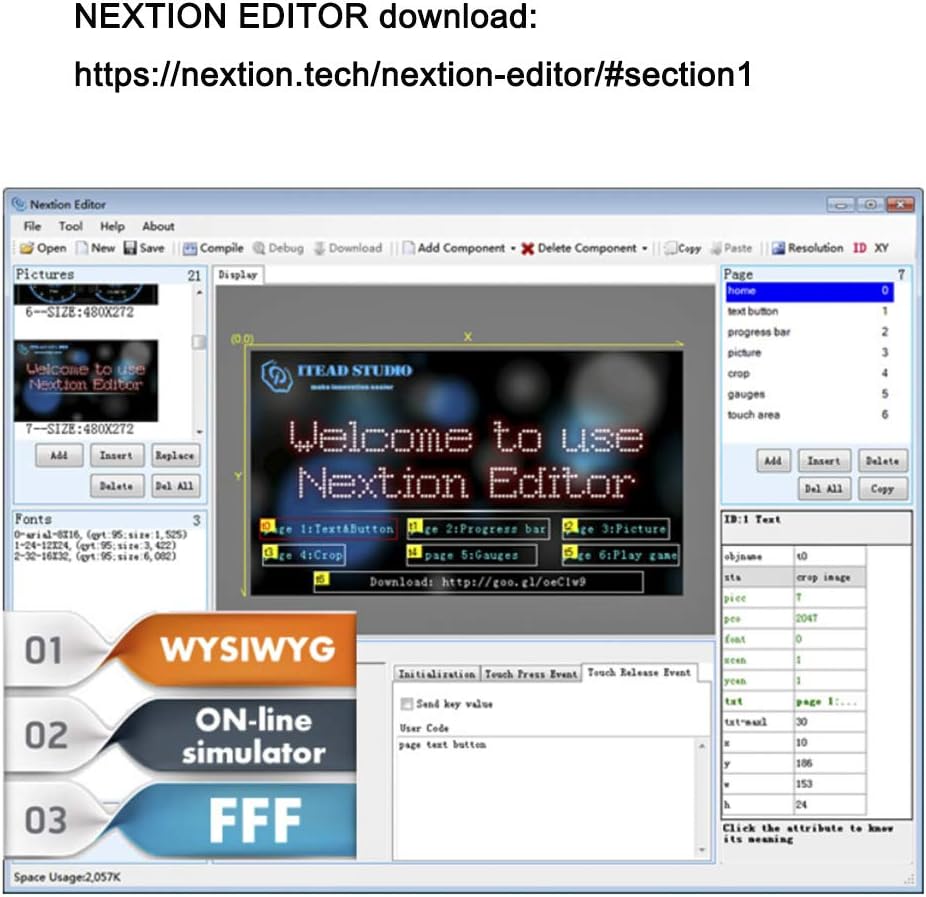
Image 3.1: The Nextion Basic Display module shown with its accompanying 4-pin cable and USB power adapter.
4. Setup
4.1. SD Card Preparation
To upload project files to the Nextion display, an SD card is required. Follow these guidelines:
- The Micro SD card must be formatted as FAT32.
- The Micro SD card capacity should be less than 32GB.
- Only one TFT project file should exist on the Micro SD card at a time for proper flashing.
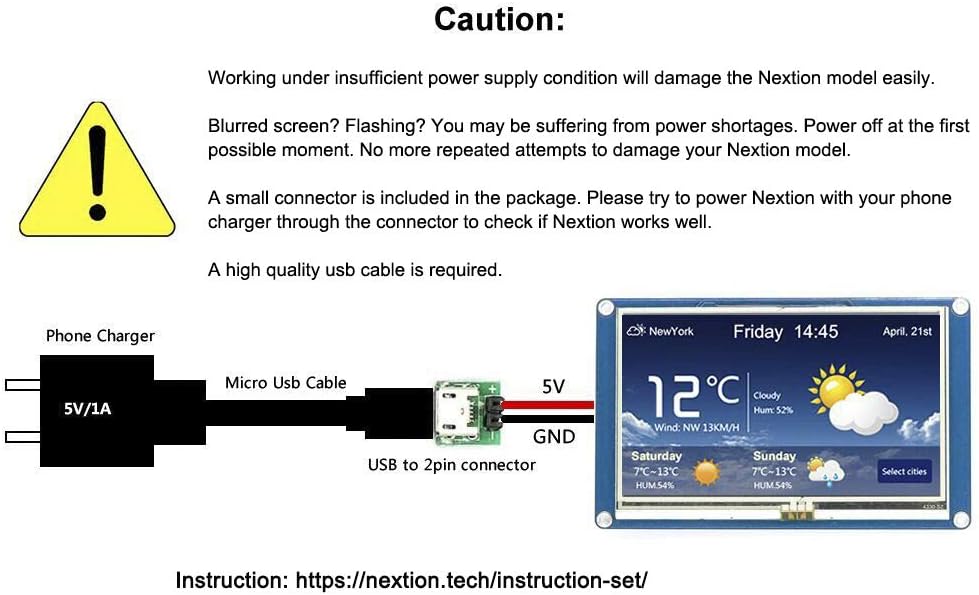
Image 4.1: Rear view of the display module, highlighting the Micro SD card slot and the 2.54mm 4-pin connector for power and data.
4.2. Power Supply
Caution: Operating the Nextion display under insufficient power supply conditions can damage the module. If the screen appears blurred or is flashing, it indicates a power shortage. Immediately power off the device. Do not repeatedly attempt to power on the device under these conditions.
A small USB to 2-pin connector is included in the package. Use this connector with a reliable 5V/1A phone charger and a high-quality USB cable to ensure stable power delivery to the Nextion display.

Image 4.2: Power supply diagram illustrating connection of a 5V/1A phone charger via a Micro USB cable and USB to 2-pin connector to the display's 5V and GND pins.
4.3. Wiring with Microcontrollers (e.g., Arduino)
The Nextion display communicates via a UART serial interface. Connect the display to your microcontroller using the provided 4-pin cable. Below is an example wiring diagram for an Arduino board:
| Nextion Pin | Arduino Pin |
|---|---|
| GND | GND |
| RX | Arduino pin 1 (TX) |
| TX | Arduino pin 0 (RX) |
| VCC | 5V |

Image 4.3: Detailed wiring diagram showing the connections between the Nextion display, an external 5V Micro USB power supply, and an Arduino board for serial communication.
5. Operation
5.1. Nextion Editor
The Nextion Editor is the primary software tool used to design and program the graphical user interface (GUI) for your Nextion display. It allows you to create pages, add components (buttons, text boxes, progress bars, etc.), and define interactions without complex coding.
Download the Nextion Editor from the official website: https://nextion.tech/nextion-editor/#section1
Image 5.1: Screenshot of the Nextion Editor, displaying various UI design elements and project structure for HMI development.
5.2. Basic Display Interaction
The Nextion display supports touch input for interacting with the designed interface. The following video demonstrates typical touch screen functionality and UI element responsiveness.
Video 5.1: A demonstration of the Nextion Basic Display's touch screen capabilities, showing interaction with various graphical user interface elements such as buttons, sliders, and gauges.
6. Applications
The Nextion Basic Display is versatile and can be integrated into a wide range of projects, including:
- Home automation control panels
- Industrial control interfaces
- Data monitoring systems
- Custom instrument displays
- Educational projects

Image 6.1: A collection of images showcasing the Nextion display integrated into different projects, such as weather stations, data analysis tools, and control interfaces.
7. Specifications
| Feature | Detail |
|---|---|
| Model Name | NX3224T024 |
| Display Size | 2.4 inches |
| Resolution | 320x240 pixels |
| Display Type | TFT Resistive Touch Screen |
| Interface | UART (Serial) |
| Compatible Devices | Raspberry Pi, Arduino, ESP8266 |
| Item Weight | 1.58 ounces (approx. 45 grams) |
| Package Dimensions | 4.3 x 2.7 x 1.3 inches |
| Manufacturer | DIYmall |
8. Troubleshooting
- Blurred or Flashing Screen: This typically indicates insufficient power. Ensure you are using a stable 5V/1A power supply and a high-quality USB cable. Disconnect and reconnect power.
- Display Not Responding: Check all wiring connections, especially the RX/TX lines and power. Verify that the project file has been successfully uploaded to the display.
- Project Upload Failure: Confirm the Micro SD card is formatted as FAT32, is less than 32GB, and contains only one .TFT project file. Ensure the display is powered correctly during the upload process.
- Communication Issues: Double-check the UART baud rate settings in your microcontroller code and the Nextion Editor project. Ensure RX and TX lines are correctly cross-connected (microcontroller TX to Nextion RX, microcontroller RX to Nextion TX).
9. Support & Resources
For further assistance, detailed documentation, and community support, please refer to the official Nextion resources:
- Nextion Instruction Set: https://nextion.tech/instruction-set/
- Nextion Editor Download: https://nextion.tech/nextion-editor/#section1


