1. Introduction
The Girafus Pro-Track-tor is an advanced pet tracking system designed to help you locate your beloved cat or other small pets. Unlike GPS trackers, it utilizes Radio Frequency (RF) technology, allowing it to function effectively indoors, in basements, garages, and dense foliage where GPS signals may fail. This system offers peace of mind with no monthly subscription fees.
Key features include:
- RF Technology: Works where GPS fails, ideal for indoor and complex outdoor environments.
- No Monthly Fees: A one-time purchase provides lifetime protection.
- Ultra-Lightweight (0.28oz): Designed for comfort, even for sensitive cats.
- 1600ft Range: Offers extensive coverage for large properties.
- 7-10 Day Battery Life: Rechargeable batteries for convenience.
Product Overview Video
Official video: The Girafus Cat Tracker: Unboxing / How-To Search? / Syncro. This video provides a comprehensive overview of the product, including unboxing, search functionality, and synchronization.
2. Components
Your Pro-Track-tor package includes the following components:
- Base Module: The handheld receiver used for tracking.
- Tag Module(s): Small, lightweight transmitters attached to your pet's collar.
- Rechargeable Batteries: For the Tag Module(s).
- Battery Charger: For the Tag Module batteries.
- AAA Batteries: For the Base Module.
- Micro USB Cable: For charging.
- Mini Screwdriver & Extra Screws: For securing the Tag Module.
- Silicone Splash-Proof Case: For the Tag Module.
- Lanyard/Strap: For carrying the Base Module.

Image: The Pro-Track-tor system components neatly arranged in its packaging.
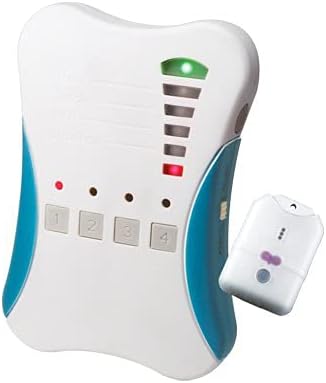
Image: Close-up of the Pro-Track-tor Base Module (left) and a single Tag Module (right).
3. Setup
3.1 Base Module Battery Installation
- Open the battery compartment on the back of the Base Module.
- Insert the required AAA batteries, ensuring correct polarity (negative terminal against the spring).
- Close the battery compartment cover securely.
3.2 Tag Module Battery Installation & Charging
- Gently slide open the casing of the Tag Module.
- Insert the LIR2032H rechargeable battery with the positive (+) terminal facing upwards, aligning with the indicator inside the case.
- Slide the two parts of the casing back together until you hear a short beeping sound, indicating the transmitter is powered on.
- Use the included mini screwdriver and screws to secure the casing, ensuring it is tightly closed for splash protection.

Image: The dedicated charger for the LIR2032H button cell batteries.
Charging the Tag Module Battery:
- Connect the battery charger to a power source via its Micro USB port (cable included, power adapter not included but common USB adapters work).
- Insert the LIR2032H battery into one of the charging slots with the positive (+) side facing upwards.
- Observe the LED indicator on the charger:
- Red LED: Battery charge is 0-49%.
- Green LED: Battery charge is 50-95%.
- LED Off: Battery is fully charged (100%).
- Ensure the battery is fully charged before first use for maximum operating time (up to 7-10 days per charge).
3.3 Attaching the Tag Module to Your Pet
To attach the Tag Module to your pet's collar, use the included silicone sleeve. Insert the Tag Module into the sleeve. The sleeve has two slots through which you can thread your pet's collar. If the collar is too large, use the included attachment strap to secure the sleeve to the collar.

Image: A cat comfortably wearing the lightweight Pro-Track-tor Tag Module on its collar.
4. Operating
4.1 Base Module Controls
- ON/OFF Switch: Located on the side, activates and deactivates the Base Module.
- Channel Buttons (1-4): Selects the radio frequency of up to four synchronized Tag Modules.
- LED Indicators: Above each channel button, indicates the currently selected channel.
- Signal Strength LEDs: Vertical bar of LEDs on the right, indicates signal strength and direction.
- Alarm/Mute Switch: Located on the side, controls audio alerts during tracking.
- SET Button: Used for synchronization (not for daily tracking).
4.2 Tracking Procedure
Before actively searching for your pet, it is recommended to test the tracking process in a controlled environment. Ensure the Tag Module and Base Module are at least 1 meter (3 feet) apart for accurate signal reception.
- Power On: Switch the Base Module to the 'ON' position. Channel 1 is automatically activated.
- Select Channel: If your pet's Tag Module is linked to a different channel (2, 3, or 4), press the corresponding channel button on the Base Module.
- Scan Environment: Slowly rotate the Base Module 360 degrees. Observe the Signal Strength LEDs and listen for the signal tone (if Alarm is enabled).
- Interpret Signals:
- The top LED lights up if a radio connection is established.
- More lit LEDs and a faster signal tone indicate a stronger connection and closer proximity to the Tag Module.
- No lit LEDs means the Tag Module is out of range.
- Determine Direction: The direction where the most LEDs light up for the longest duration, and the signal tone is most frequent, indicates the direction of your pet.
- Move and Re-evaluate: Walk a few meters in the determined direction, then stop and re-evaluate the signal. Repeat this process until you are close to your pet.
- Visual Contact: Once the Base Module indicates a short distance (all 5 LEDs lit), try to locate your pet by visual contact.
Important Note: Your pet may move during the search, so continuously re-evaluate the signal and adjust your direction accordingly.
5. Maintenance
- Battery Charging: Regularly charge the Tag Module batteries (LIR2032H) to ensure optimal performance. The battery lasts up to 7-10 days on a full charge.
- Base Module Batteries: Replace the AAA batteries in the Base Module as needed.
- Cleaning: Wipe the devices with a soft, dry cloth. Avoid using harsh chemicals or abrasive materials.
- Splash Protection: Always ensure the Tag Module's casing is securely closed with the screws when exposed to moisture to maintain its splash-proof integrity.
6. Troubleshooting
Common Issues and Solutions:
| Issue | Possible Cause | Solution |
|---|---|---|
| No signal / Weak signal | Tag module off or battery low; out of range; interference. | Ensure Tag Module is powered on and charged. Move closer to the pet. Check for large metal objects or dense structures causing interference. |
| Short battery life (Tag Module) | Battery not fully charged; aging battery. | Fully charge the battery before each use. Consider replacing the rechargeable battery if it no longer holds a charge. |
| Tag module casing opens easily | Screws not tightened; wear and tear. | Ensure screws are fully tightened. Use the provided extra screws if needed. Some users reinforce with tape for added security. |
| Difficulty synchronizing new tags | Incorrect synchronization procedure. | Follow the synchronization steps precisely (Section 4.3). Ensure other tags are deactivated during the process. |
4.3 Synchronization (Setup/Change)
Tag Modules and Base Modules delivered together are pre-synchronized. This procedure is only necessary if you purchase additional Tag Modules or need to re-synchronize existing ones.
- Deactivate Existing Tags: Before linking a new Tag Module, temporarily deactivate all other linked Tag Modules by opening their casings and removing the battery.
- Prepare New Tag: Ensure the new Tag Module is powered on (battery inserted and casing closed).
- Base Module Preparation: Ensure the Base Module is switched OFF.
- Initiate Synchronization: On the Base Module, simultaneously hold down the 'SET' button (on the side) and the channel button (1, 2, 3, or 4) you wish to link the new Tag Module to.
- Power On Base Module: While still holding down the 'SET' and channel buttons, switch the Base Module to the 'ON' position.
- Observe LED: Continue holding the buttons until the LED above the selected channel button blinks twice.
- Release Buttons: Release both buttons.
- Place Tag: Place the prepared Tag Module near the Base Module (but no closer than 10cm).
- Confirm Link: The Base Module's distance indicator should now show the distance to the newly linked Tag Module. A short beeping sound from the Tag Module confirms successful linking.
To Delete All Synchronizations: Hold down the 'SET' button and the channel button until the channel LED blinks three times. This will delete all linked Tag Modules from that channel. You will then need to re-synchronize any tags you wish to use.
7. Specifications
| Feature | Detail |
|---|---|
| Brand | Girafus |
| Model Number | 227PA-1 |
| Item Weight (Tag) | 0.28oz (8g) |
| Product Dimensions (Tag) | 1.6" x 0.8" (approx. 4.06 x 2.03 cm) |
| Technology | Radio Frequency (RF) |
| Range | Up to 1600ft (approx. 500m) in open field |
| Tag Battery Type | LIR2032H (Rechargeable) |
| Base Module Battery Type | AAA Batteries (Standard) |
| Max Tag Modules per Base | 4 |
| Country of Origin | Taiwan |
| Material | Plastic |
| Color | White |
8. Warranty & Support
Warranty information for your Pro-Track-tor device is typically included within the product packaging. Please refer to the documentation provided at the time of purchase for specific warranty terms and conditions.
For technical support, troubleshooting assistance, or inquiries regarding your Girafus Pro-Track-tor, please contact Girafus Technologies directly. Contact details can usually be found on the product packaging or their official website.


