Introduction
This manual provides comprehensive instructions for the safe and efficient operation, maintenance, and troubleshooting of your Krups Nescafé Dolce Gusto Drop KP350B coffee machine. Please read this manual thoroughly before first use and retain it for future reference.
Key Features:
- Versatile beverage preparation for over 30 hot and cold drink varieties.
- Rapid heating system for quick beverage preparation.
- Intuitive sensor-touch control panel for water volume adjustment.
- 15 bar pump pressure for optimal extraction.
- Distinctive drop-shaped design.
- Magnetic capsule holder for ease of use.
- Dishwasher-safe and height-adjustable drip tray for easy cleaning.
Important Safety Instructions
Always follow basic safety precautions when using electrical appliances to reduce the risk of fire, electric shock, and injury to persons.
- Read all instructions before using the appliance.
- Do not touch hot surfaces. Use handles or knobs.
- To protect against fire, electric shock, and injury, do not immerse cord, plugs, or appliance in water or other liquid.
- Close supervision is necessary when any appliance is used by or near children.
- Unplug from outlet when not in use and before cleaning. Allow to cool before putting on or taking off parts, and before cleaning the appliance.
- Do not operate any appliance with a damaged cord or plug or after the appliance malfunctions, or has been damaged in any manner. Return appliance to the nearest authorized service facility for examination, repair, or or adjustment.
- The use of accessory attachments not recommended by the appliance manufacturer may result in fire, electric shock, or injury to persons.
- Do not use outdoors.
- Do not let cord hang over edge of table or counter, or touch hot surfaces.
- Do not place on or near a hot gas or electric burner, or in a heated oven.
- Always attach plug to appliance first, then plug cord into the wall outlet. To disconnect, turn any control to "off", then remove plug from wall outlet.
- Do not use appliance for other than intended household use.
- Scalding may occur if the capsule holder is opened during the brewing cycle.
Product Components
Familiarize yourself with the main parts of your coffee machine:
- Water Reservoir: Removable tank for water.
- Capsule Holder: Tray for inserting Nescafé Dolce Gusto capsules.
- Drip Tray: Collects excess liquid, adjustable for different cup sizes.
- Control Panel: Sensor-touch interface for power and beverage volume selection.
- Brew Head: Where the capsule is pierced and water is dispensed.

Image 1: Front view of the Krups Nescafé Dolce Gusto Drop KP350B coffee machine with a prepared espresso.

Image 2: The Krups Nescafé Dolce Gusto Drop KP350B coffee machine, showcasing its unique design.
Setup Instructions
- Unpacking: Carefully remove all packaging materials and dispose of them responsibly. Ensure all components are present and undamaged.
- Initial Cleaning: Before first use, wash the water reservoir, capsule holder, and drip tray with warm soapy water. Rinse thoroughly and dry. Wipe the exterior of the machine with a damp cloth.
- Positioning: Place the machine on a stable, flat, heat-resistant surface, away from water sources and heat.
- Fill Water Reservoir: Fill the water reservoir with fresh, potable water up to the MAX level indicator. Place it back onto the machine.
- First Use (Priming):
- Plug the machine into a grounded electrical outlet. The power button will illuminate.
- Press the power button to turn on the machine. It will preheat, indicated by flashing lights on the control panel. Once ready, the lights will be solid green.
- Place an empty cup on the drip tray.
- Without a capsule, slide the capsule holder into the machine.
- Select the maximum water volume using the sensor-touch control (all green bars).
- Press the hot water button (red) to run a full cycle of hot water through the machine. Repeat with cold water (blue) if desired. This primes the pump and cleans the internal system.
- Discard the water. Your machine is now ready for use.
Operating Instructions
Follow these steps to prepare your desired beverage:
- Power On: Ensure the machine is plugged in and press the power button. Wait for the green lights on the control panel to become solid, indicating the machine is ready.
- Insert Capsule: Open the capsule holder. Insert a Nescafé Dolce Gusto capsule into the holder. Close the holder securely.
- Select Water Volume: Use the sensor-touch control panel to select the desired water volume according to the capsule's recommendation or your preference. The green bars indicate the volume level.
- Choose Temperature: Press the red button for hot beverages or the blue button for cold beverages.
- Brewing: The machine will begin brewing. The lights will flash during brewing and become solid when complete.
- Remove Capsule: Once brewing is complete, carefully open the capsule holder and remove the used capsule. Dispose of it properly.
- Power Off: Press the power button to turn off the machine, or it will automatically shut off after a period of inactivity.
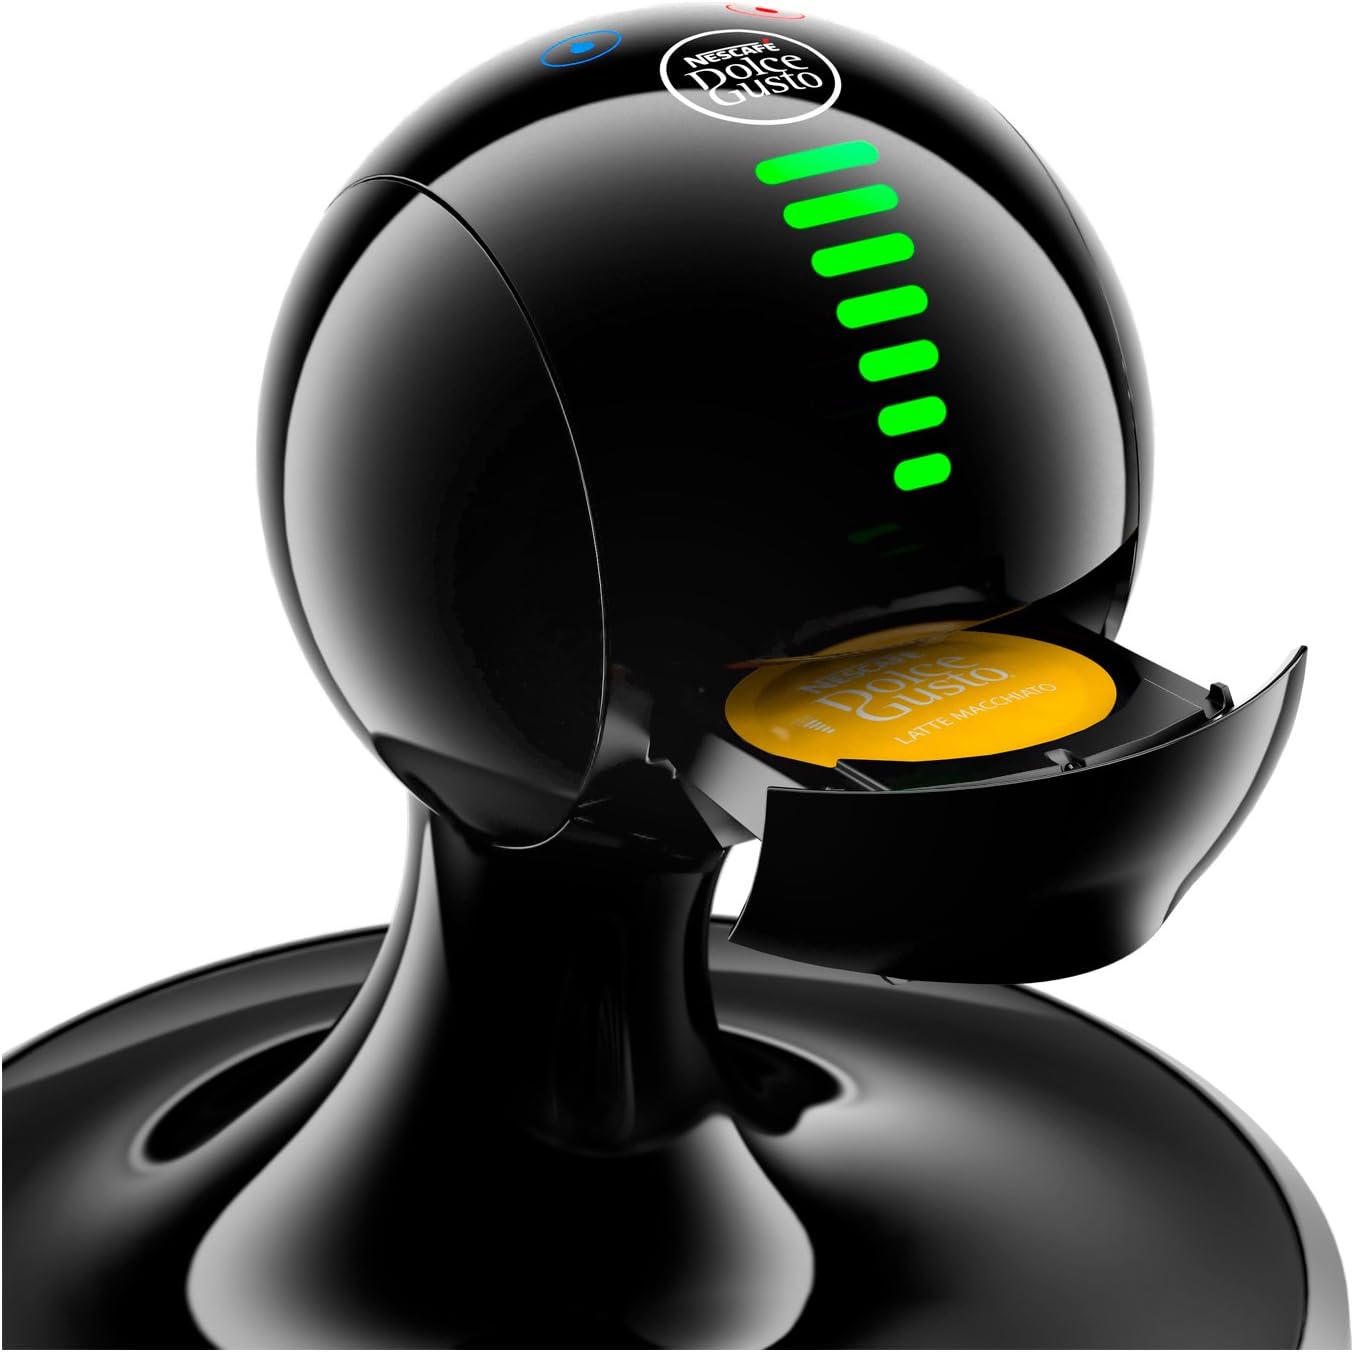
Image 3: A Nescafé Dolce Gusto capsule being inserted into the machine's capsule holder.

Image 4: Adjusting the water volume using the sensor-touch control panel.

Image 5: The coffee machine brewing an espresso.

Image 6: The coffee machine preparing a layered latte macchiato.

Image 7: A selection of beverages and capsules compatible with the machine.
Maintenance and Cleaning
Regular cleaning ensures optimal performance and extends the lifespan of your machine.
Daily Cleaning:
- Drip Tray and Capsule Holder: Remove and empty the drip tray and capsule holder after each use. Wash them with warm soapy water, rinse, and dry. These parts are dishwasher-safe.
- Exterior: Wipe the exterior of the machine with a soft, damp cloth. Do not use abrasive cleaners or scouring pads.
- Water Reservoir: Rinse the water reservoir daily and refill with fresh water.
Descaling:
Descaling is essential to remove mineral deposits and maintain machine performance. The frequency depends on water hardness and usage. Refer to the official Nescafé Dolce Gusto descaling instructions or contact customer support for recommended descaling solutions and procedures.
Troubleshooting
If you encounter issues with your Krups Nescafé Dolce Gusto Drop KP350B, refer to the table below for common problems and solutions.
| Problem | Possible Cause | Solution |
|---|---|---|
| Machine does not turn on. | Not plugged in; power outlet issue. | Ensure the power cord is securely plugged into a working electrical outlet. |
| No water dispensed. | Water reservoir empty; airlock in pump; machine not primed. | Fill the water reservoir. Perform the priming procedure (see Setup Instructions). |
| Beverage is cold or not hot enough. | Machine not fully preheated; descaling needed. | Wait for the green lights to be solid before brewing. Descale the machine if necessary. |
| Water leaks from the machine. | Water reservoir not correctly seated; capsule not properly inserted; drip tray full. | Ensure the water reservoir is correctly positioned. Check capsule insertion. Empty the drip tray. |
| Brewing stops prematurely. | Water reservoir empty; capsule issue. | Refill water reservoir. Ensure capsule is not damaged and is correctly inserted. |
Technical Specifications
| Feature | Detail |
|---|---|
| Brand | NESCAFÉ DOLCE GUSTO (Manufactured by Groupe SEB) |
| Model Number | KP350B |
| Color | Silver |
| Product Dimensions | 25 x 25 x 32 cm |
| Weight | 3.5 kg |
| Power/Wattage | 1500 watts |
| Voltage | 230 Volts |
| Material | Plastic |
| Compatible Models | Dolce Gusto capsules |
| Special Features | Milk frother (implied by hot/cold drinks and latte images), Automatic water dosing, Flow-Stop, Sensor Touch |
| Water Reservoir Capacity | 0.8 L |
Warranty and Support
This product comes with a manufacturer's warranty. For detailed warranty terms and conditions, please refer to the documentation included with your purchase or visit the official Krups website. For technical support, spare parts, or service, please contact Krups customer service.
Krups offers a 15-year repairability commitment. For more information, visit the official Krups service channels.

Image 8: Krups 15-year repairability commitment logo.