
Titan Controls Apollo 8
Contents
Titan Controls Apollo 8 Two Outlet Mechanical Timer User Manual
Model: Apollo 8
Introduction
This manual provides instructions for the safe and efficient operation of your Titan Controls Apollo 8 Two Outlet Mechanical Timer. This device is designed to automate the on/off cycles of electrical appliances with a 24-hour analog timer, featuring two grounded outlets for 120V applications. Please read this manual thoroughly before installation and use.
Safety Information
- Electrical Hazard: Always ensure the timer is unplugged from the power source before making any adjustments or connecting/disconnecting devices.
- Indoor Use Only: This timer is designed for indoor use in dry locations. Do not expose to water or high humidity.
- Load Capacity: Do not exceed the maximum electrical rating of the timer (15A, 1/2HP, 120V). Overloading can cause overheating and fire.
- Grounding: Ensure the timer is plugged into a properly grounded 3-prong outlet.
- Children: Keep out of reach of children.
Product Overview
The Apollo 8 timer features a 24-hour analog dial with push-down pins for setting on/off times. It includes two grounded outlets for connecting your devices.
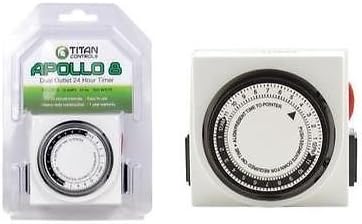
This image displays the Titan Controls Apollo 8 mechanical timer. On the left, the timer is shown in its retail packaging. On the right, a close-up view of the timer's front face reveals the 24-hour analog dial with time segments and the setting pins.
- Timer Dial: Rotates clockwise, marked with 24 hours.
- Setting Pins: Small, push-down segments around the dial. Each pin typically represents 15 or 30 minutes.
- Manual Override Switch: Allows you to turn connected devices on or off manually, bypassing the timer settings.
- Outlets: Two 3-prong grounded outlets for connecting appliances.
Setup
- Unpack: Carefully remove the timer from its packaging.
- Set Current Time: Rotate the entire timer dial clockwise until the current time aligns with the arrow indicator on the timer's face. Ensure you distinguish between AM and PM hours on the 24-hour dial (e.g., 1 PM is 13:00, 6 PM is 18:00).
- Set ON/OFF Times:
- Push down the pins corresponding to the time periods you want the connected device to be ON.
- Leave the pins in the up position for the time periods you want the connected device to be OFF.
- Each pin typically represents a 15-minute interval.
- Connect Devices: Plug the appliance(s) you wish to control into the outlets on the timer.
- Plug In Timer: Insert the timer's plug into a standard 120V grounded wall outlet.
Operating Instructions
- Automatic Operation: Once set up and plugged in, the timer will automatically turn the connected devices on and off according to the programmed schedule. The dial will continuously rotate.
- Manual Override: Use the manual override switch (usually a small lever on the side or top) to temporarily bypass the timer settings.
- "ON" position: Keeps the connected devices continuously on.
- "OFF" position: Keeps the connected devices continuously off.
- "TIMER" or "AUTO" position: Returns control to the programmed schedule.
- Adjusting Schedule: To change the ON/OFF times, simply push down or pull up the desired pins on the timer dial. Re-check the current time setting if the timer has been unplugged or power was interrupted.
Maintenance
- Cleaning: Disconnect the timer from the power outlet before cleaning. Wipe the exterior with a soft, dry cloth. Do not use liquid cleaners or immerse in water.
- Storage: Store the timer in a cool, dry place when not in use.
- Inspection: Periodically inspect the timer and its cord for any signs of damage. Discontinue use if damage is found.
Troubleshooting
| Problem | Possible Cause | Solution |
|---|---|---|
| Device does not turn ON/OFF at set times. |
|
|
| Timer dial is not rotating. |
|
|
| Connected device does not work at all. |
|
|
Specifications
- Model: Apollo 8
- Brand: Titan Controls
- Type: Mechanical, Analog, 24-Hour
- Outlets: Two (2) Grounded 3-Prong
- Voltage: 120V
- Maximum Load: 15 Amps, 1/2 HP
- Material: Plastic
- Batteries Required: No
- ASIN: B014MYHMGO
- UPC: 790683736876
Warranty
Specific warranty information for the Titan Controls Apollo 8 timer may vary. Please refer to the product packaging or the manufacturer's official website for the most current warranty details. Typically, products are covered against defects in materials and workmanship for a limited period from the date of purchase.
Support
For technical assistance, troubleshooting beyond this manual, or warranty claims, please contact Titan Controls customer support. Contact information can usually be found on the product packaging or their official website.
Website: www.titangrow.com
Documents and downloads
Ask a question about this manual
Ask about setup, troubleshooting, compatibility, parts, safety, or missing instructions. Manuals+ will review the question and use this page’s manual context to help answer it.