1. Introduction
This manual provides detailed instructions for the setup, operation, and maintenance of your Radical RPL55T130M Professional Research Trinocular Geology Polarizing Microscope. This instrument is designed for geological, petrological, mineralogical, and pharmaceutical applications, featuring a robust metal construction and a strain-free polarizing optical system.
The microscope includes a dedicated trinocular camera port, anti-reflection and hard-coated optical components, and a 5-megapixel camera for digital imaging and video capture. It supports magnifications from 40x to 600x and can switch between brightfield and polarizing observation modes.
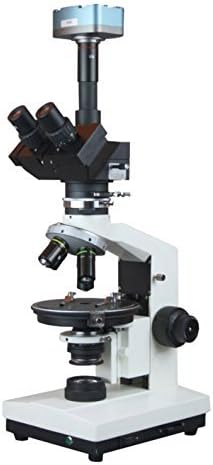
Figure 1: Front view of the Radical RPL55T130M Trinocular Polarizing Microscope. This image displays the main body of the microscope, including the trinocular head, objective turret, circular rotating stage, and focusing knobs.
2. Safety Information
- Always handle the microscope with care to prevent damage to optical and mechanical components.
- Ensure the microscope is placed on a stable, level surface to prevent tipping.
- Connect the power cord only to a grounded electrical outlet with the correct voltage (110/220V, as specified).
- Avoid direct exposure of eyes to the halogen illumination source.
- Do not attempt to disassemble or repair the microscope yourself. Refer servicing to qualified personnel.
- Keep the microscope away from dust, moisture, and extreme temperatures.
3. Component Identification
Familiarize yourself with the main components of your microscope:

Figure 2: Side view of the Radical RPL55T130M Trinocular Polarizing Microscope. This image highlights the focusing mechanisms and the overall profile of the instrument, including the mounted 5MP camera.
- Trinocular Head: Inclined at 45 degrees, rotatable 360 degrees, with slots for retarding plates and a sliding Bertrand lens. Features a 100% light transfer camera port.
- Eyepieces: WF 10x, 10x with Cross, and 10x with Micrometer.
- Objectives: Strain-free P4x, P10x, P40x (spring-loaded).
- Nosepiece: Centrable quadruple nosepiece with positive centering and click stops.
- Circular Rotating Stage: For precise sample manipulation.
- Focusing Knobs: Separate coarse and fine focusing knobs for precise adjustment.
- Illumination: 20W halogen lamp.
- Polarizer: 360-degree rotation, swing-out design for brightfield observation.
- Analyzer: With slots for retarding plates and sliding Bertrand lens.
- Compensators: Mica (1/4th Wavelength), Gypsum (Full Wavelength), Quartz (1-4 Wavelength).
- 5MP USB Camera: For digital imaging, includes optical adapter.
4. Setup Instructions
- Unpacking: Carefully remove all components from the packaging. Retain all packaging materials for future transport or storage.
- Placement: Place the microscope on a sturdy, vibration-free surface.
- Head Installation: Gently place the trinocular head onto the microscope body and secure it with the set screw.
- Eyepiece Insertion: Insert the desired eyepieces into the eyepiece tubes of the trinocular head.
- Objective Installation: Screw the objective lenses into the nosepiece in increasing order of magnification (e.g., P4x, P10x, P40x).
- Power Connection: Connect the power cord to the microscope's power input and then to a suitable electrical outlet.
- Camera Setup:
- Attach the 5MP USB camera to the dedicated camera port on the trinocular head using the optical adapter.
- Connect the USB cable from the camera to your computer.
- Install the provided drivers and software for Windows or Mac operating systems.
5. Operating Instructions
5.1 Basic Observation (Brightfield)
- Turn on the microscope's power switch.
- Place your specimen slide on the circular rotating stage and secure it with the stage clips.
- Rotate the nosepiece to select the lowest power objective (e.g., P4x).
- Adjust the illumination intensity using the dimmer control.
- Use the coarse focusing knob to bring the specimen into approximate focus.
- Use the fine focusing knob for sharp, detailed focus.
- Adjust the interpupillary distance and diopter on the eyepieces for comfortable viewing.
- To switch to higher magnification, rotate the nosepiece to the next objective. Re-focus using only the fine focusing knob.
5.2 Polarizing Observation
This microscope is equipped for polarizing microscopy, essential for geological and material science applications.
- Engage Polarizer: Swing the polarizer into the light path beneath the stage. Rotate it to achieve a dark field (crossed polars) when no specimen is present.
- Engage Analyzer: Insert the analyzer into its slot in the trinocular head.
- Centering the Nosepiece: For accurate polarizing observations, ensure the objectives are centered. Use the centering screws on the nosepiece for each objective.
- Using Compensators: Insert the Mica (1/4th Wavelength), Gypsum (Full Wavelength), or Quartz (1-4 Wavelength) compensator plates into the designated slots in the analyzer to observe interference colors and determine optical properties of anisotropic materials.
- Bertrand Lens: Engage the sliding Bertrand lens to observe interference figures (conoscopic observation). Use the centering mechanism for the Bertrand lens if available.
- Rotating Stage: Rotate the circular stage to observe changes in birefringence and extinction angles of your specimen.
5.3 Digital Imaging with 5MP Camera
- Ensure the 5MP USB camera is properly connected to the trinocular port and your computer.
- Launch the installed camera software on your computer.
- Adjust the microscope's focus and illumination for optimal image quality on your computer screen.
- Use the software to adjust camera settings such as exposure, white balance, and gain.
- Capture still images or record video as needed. The software also includes measuring capabilities for 2-dimensional linear measurements (Windows only).
6. Maintenance
- Cleaning Optics: Use a soft, lint-free cloth and a specialized optical cleaning solution to clean objective lenses and eyepieces. Avoid touching optical surfaces with bare hands.
- Cleaning Body: Wipe the microscope body with a soft, damp cloth. Do not use harsh chemicals or solvents.
- Dust Protection: Always cover the microscope with a dust cover when not in use.
- Lamp Replacement: If the halogen lamp burns out, ensure the microscope is unplugged and cooled before carefully replacing it with a new 20W halogen bulb.
- Storage: Store the microscope in a dry, cool, and dust-free environment.
7. Troubleshooting
| Problem | Possible Cause | Solution |
|---|---|---|
| No illumination | Power cord disconnected, lamp burnt out, power switch off. | Check power connection, replace lamp, turn on power switch. |
| Image is blurry | Incorrect focus, dirty objective/eyepiece, objective not fully engaged. | Adjust fine focus, clean optics, rotate nosepiece until objective clicks into place. |
| Dark field in brightfield mode | Polarizer or analyzer engaged. | Swing out the polarizer and remove the analyzer. |
| Camera not detected | USB cable loose, drivers not installed, software not running. | Check USB connection, install drivers, launch camera software. |
8. Specifications
| Feature | Detail |
|---|---|
| Model Number | RPL55T130M |
| Brand | Radical |
| Head | Trinocular, 45° Inclined, 360° Rotatable |
| Eyepieces | WF 10x, 10x with Cross, 10x with Micrometer |
| Objectives | Strain-Free P4x, P10x, P40x (Spring Loaded) |
| Nosepiece | Centrable Quadruple, Positive Centering & Click Stops |
| Magnification Range | 40x - 600x |
| Focusing | Graduated Separate Coarse & Fine Knobs |
| Illumination | 20W Halogen, 110/220V |
| Polarizer | 360° Rotation, Swing-out for Brightfield |
| Analyzer | With slots for Retarding Plates & Sliding Bertrand Lens |
| Compensators | Mica (1/4th Wavelength), Gypsum (Full Wavelength), Quartz (1-4 Wavelength) |
| Camera | 5 Megapixel USB Camera with Optical Adapter |
| Software | Drivers for Windows & Mac, Measuring software for 2D Linear (Windows Only) |
| Material | Metal Construction |
9. Warranty and Support
For warranty information, technical support, or service inquiries, please refer to the documentation provided with your purchase or contact Radical customer support directly. Keep your purchase receipt as proof of purchase.


