1. Important Safety Instructions
Read and understand all safety warnings and instructions before operating this electric hoist. Failure to follow these instructions may result in electric shock, fire, and/or serious injury.
- Work Area Safety: Keep the work area clean and well-lit. Do not operate the hoist in explosive atmospheres, such as in the presence of flammable liquids, gases, or dust.
- Electrical Safety: Ensure the power supply matches the specifications of the hoist (120V, 60Hz). Do not expose the hoist to rain or wet conditions. Never operate with a damaged cord or plug.
- Personal Safety: Always wear appropriate personal protective equipment (PPE), including safety glasses, gloves, and safety footwear. Do not overreach. Maintain proper footing and balance at all times.
- Hoist Use and Care:
- Do not exceed the rated load capacity (400 kg without pulley, 800 kg with pulley).
- Inspect the hoist, cable, and hooks for damage before each use. Do not use if any part is damaged.
- Ensure the load is properly secured and balanced before lifting.
- Keep hands and body clear of the cable and moving parts during operation.
- Do not use the hoist to lift people or animals.
- Avoid sudden starts and stops when lifting or lowering loads.
- Do not leave a suspended load unattended.
- Disconnect the hoist from the power supply before performing any adjustments, changing accessories, or storing.
2. Product Overview and Components
The Toolcraft TC3501 Electric Hoist is designed for lifting and lowering loads up to 800 kg. It features a robust motor, steel cable, and a remote control for safe operation.
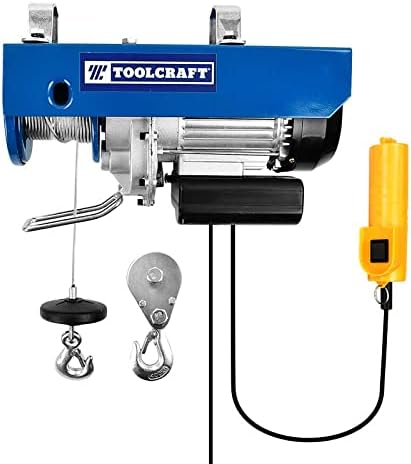
Figure 1: Main hoist unit showing the motor, cable drum, steel cable, main hook, and wired remote control.
Key Components:
- Hoist Motor Unit: Contains the electric motor, gearbox, and cable drum.
- Steel Cable: High-strength steel cable, 5.0 mm thick, for lifting loads.
- Main Hook: Attached to the end of the steel cable for securing loads.
- Pulley System (Load Doubler): An additional pulley and hook assembly used to double the lifting capacity (from 400 kg to 800 kg) and halve the lifting speed and height.
- Remote Control: Wired control unit with "Up" and "Down" buttons for operating the hoist.
- Mounting Brackets: Two sturdy brackets for suspending the hoist from a suitable support structure.

Figure 2: The electric hoist securely mounted on a horizontal support beam using its integrated brackets.
3. Setup and Installation
Proper installation is crucial for safe and efficient operation. Ensure the mounting surface can support the hoist's weight plus the maximum intended load.
3.1 Mounting the Hoist
- Select a Suitable Support: Choose a robust overhead beam or structure capable of safely supporting at least twice the maximum rated load (e.g., 1600 kg for an 800 kg hoist).
- Secure Mounting Brackets: The hoist comes with integrated mounting brackets. Position the hoist on the chosen support structure and ensure the brackets are securely fastened. Use appropriate bolts, nuts, and washers (not included) to prevent any movement or slippage.
- Check Stability: After mounting, gently pull on the hoist to confirm it is stable and securely attached to the support structure.

Figure 3: Side view illustrating the hoist's mounting brackets and the product specification label.
3.2 Setting Up the Pulley System (for 800 kg capacity)
To achieve the 800 kg lifting capacity, the included pulley system must be used. This configuration effectively doubles the lifting force but halves the lifting speed and maximum height.
- Attach Pulley to Hoist Hook: Take the main hook (the one directly attached to the steel cable) and attach it to the top loop of the pulley block.
- Route the Cable: Pass the steel cable from the hoist drum, down through the pulley wheel, and then back up to the secondary attachment point on the hoist body. Secure the cable end to this point.
- Attach Load to Pulley Hook: The load will now be attached to the hook on the pulley block.
Note: When using the pulley system, the maximum lifting height is reduced to 6 meters. Without the pulley, the maximum lifting height is 12 meters.
4. Operating Instructions
Always perform a pre-operation check before each use.
4.1 Pre-Operation Check
- Inspect the entire hoist for any visible damage, especially the steel cable, hooks, and power cord.
- Ensure all mounting bolts are tight and the hoist is securely attached.
- Verify that the load to be lifted does not exceed the hoist's capacity for the chosen configuration (400 kg or 800 kg).
- Clear the lifting path of any obstructions.
4.2 Lifting and Lowering Loads
- Connect Power: Plug the hoist into a grounded 120V, 60Hz power outlet.
- Attach Load: Securely attach the load to the hoist hook (or pulley hook if using the 800 kg configuration). Ensure the load is balanced.
- Lift Load: Press and hold the "UP" button on the remote control to lift the load. Lift slowly and smoothly. Observe the load for stability.
- Lower Load: Press and hold the "DOWN" button on the remote control to lower the load. Lower slowly and smoothly.
- Emergency Stop: In case of an emergency, release the control button immediately. The hoist will stop.
- After Use: Once the task is complete, lower the hook to a safe position, disconnect the power, and store the hoist properly.
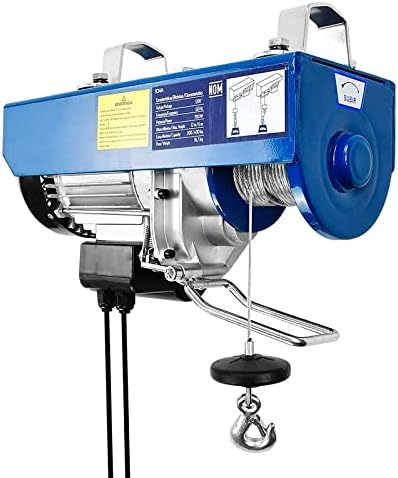
Figure 4: Angled view of the hoist, highlighting the robust construction and the connection point for the remote control cable.
5. Maintenance
Regular maintenance ensures the longevity and safe operation of your Toolcraft electric hoist.
- Cable Inspection: Regularly inspect the steel cable for kinks, fraying, corrosion, or broken strands. Replace the cable immediately if any damage is found.
- Hook Inspection: Check hooks for deformation, cracks, or excessive wear. Ensure safety latches operate freely.
- Motor and Housing: Keep the motor housing clean and free of dust and debris to ensure proper ventilation. Do not open the motor housing; refer to qualified service personnel for internal issues.
- Lubrication: The hoist is factory-lubricated. Do not attempt to lubricate internal components unless specified by the manufacturer.
- Storage: Store the hoist in a dry, clean environment when not in use. Protect it from moisture and extreme temperatures.
6. Troubleshooting
This section addresses common issues you might encounter with your electric hoist.
| Problem | Possible Cause | Solution |
|---|---|---|
| Hoist does not operate. | No power supply; power cord damaged; thermal overload activated. | Check power connection and outlet. Inspect power cord for damage. Allow hoist to cool down if thermal overload is suspected. |
| Hoist lifts slowly or struggles. | Overload; low voltage; motor issue. | Reduce load to within rated capacity. Check power supply voltage. If problem persists, contact service. |
| Unusual noise during operation. | Lack of lubrication; worn gears; foreign object. | Stop operation immediately. Inspect for foreign objects. If noise continues, contact qualified service personnel. |
| Cable is frayed or damaged. | Wear and tear; improper use. | DO NOT USE. Replace the steel cable immediately with an original manufacturer-approved replacement. |
7. Specifications
Technical data for the Toolcraft TC3501 Electric Hoist.
- Model: TC3501
- Brand: TOOLCRAFT
- Power: 1,350 W / 1.8 HP
- Voltage: 120V
- Frequency: 60Hz
- Maximum Lifting Capacity:
- 400 kg (without pulley system)
- 800 kg (with pulley system)
- Maximum Lifting Height:
- 12 m (for 400 kg load)
- 6 m (for 800 kg load)
- Steel Cable Thickness: 5.0 mm
- Product Dimensions (L x W x H): 28 x 18 x 44 cm
- Product Weight: 20.3 kg

Figure 5: A detailed view of the Toolcraft branding and the cable drum mechanism.
8. Warranty and Support
This Toolcraft TC3501 Electric Hoist is covered by the manufacturer's standard warranty. Please refer to the warranty card included with your purchase or contact Toolcraft customer service for specific warranty terms and conditions.
For technical support, spare parts, or service inquiries, please contact your authorized Toolcraft dealer or visit the official Toolcraft website.


