
1. Introduction
Thank you for choosing the Kaiser MCS-9950 Digital AM/FM Car Stereo. This unit features a detachable faceplate, multiple media playback options including USB, SD, and MMC, an AUX input, and Bluetooth connectivity. This manual provides comprehensive instructions for the proper installation, operation, and maintenance of your new car stereo. Please read this manual thoroughly before use and keep it for future reference.
2. Package Contents
Please check the contents of your package to ensure all items are present:
- Kaiser MCS-9950 Car Stereo Unit
- Detachable Faceplate
- Remote Control
- Installation Accessories (wiring harness, mounting sleeve, removal keys)
- User Manual (this document)
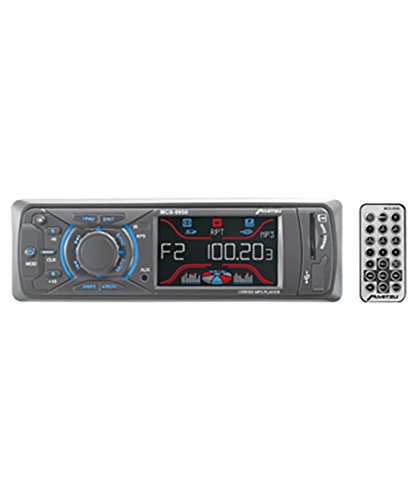
Figure 1: Kaiser MCS-9950 Car Stereo unit with its detachable faceplate and remote control. The image shows the main unit, the separate faceplate, and a remote control, illustrating the primary components included in the package.
3. Product Features
- Digital AM/FM Tuner: High-sensitivity tuner for clear radio reception with automatic station search and storage.
- Detachable Faceplate: For enhanced security and convenience.
- Multi-Media Playback: Supports USB drives, SD cards, and MMC cards.
- AUX Input: 3.5mm front auxiliary input for connecting external audio devices.
- Bluetooth Connectivity: Integrated Bluetooth for wireless audio streaming and hands-free calling.
- Electronic Equalizer: Pre-set equalizer modes to optimize sound output.
- Anti-Shock Function: Ensures smooth playback even on bumpy roads.
- Clock Display: Integrated digital clock.
- LCD Display: Blue and red LCD with equalizer effect for clear visibility.
- High Power Output: 900 W PMPO (Peak Music Power Output), 4x25 W maximum audio output.
- Track Navigation: +10 / -10 track reader for quick song selection.
- Remote Control: Full-function remote for convenient operation.
4. Setup and Installation
Important: Professional installation is recommended. Disconnect the vehicle's negative battery terminal before starting installation to prevent electrical shorts.
4.1 Wiring Diagram (General Guidance)
While a specific wiring diagram is not provided in this manual, typical car stereo installations involve the following connections:
- Yellow Wire: Constant 12V (Battery Positive)
- Red Wire: Switched 12V (Ignition/ACC)
- Black Wire: Ground (Chassis Ground)
- Blue Wire: Power Antenna / Amplifier Remote Turn-On
- Speaker Wires: Typically color-coded (e.g., White/White-Black for Front Left, Gray/Gray-Black for Front Right, Green/Green-Black for Rear Left, Purple/Purple-Black for Rear Right). Ensure correct polarity.
Refer to your vehicle's wiring diagram and the included wiring harness for precise connections. Insulate all connections properly.
4.2 Mounting the Unit
- Install the mounting sleeve into the dashboard opening. Bend the tabs outward to secure it.
- Connect all necessary wiring to the car stereo's harness.
- Slide the car stereo unit into the mounting sleeve until it locks into place.
- Attach the detachable faceplate.
- Reconnect the vehicle's negative battery terminal.
5. Operating Instructions
5.1 Basic Operation
- Power ON/OFF: Press the POWER button (usually marked with ⏻ or SRC) to turn the unit on or off.
- Volume Control: Rotate the VOLUME knob or use the VOL+ / VOL- buttons on the remote.
- Source Selection: Press the SRC or MODE button to cycle through available sources (FM, AM, USB, SD, AUX, Bluetooth).
5.2 Radio Operation (AM/FM)
- Band Selection: Press the BAND button to switch between FM1, FM2, FM3, and AM1, AM2.
- Automatic Tuning: Press and hold the SEEK or TUNE buttons (usually << / >>) to automatically search for the next strong station.
- Manual Tuning: Briefly press the SEEK or TUNE buttons to fine-tune the frequency.
- Store/Recall Presets: To store a station, tune to the desired frequency, then press and hold one of the numeric preset buttons (1-6) until you hear a beep. To recall, simply press the corresponding preset button.
- Automatic Store: Press and hold the AMS button (if available) to automatically scan and store strong stations into presets.
5.3 USB/SD/MMC Playback
- Insert a USB drive into the USB port or an SD/MMC card into the card slot. The unit will automatically switch to USB/SD mode and begin playback.
- Play/Pause: Press the PLAY/PAUSE button.
- Next/Previous Track: Press the NEXT (>>) or PREVIOUS (<<) buttons.
- Fast Forward/Rewind: Press and hold the NEXT or PREVIOUS buttons.
- +10 / -10 Track: Use the dedicated +10 or -10 buttons for quick track navigation.
5.4 AUX Input Operation
- Connect your external audio device (e.g., smartphone, MP3 player) to the 3.5mm AUX input jack on the front panel using an audio cable.
- Press the SRC or MODE button until "AUX" is displayed.
- Control playback from your external device. Adjust volume using the car stereo's volume control.
5.5 Bluetooth Operation
The Kaiser MCS-9950 features integrated Bluetooth for wireless audio and hands-free calling.
- Pairing:
- Ensure Bluetooth is enabled on your mobile device (e.g., smartphone).
- Select "BT" or "Bluetooth" as the source on the car stereo. The unit will enter pairing mode.
- On your mobile device, search for available Bluetooth devices. Select "MCS-9950" or a similar name.
- If prompted for a PIN, enter "0000" (default). Once paired, the display will confirm connection.
- Audio Streaming (A2DP):
- Once paired, you can stream audio from your mobile device to the car stereo.
- Use the car stereo's NEXT/PREVIOUS buttons to skip tracks or control playback from your device.
- Hands-Free Calling (HFP):
- When a call comes in, the car stereo display will show the caller ID (if supported).
- Press the ANSWER button (usually ☎) on the faceplate or remote to answer.
- Press the END CALL button (usually ☏) to end the call.
5.6 Detachable Faceplate
- Removing: Press the RELEASE button (usually on the top left of the faceplate). Gently pull the faceplate towards you.
- Attaching: Align the faceplate with the main unit's slots on the right side, then push the left side until it clicks into place.
- Store the faceplate in a protective case when removed to prevent damage.
6. Maintenance
- Cleaning the Faceplate: Use a soft, dry cloth to wipe the faceplate. Do not use abrasive cleaners or solvents.
- Cleaning the Unit: Ensure the unit is off and cool. Use a soft, dry cloth. Avoid spraying liquids directly onto the unit.
- USB/SD Card Slots: Keep these slots free from dust and debris.
- Fuse Replacement: If the unit does not power on, check the fuse located at the rear of the unit. Replace with a fuse of the same amperage rating only.
7. Troubleshooting
| Problem | Possible Cause | Solution |
|---|---|---|
| No power | Incorrect wiring; Blown fuse; Loose connection. | Check power and ground connections. Verify fuse. Ensure ignition wire is connected. |
| No sound | Volume too low; Mute activated; Incorrect speaker wiring; Faulty speakers. | Increase volume. Deactivate mute. Check speaker connections and polarity. Test with known good speakers. |
| Radio reception is poor | Antenna not connected; Damaged antenna; Weak signal area. | Ensure antenna is securely connected. Check antenna for damage. Try tuning in a different location. |
| USB/SD card not playing | Unsupported file format; Corrupted files; Card not inserted correctly; Maximum capacity exceeded. | Ensure files are in supported format (e.g., MP3). Reinsert card. Try a different card/USB drive. |
| Bluetooth pairing fails | Bluetooth not enabled on device; Incorrect pairing procedure; Device too far. | Ensure Bluetooth is on and discoverable on your device. Follow pairing steps. Keep devices close. |
| Detachable faceplate not attaching | Misalignment; Debris in connectors. | Ensure correct alignment. Check for any obstructions in the connectors. |
8. Specifications
| Model Number | MCS-9950 |
| Product Dimensions | 45 x 41.5 x 24.5 cm |
| Product Weight | 900 g |
| Connectivity Technology | MMC card, Bluetooth |
| Special Features | Bluetooth integrated, Detachable Faceplate, USB/SD/MMC Reader, AUX Input, AM/FM Tuner, Preset Electronic Equalizer, Anti-shock, Clock, LCD Display (Blue/Red with EQ effect), Auto Search/Store Radio Stations, Remote Control |
| Display Technology | LCD |
| Other Display Functions | Wireless |
| Max Power Output | 900 W PMPO, 4x25 W |
| Compatible Devices | Smartphone |
9. Warranty and Support
Kaiser products are manufactured to high-quality standards. For warranty information, please refer to the warranty card included with your product or contact your local dealer. Keep your purchase receipt as proof of purchase.
For technical support or service inquiries, please contact Kaiser customer service through their official website or the contact information provided with your product documentation.