
1. Introduction
This manual provides comprehensive instructions for the installation, operation, and maintenance of your GIGABYTE H81M-S2H GSM Desktop Motherboard. Designed to support 4th Generation Intel Core processors, this motherboard integrates GIGABYTE's Ultra Durable Technology, ensuring reliability and performance for your PC build. Please read this manual thoroughly before proceeding with installation.
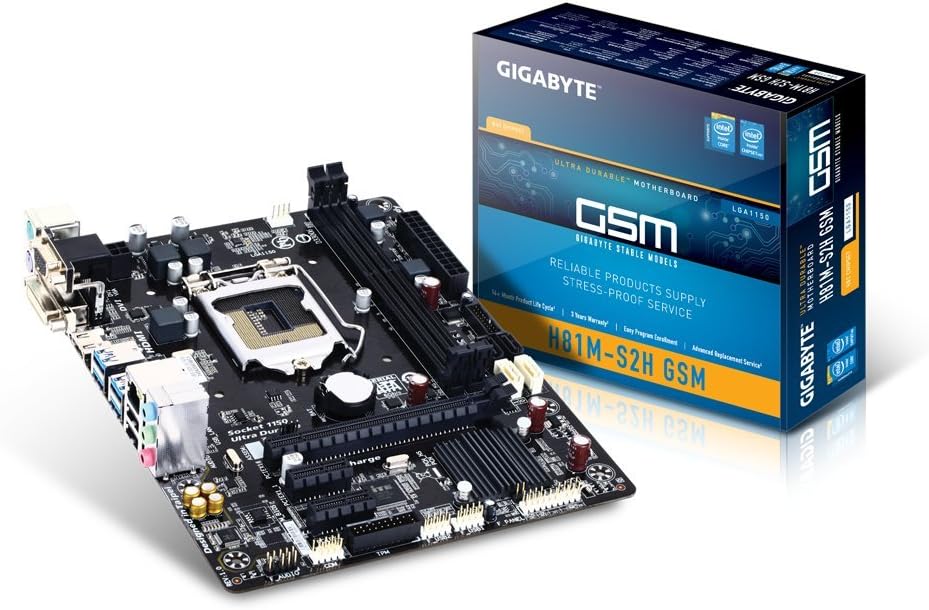
Figure 1.1: GIGABYTE H81M-S2H GSM Motherboard and Packaging
This image displays the GIGABYTE H81M-S2H GSM Desktop Motherboard alongside its retail packaging, highlighting the product's appearance and branding.
2. Key Features
- Supports 4th Generation Intel Core processors.
- GIGABYTE Ultra Durable Technology for enhanced durability and longevity.
- Audio Noise Guard with High Quality Audio Capacitors for superior sound.
- GIGABYTE UEFI BIOS for intuitive system configuration.
- GIGABYTE On/Off Charge for convenient USB device charging.
- LAN with high ESD Protection for network stability.
- Integrated HDMI, DVI, and D-SUB ports on the rear panel for versatile display connectivity.
- Solid capacitors for CPU VRM design, ensuring stable power delivery.
- Part of the GIGABYTE 8 Series Motherboard lineup, optimized for the Intel 8 Series platform.
3. Setup and Installation
3.1. Pre-Installation Checklist
- Ensure you have a compatible CPU (4th Generation Intel Core processors).
- Verify RAM compatibility (DDR3).
- Prepare a static-free workspace.
- Gather necessary tools: screwdriver, thermal paste (if CPU cooler requires it).
3.2. Motherboard Layout

Figure 3.1: Motherboard Component Layout
This image provides a top-down view of the motherboard, illustrating the placement of key components such as the CPU socket, RAM slots, PCIe slots, and various connectors.
3.3. Installation Steps
- Install CPU: Carefully open the CPU socket lever, align the CPU with the triangle marker, place it gently into the socket, and close the lever.
- Install CPU Cooler: Apply thermal paste (if not pre-applied) and secure the CPU cooler according to its instructions. Connect the CPU fan cable to the CPU_FAN header.
- Install RAM: Open the clips on the DDR3 memory slots. Align the RAM modules with the notch and press firmly until the clips lock into place.
- Mount Motherboard: Install standoffs in your PC case, then carefully place the motherboard onto the standoffs and secure it with screws.
- Connect Power: Connect the 24-pin ATX power connector and the 8-pin (or 4-pin) CPU power connector from your power supply to the motherboard.
- Connect Storage Devices: Use SATA cables to connect your hard drives or SSDs to the SATA ports on the motherboard.
- Connect Front Panel Cables: Connect the power switch, reset switch, HDD LED, and USB/audio headers from your case to the corresponding pins on the motherboard. Refer to the motherboard layout for exact pin locations.
- Install Expansion Cards: Insert graphics cards or other PCIe expansion cards into the appropriate PCIe slots and secure them.
4. Operating the Motherboard
4.1. BIOS Setup
Upon first boot, you may need to enter the BIOS/UEFI setup to configure boot order, system time, and other settings. Typically, you can access the BIOS by pressing the DEL key during startup. The GIGABYTE UEFI BIOS provides an intuitive graphical interface for easy navigation.
4.2. Driver Installation
After installing your operating system, install the necessary drivers for the motherboard's chipset, LAN, audio, and other integrated components. These drivers are usually provided on a support CD or can be downloaded from the official GIGABYTE website.
4.3. On/Off Charge Feature

Figure 4.1: On/Off Charge Feature
The On/Off Charge feature allows for faster charging of USB devices, even when the PC is turned off or in standby mode. Ensure your device supports this feature and connect it to a compatible USB port.
5. Maintenance
- Keep Clean: Regularly clean dust from the motherboard and components using compressed air. Ensure the system is powered off and unplugged before cleaning.
- BIOS Updates: Periodically check the GIGABYTE website for BIOS updates. Updates can improve stability, compatibility, and performance. Follow update instructions carefully to avoid system damage.
- Cable Management: Ensure internal cables are neatly managed to improve airflow and prevent overheating.
- Environmental Conditions: Operate the motherboard in a well-ventilated area with stable temperature and humidity to prolong its lifespan.
6. Troubleshooting
6.1. Common Issues and Solutions
| Problem | Possible Cause | Solution |
|---|---|---|
| System does not power on. | Power cables not connected properly; faulty power supply. | Check 24-pin and 8-pin CPU power connectors. Test power supply. |
| No display output. | Graphics card not seated correctly; monitor cable loose; incorrect display output selected. | Reseat graphics card. Check monitor cable connections. Ensure monitor input matches motherboard/GPU output. |
| System reboots unexpectedly. | Overheating; unstable power; faulty RAM. | Check CPU/GPU temperatures. Ensure power supply is adequate. Test RAM modules individually. |
| USB devices not recognized. | Missing USB drivers; faulty USB port. | Install/update USB drivers. Try a different USB port. |
| LAN connection issues. | Missing LAN drivers; faulty Ethernet cable; network configuration issues. | Install/update LAN drivers. Replace Ethernet cable. Check network settings. |
| Audio not working. | Missing audio drivers; incorrect audio output selected. | Install/update audio drivers. Check audio output settings in OS. |
6.2. High ESD Protection

Figure 6.1: High ESD Protection
The motherboard features High ESD Protection for LAN and USB ports, safeguarding against electrostatic discharge damage. While this provides enhanced durability, always handle components with anti-static precautions.
7. Specifications
| Feature | Detail |
|---|---|
| Brand | GIGABYTE |
| Model Number | GA-H81M-S2H GSM-B |
| CPU Socket | LGA 1150 |
| Compatible Processors | Intel Celeron, Intel Pentium (4th Generation Intel Core processors supported) |
| Chipset Type | Intel H81 |
| RAM Memory Technology | DDR3 |
| RAM Memory Maximum Size | 16 GB |
| Number of USB 2.0 Ports | 6 (total, including internal headers) |
| Product Dimensions (LxWxH) | 19.5 x 12.5 x 8.75 inches |
| Item Weight | 1.4 pounds |
| Platform | Linux (compatible with various OS) |
| Video Output | HDMI, DVI, D-SUB (VGA) |
| Audio | High Quality Audio Capacitors, Audio Noise Guard |
| LAN | High ESD Protection |
7.1. 4K Display Support

Figure 7.1: 4K Display Support
This motherboard supports 4K display output, with actual support dependent on the capabilities of the installed CPU's integrated graphics (e.g., Intel HD Graphics 4600).
8. Support and Warranty
For technical support, driver downloads, BIOS updates, and detailed warranty information, please visit the official GIGABYTE website. Keep your purchase receipt as proof of purchase for warranty claims.
GIGABYTE Official Website: www.gigabyte.com