1. Introduction
The Netis E1+ is a versatile networking device designed to extend your existing Wi-Fi coverage, eliminate dead zones, and provide a secured internal network. It functions as a 300Mbps Wireless N Range Extender, a Travel Router, and a Wi-Fi Repeater. This manual provides detailed instructions for setting up and operating your E1+ device.

Figure 1: Netis E1+ N300 WiFi Extender in use.
2. Features
- Excellent Wireless N Speed: Achieves speeds up to 300Mbps for smooth online activities.
- Range Extender Mode: Extends your existing wireless coverage to eliminate Wi-Fi dead zones.
- Travel Router Mode: Allows for secured internal network setup from a DSL or cable modem, ideal for travel.
- Smart Signal Indicator: Helps in finding the optimal placement for the range extender.
- WPS Button: Enables quick and easy setup to connect to your main router within seconds.
- Ethernet Port: Provides an additional connection for wired devices to access the internet.
- Portable Design: Stylish and portable with a built-in power adapter, suitable for both home and travel use.

Figure 2: The Netis E1+ is designed for reliable performance, including gaming.
3. Package Contents
- Netis E1+ Wireless N Range Extender
- Quick Installation Guide
4. Product Overview
Familiarize yourself with the physical components of your Netis E1+ device.
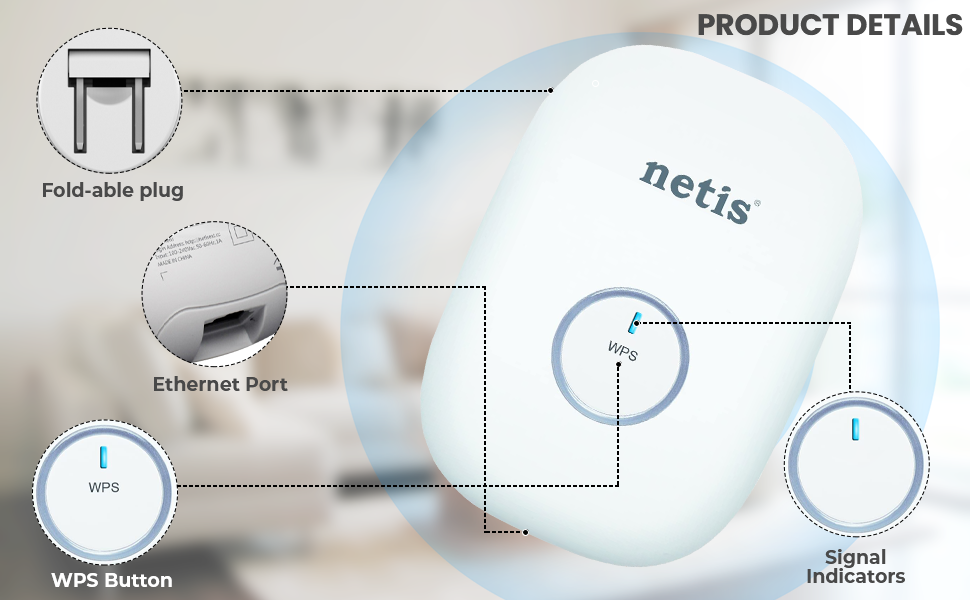
Figure 3: Key components of the Netis E1+.
- Fold-able Plug: For direct connection to a power outlet.
- Ethernet Port: Connects wired devices like PCs, smart TVs, or gaming consoles.
- WPS Button: Used for quick and secure connection to a WPS-enabled router.
- Signal Indicators: LEDs that show the status of the Wi-Fi signal (e.g., strong, weak, or no signal).

Figure 4: Ethernet port connectivity for various devices.

Figure 5: Signal indicator status (Blue: Strong Signal, Red: Weak Signal).
5. Setup
This section guides you through the initial setup of your Netis E1+ in Range Extender mode. For a visual guide, please refer to the setup video below.
Video 1: Netis E1+ Setup Guide. This video demonstrates the step-by-step process to configure your E1+ as a Wi-Fi range extender.
5.1. Quick Setup using WPS Button
- Power On: Plug the E1+ into a power outlet. Wait until the LED light starts flashing.
- Activate WPS on Router: Press the WPS button on your main Wi-Fi router.
- Activate WPS on E1+: Within two minutes, press the WPS button on your Netis E1+. The LED indicator on the E1+ will become solid when successfully connected.
- Relocate (Optional): Once connected, you can unplug the E1+ and move it to an optimal location within your router's Wi-Fi range but closer to the dead zone.

Figure 6: Using the WPS button for quick setup.
5.2. Manual Setup using a Mobile Device
- Power On: Plug the E1+ into a power outlet. Wait until the LED light starts flashing.
- Connect to E1+ Wi-Fi: On your mobile device (smartphone or tablet), go to Wi-Fi settings. Connect to the network named "netis" (or similar default SSID for E1+). No password is required for the initial connection.
- Access Configuration Page: After connecting, a Netis login window should automatically pop up. If not, open a web browser and navigate to http://192.168.1.254.
- Select Mode: On the configuration page, select "Range Extender mode" and tap the "Start" button.
- Select Network to Extend: The E1+ will search for available Wi-Fi networks. Tap on your desired Wi-Fi network name from the list.
- Enter Password: Input the password for your main Wi-Fi network and tap "Connect".
- Verify Connection: Wait until the LED light indicator on the E1+ becomes solid, indicating a successful connection and extended signal.
- Reconnect Mobile Device: Go back to your mobile device's Wi-Fi settings. You should now see a new extended network (e.g., your original network name with "_EXT" appended). Connect to this new network using your original Wi-Fi password.
6. Operating Modes
6.1. Range Extender Mode
In Range Extender mode, the E1+ connects wirelessly to your existing router and amplifies its signal, extending Wi-Fi coverage to areas with weak or no signal. This is ideal for larger homes or offices to eliminate dead zones.
6.2. Travel Router Mode
The Travel Router mode allows you to create a private, secure Wi-Fi network from a wired internet connection (e.g., in a hotel room or conference center). Simply connect the E1+ to an Ethernet port, and it will broadcast its own Wi-Fi network for your devices.
7. Placement Guidelines
Optimal placement of your E1+ is crucial for maximizing Wi-Fi coverage and performance. Use the signal indicator to help find the best spot.

Figure 7: Extending Wi-Fi coverage with the Netis E1+.

Figure 8: Correct and incorrect placement for the E1+.
- Correct Placement: Place the E1+ roughly halfway between your main router and the Wi-Fi dead zone. The signal indicator should show a strong signal (blue).
- Incorrect Placement (Too Close): Placing it too close to the router will not effectively extend coverage to the dead zone.
- Incorrect Placement (Too Far): Placing it too far from the router, where the existing signal is already weak (red indicator), will result in poor extended signal quality.
8. Maintenance
To ensure optimal performance and longevity of your Netis E1+:
- Keep the device in a well-ventilated area, away from direct sunlight and heat sources.
- Avoid placing the device near obstructions like large metal objects or thick walls that can interfere with Wi-Fi signals.
- Regularly check for firmware updates on the Netis official website to ensure the best performance and security.
- Clean the device periodically with a soft, dry cloth. Do not use liquid cleaners.
9. Troubleshooting
If you encounter issues with your Netis E1+, try the following troubleshooting steps:
- No Power: Ensure the E1+ is securely plugged into a working power outlet.
- No Internet Access After Setup:
- Verify that your main router has an active internet connection.
- Check the signal indicator on the E1+. If it's red, relocate the E1+ closer to your main router.
- Ensure you entered the correct Wi-Fi password for your main router during setup.
- Weak Extended Signal: Relocate the E1+ to a position where it receives a stronger signal from your main router (blue indicator) while still being close enough to the desired coverage area.
- Cannot Access Configuration Page: Ensure your mobile device is connected to the E1+'s default Wi-Fi network (e.g., "netis") and try accessing http://192.168.1.254 again. Clear your browser cache if necessary.
- Factory Reset: If problems persist, you may need to perform a factory reset. With the E1+ powered on, use a pin to press and hold the reset button (usually a small hole) for about 5-10 seconds until the lights flash. The device will revert to factory default settings.
10. Specifications
| Feature | Detail |
|---|---|
| Wireless Type | 802.11b, 802.11g, 802.11n |
| Data Transfer Rate | 300 Megabits Per Second |
| Item Model Number | E1+ |
| Item Weight | 6.4 ounces |
| Product Dimensions | 5 x 4 x 3 inches |
| Color | White |
| Manufacturer | Netis Systems USA Corp |
| First Available Date | July 17, 2015 |
11. Warranty and Support
For warranty information, please refer to the documentation included with your purchase or visit the official Netis website. If you encounter any problems or require technical assistance, please contact Netis support.
Netis Support Email: support@netis-systems.com