1. Introduction
Thank you for choosing the Neewer NW910 I-TTL HSS Speedlight Flash. This powerful and versatile flash unit is designed to enhance your photography with advanced features such as I-TTL automatic flash, High-Speed Sync (HSS) up to 1/8000s, and Master/Slave capabilities. Its intuitive LCD display ensures ease of use for both beginners and experienced photographers.
Note: Camera is not included. This flash is not compatible with Nikon D50, DX1, DX2 cameras.
2. Safety Information
- Do not disassemble or attempt to repair the flash unit yourself. Refer all servicing to qualified personnel.
- Keep the flash unit dry. Do not expose it to rain or moisture.
- Do not touch the flash tube after firing, as it can be hot.
- Use only specified batteries (4x AA alkaline or Ni-MH batteries). Do not mix old and new batteries or different types of batteries.
- Remove batteries if the flash will not be used for an extended period.
- Avoid direct eye exposure to the flash, especially at close range, as it can impair vision.
3. Package Contents
Verify that all items are present in your package:
- 1 x Neewer NW910 Speedlight Flash
- 1 x Soft Flash Diffuser
- 1 x Hard Flash Diffuser
- 1 x Mini Stand
- 1 x Protective Pouch
- 1 x User Manual (this document)

Image: Neewer NW910 Speedlight Flash and its retail box, showing the flash unit and packaging.

Image: Neewer NW910 Speedlight Flash shown alongside its black protective pouch.
4. Product Overview
Familiarize yourself with the main components and controls of your NW910 Speedlight Flash.
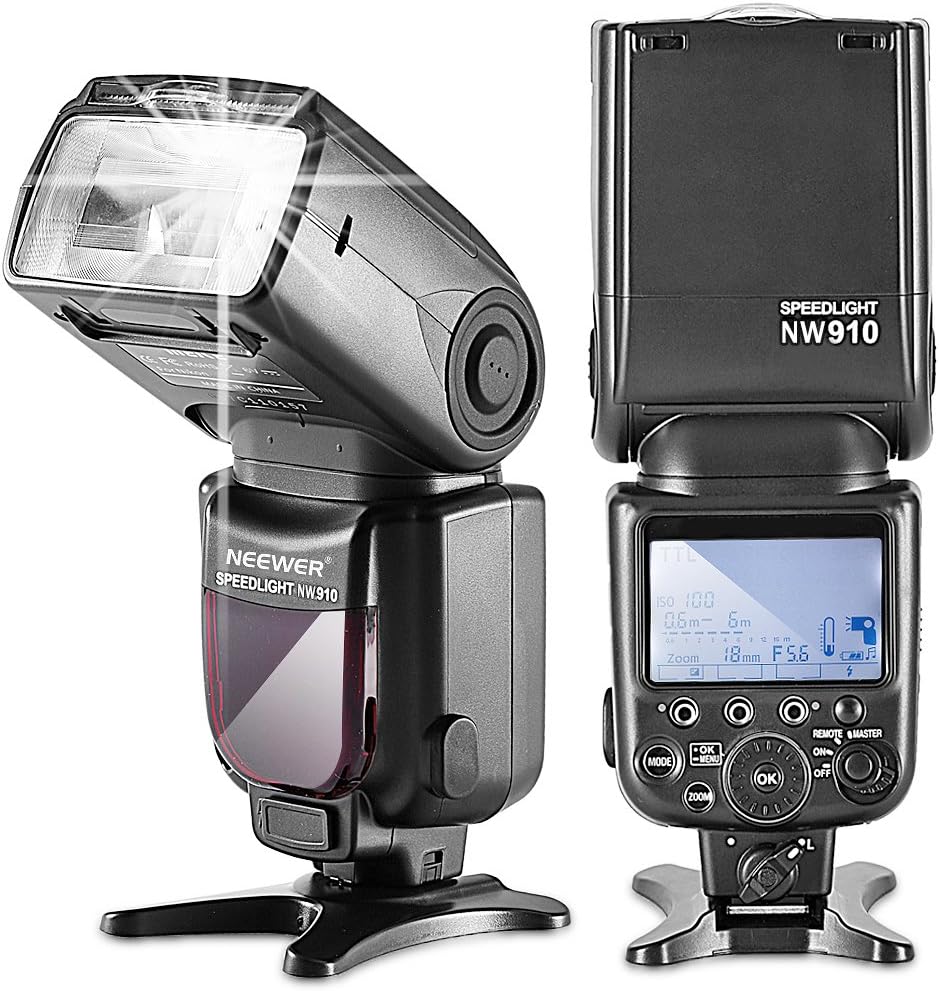
Image: Front and back views of the Neewer NW910 Speedlight Flash. The back view clearly shows the LCD display and control buttons.
Main Components:
- Flash Head: Rotates and tilts for bounce flash.
- Built-in Wide Panel & Bounce Card: Located within the flash head.
- LCD Display: Shows current settings and modes.
- Control Buttons: MODE, ZOOM, OK, Left/Right/Up/Down navigation, ON/OFF, REMOTE/MASTER.
- Hot Shoe: For mounting onto a camera or stand.
- Battery Compartment: Holds 4 AA batteries.
- PC Sync Port: For wired connection to a camera or trigger.
- External Power Port: For connecting an external power pack (e.g., CP-E4, not included).
5. Setup
5.1 Battery Installation
- Open the battery compartment cover on the side of the flash unit.
- Insert four (4) AA alkaline or Ni-MH batteries, ensuring correct polarity (+/-).
- Close the battery compartment cover securely.
5.2 Mounting to Camera
- Ensure your camera and the flash unit are both powered off.
- Slide the flash's hot shoe into your camera's hot shoe mount.
- Tighten the locking knob on the flash unit to secure it firmly to the camera.

Image: The Neewer NW910 Speedlight Flash securely mounted on the hot shoe of a Nikon DSLR camera.
5.3 Power On/Off
Press and hold the ON/OFF button for a few seconds to power the flash unit on or off. The LCD screen will illuminate upon power-on.
6. Operating Modes
Press the MODE button to cycle through the available flash modes: TTL, M (Manual), RPT (Multi), HSS (High-Speed Sync), MASTER, SLAVE (S1/S2).

Image: The Neewer NW910 Speedlight Flash LCD display showing various operating modes, including S1, RPT (Multi), and TTL, with corresponding settings.
6.1 TTL (Through-The-Lens) Mode
In TTL mode, the flash output is automatically controlled by the camera's metering system to achieve optimal exposure. This is ideal for quick shooting and changing light conditions.
- Press MODE until "TTL" appears on the LCD.
- Flash Exposure Compensation (FEC) can be adjusted using the navigation buttons to fine-tune exposure.
6.2 Manual (M) Mode
Manual mode allows you to set the flash output power manually from 1/1 (full power) to 1/128 in 1/3 stop increments. This provides precise control over lighting.
- Press MODE until "M" appears on the LCD.
- Use the navigation buttons to adjust the flash power level.
6.3 Multi (RPT) Mode
Multi mode (also known as Repeating Flash) fires the flash multiple times during a single exposure, creating stroboscopic effects. You can set the flash output, number of flashes, and frequency (Hz).
- Press MODE until "RPT" appears on the LCD.
- Use the navigation buttons to set flash power, flash count, and frequency.
6.4 High-Speed Sync (HSS)
HSS allows the flash to synchronize with shutter speeds faster than the camera's normal sync speed (up to 1/8000s). This is useful for freezing fast motion or using wide apertures in bright conditions.
- HSS is typically activated automatically when the camera's shutter speed exceeds the normal sync speed while in TTL or M mode, provided the camera supports HSS.
- Ensure your camera's settings are configured for HSS if required.
6.5 Master Mode
In Master mode, the NW910 can wirelessly control other compatible slave flash units (e.g., other NW910 units) using optical pulse signals. You can control up to 3 slave groups (A, B, C).
- Press REMOTE/MASTER button to switch to Master mode.
- Use the navigation buttons to set the mode and power for each slave group.
6.6 Slave Modes (S1/S2)
The NW910 can function as an optical slave unit, triggered by another flash.
- S1 Mode: The flash fires in response to the first flash from a master unit. Suitable for manual flash.
- S2 Mode: The flash ignores the pre-flash from a master unit and fires on the main flash. Suitable for TTL flash systems that use a pre-flash.
- Press MODE until "SLAVE" appears, then use navigation to select S1 or S2.
6.7 Zoom Function
The flash head's zoom position can be set automatically or manually to match the lens focal length, optimizing light coverage.
- Press the ZOOM button.
- Use the navigation buttons to select Auto Zoom or Manual Zoom (18-180mm).
6.8 Bounce Flash (Head Rotation)
The flash head can be rotated horizontally (0-360 degrees) and tilted vertically (-7 to 90 degrees) to bounce light off ceilings or walls, creating softer, more natural illumination.
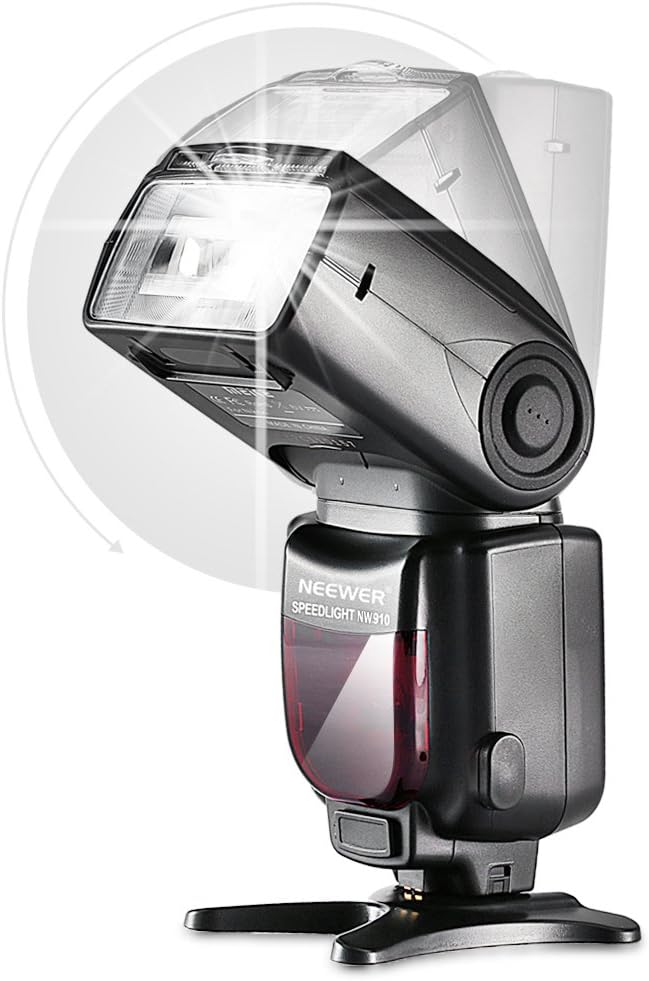
Image: A diagram illustrating the horizontal and vertical rotation capabilities of the Neewer NW910 Speedlight Flash head.
6.9 AF Assist Beam
The built-in AF assist beam helps the camera achieve focus in low-light conditions. It activates automatically when needed.
6.10 Power Saving Mode
The flash unit enters power-saving mode after a period of inactivity to conserve battery life. It can be woken up by pressing any button or firing the camera shutter.
6.11 Overheat Protection
To prevent damage from continuous high-power firing, the flash unit features overheat protection. If the unit becomes too hot, it will temporarily disable firing until it cools down.
7. Using Diffusers
The NW910 comes with both a soft and a hard flash diffuser to modify the light quality.

Image: The Neewer NW910 Speedlight Flash shown with both the soft dome diffuser and the hard plastic diffuser attached to the flash head.
7.1 Soft Flash Diffuser
The soft diffuser is a compact, portable accessory that slides over the flash head. It diffuses and softens the light, reducing harsh shadows and creating a more even illumination.
7.2 Hard Flash Diffuser
The hard diffuser helps to reduce and soften harsh shadows behind the subject and minimizes red-eye effect. It disperses and softens the light for a more balanced and uniform distribution.
8. Maintenance
8.1 Cleaning
- Use a soft, dry cloth to clean the flash unit.
- For stubborn dirt, use a cloth lightly dampened with water and a mild detergent, then wipe dry immediately.
- Do not use organic solvents such as alcohol or thinner.
- Clean the hot shoe contacts periodically with a clean, dry cloth to ensure good electrical connection.
8.2 Storage
- Store the flash unit in a cool, dry place, away from direct sunlight and high humidity.
- Remove batteries if storing for an extended period to prevent leakage.
- Use the provided protective pouch for storage and transport.
9. Troubleshooting
| Problem | Possible Cause | Solution |
|---|---|---|
| Flash does not fire. | Low battery, incorrect mode, flash not securely mounted, camera settings. | Check battery level and replace if necessary. Ensure flash is in an appropriate mode (TTL/M). Re-mount flash securely. Check camera flash settings. |
| Flash output is too dark/bright. | Incorrect flash exposure compensation (FEC), manual power setting, distance to subject. | Adjust FEC in TTL mode. Adjust manual power setting in M mode. Ensure subject is within flash range. |
| Flash does not sync with high shutter speeds. | HSS not enabled or camera/flash incompatibility. | Ensure HSS mode is active (if applicable) and both camera and flash support HSS. |
| Flash overheats frequently. | Excessive continuous firing at high power. | Allow the flash to cool down. Reduce firing frequency or power output. |
| Wireless slave mode not working. | Incorrect slave mode (S1/S2), obstruction, distance, master flash pre-flash issue. | Ensure correct S1/S2 mode is selected. Check line of sight. Reduce distance. If using S1, ensure master flash does not emit a pre-flash. |
10. Specifications
| Feature | Specification |
|---|---|
| Guide Number | 60 (ISO 100, 180mm) |
| Flash Coverage | 18-180mm (Auto/Manual Zoom) |
| Flash Modes | TTL, M, RPT, HSS, MASTER, SLAVE (S1/S2) |
| High-Speed Sync | Up to 1/8000s |
| Vertical Rotation Angle | -7 to 90 degrees |
| Horizontal Rotation Angle | 0 to 360 degrees |
| Wireless Triggering | Optical pulse induction |
| Wireless Triggering Distance | Indoor: 12-15m; Outdoor: 8-10m |
| Channels | 4 |
| Controllable Slave Groups | 3 (A, B, C) |
| Flashes per Battery Set | 100-1500 times (with AA alkaline batteries) |
| Recycle Time | Approx. 3 seconds |
| Color Temperature | 5600K |
| Flash Duration | Normal flash: 1.2ms or shorter; Quick flash: 2.3ms or shorter |
| External Interface | Hot shoe, PC sync port, External charge port |
| Power Supply | 4 x AA alkaline batteries or AA Ni-MH batteries (not included) |
| Additional Features | Front/Rear curtain sync, FEB lock, AF assist beam, Custom function settings, Power saving mode, Overheat protection, Flash exposure compensation, Memory function. |
11. Warranty and Support
Neewer products are designed and manufactured to high-quality standards. For warranty information and technical support, please refer to the warranty card included with your product or visit the official Neewer website. Keep your purchase receipt as proof of purchase.


