
1. Introduction
Thank you for choosing the MACKIE MIX5 5-Channel Compact Analog Mixer. This device is engineered to provide high-quality audio mixing in a portable and durable package. Featuring a high-headroom, low-noise Mackie preamplifier, a robust metal chassis, and premium components, the MIX5 is suitable for a wide range of audio applications, from home studios to live sound setups.
This manual will guide you through the setup, operation, maintenance, and troubleshooting of your MIX5 mixer to ensure optimal performance and longevity.
2. Important Safety Information
- Read these instructions thoroughly before use.
- Keep these instructions for future reference.
- Heed all warnings printed on the product and in this manual.
- Follow all instructions for safe operation.
- Do not use this apparatus near water or in damp environments.
- Clean only with a dry, soft cloth.
- Do not block any ventilation openings. Install in accordance with the manufacturer’s instructions.
- Do not install near any heat sources such as radiators, heat registers, stoves, or other apparatus (including amplifiers) that produce heat.
- Protect the power cord from being walked on or pinched, particularly at plugs, convenience receptacles, and the point where they exit from the apparatus.
- Only use attachments/accessories specified by the manufacturer.
- Unplug this apparatus during lightning storms or when unused for long periods of time.
- Refer all servicing to qualified service personnel. Servicing is required when the apparatus has been damaged in any way, such as power-supply cord or plug is damaged, liquid has been spilled or objects have fallen into the apparatus, the apparatus has been exposed to rain or moisture, does not operate normally, or has been dropped.
3. Features
The MACKIE MIX5 offers a comprehensive set of features for its compact size:
- 5-Channel Compact Mixer: High-headroom and low-noise design for pristine audio.
- Microphone/Line Input: One studio-level quality microphone/line input (XLR/1/4" TRS).
- Stereo Line Inputs: Two stereo 1/4" TRS line inputs for instruments or playback devices.
- RCA Inputs/Outputs: Dedicated stereo RCA input for playback and stereo RCA output for recording.
- Main Outputs: Main L/R 1/4" TRS outputs for connecting to speakers or amplifiers.
- Headphone Output: Independent headphone output with dedicated volume control for monitoring.
- 2-Band EQ: High (12kHz) and Low (80Hz) equalization on Channel 1 for tone shaping.
- Durable Construction: Rugged, all-metal chassis designed for reliability and portability.
- Ultra-Compact Size: Ideal for desktop use or on-the-go applications.
4. Setup
4.1 Unpacking
Carefully unpack your MACKIE MIX5 mixer and ensure all components are present:
- MACKIE MIX5 Unit
- Power Adapter (18VAC~ 300mA)
If any items are missing or damaged, please contact your dealer immediately.
4.2 Placement
Place the MIX5 on a stable, flat surface. Ensure there is adequate ventilation around the unit. Avoid placing the mixer near sources of excessive heat, moisture, or direct sunlight.
4.3 Power Connection
Connect the included power adapter to the 18VAC~ 300mA input jack located on the rear panel of the MIX5. Then, plug the power adapter into a suitable AC power outlet.

Image: Rear panel of the MACKIE MIX5, highlighting the 18VAC~ 300mA power input. This is where the included power adapter connects to supply power to the unit.
Note: The MACKIE MIX5 does not have a dedicated power switch. The unit powers on automatically when the power adapter is connected to both the mixer and a live AC outlet. To power off the unit, disconnect the power adapter from the outlet or the mixer.
5. Operating
5.1 Front Panel Overview
Familiarize yourself with the controls and connections on the front panel of your MACKIE MIX5 mixer:
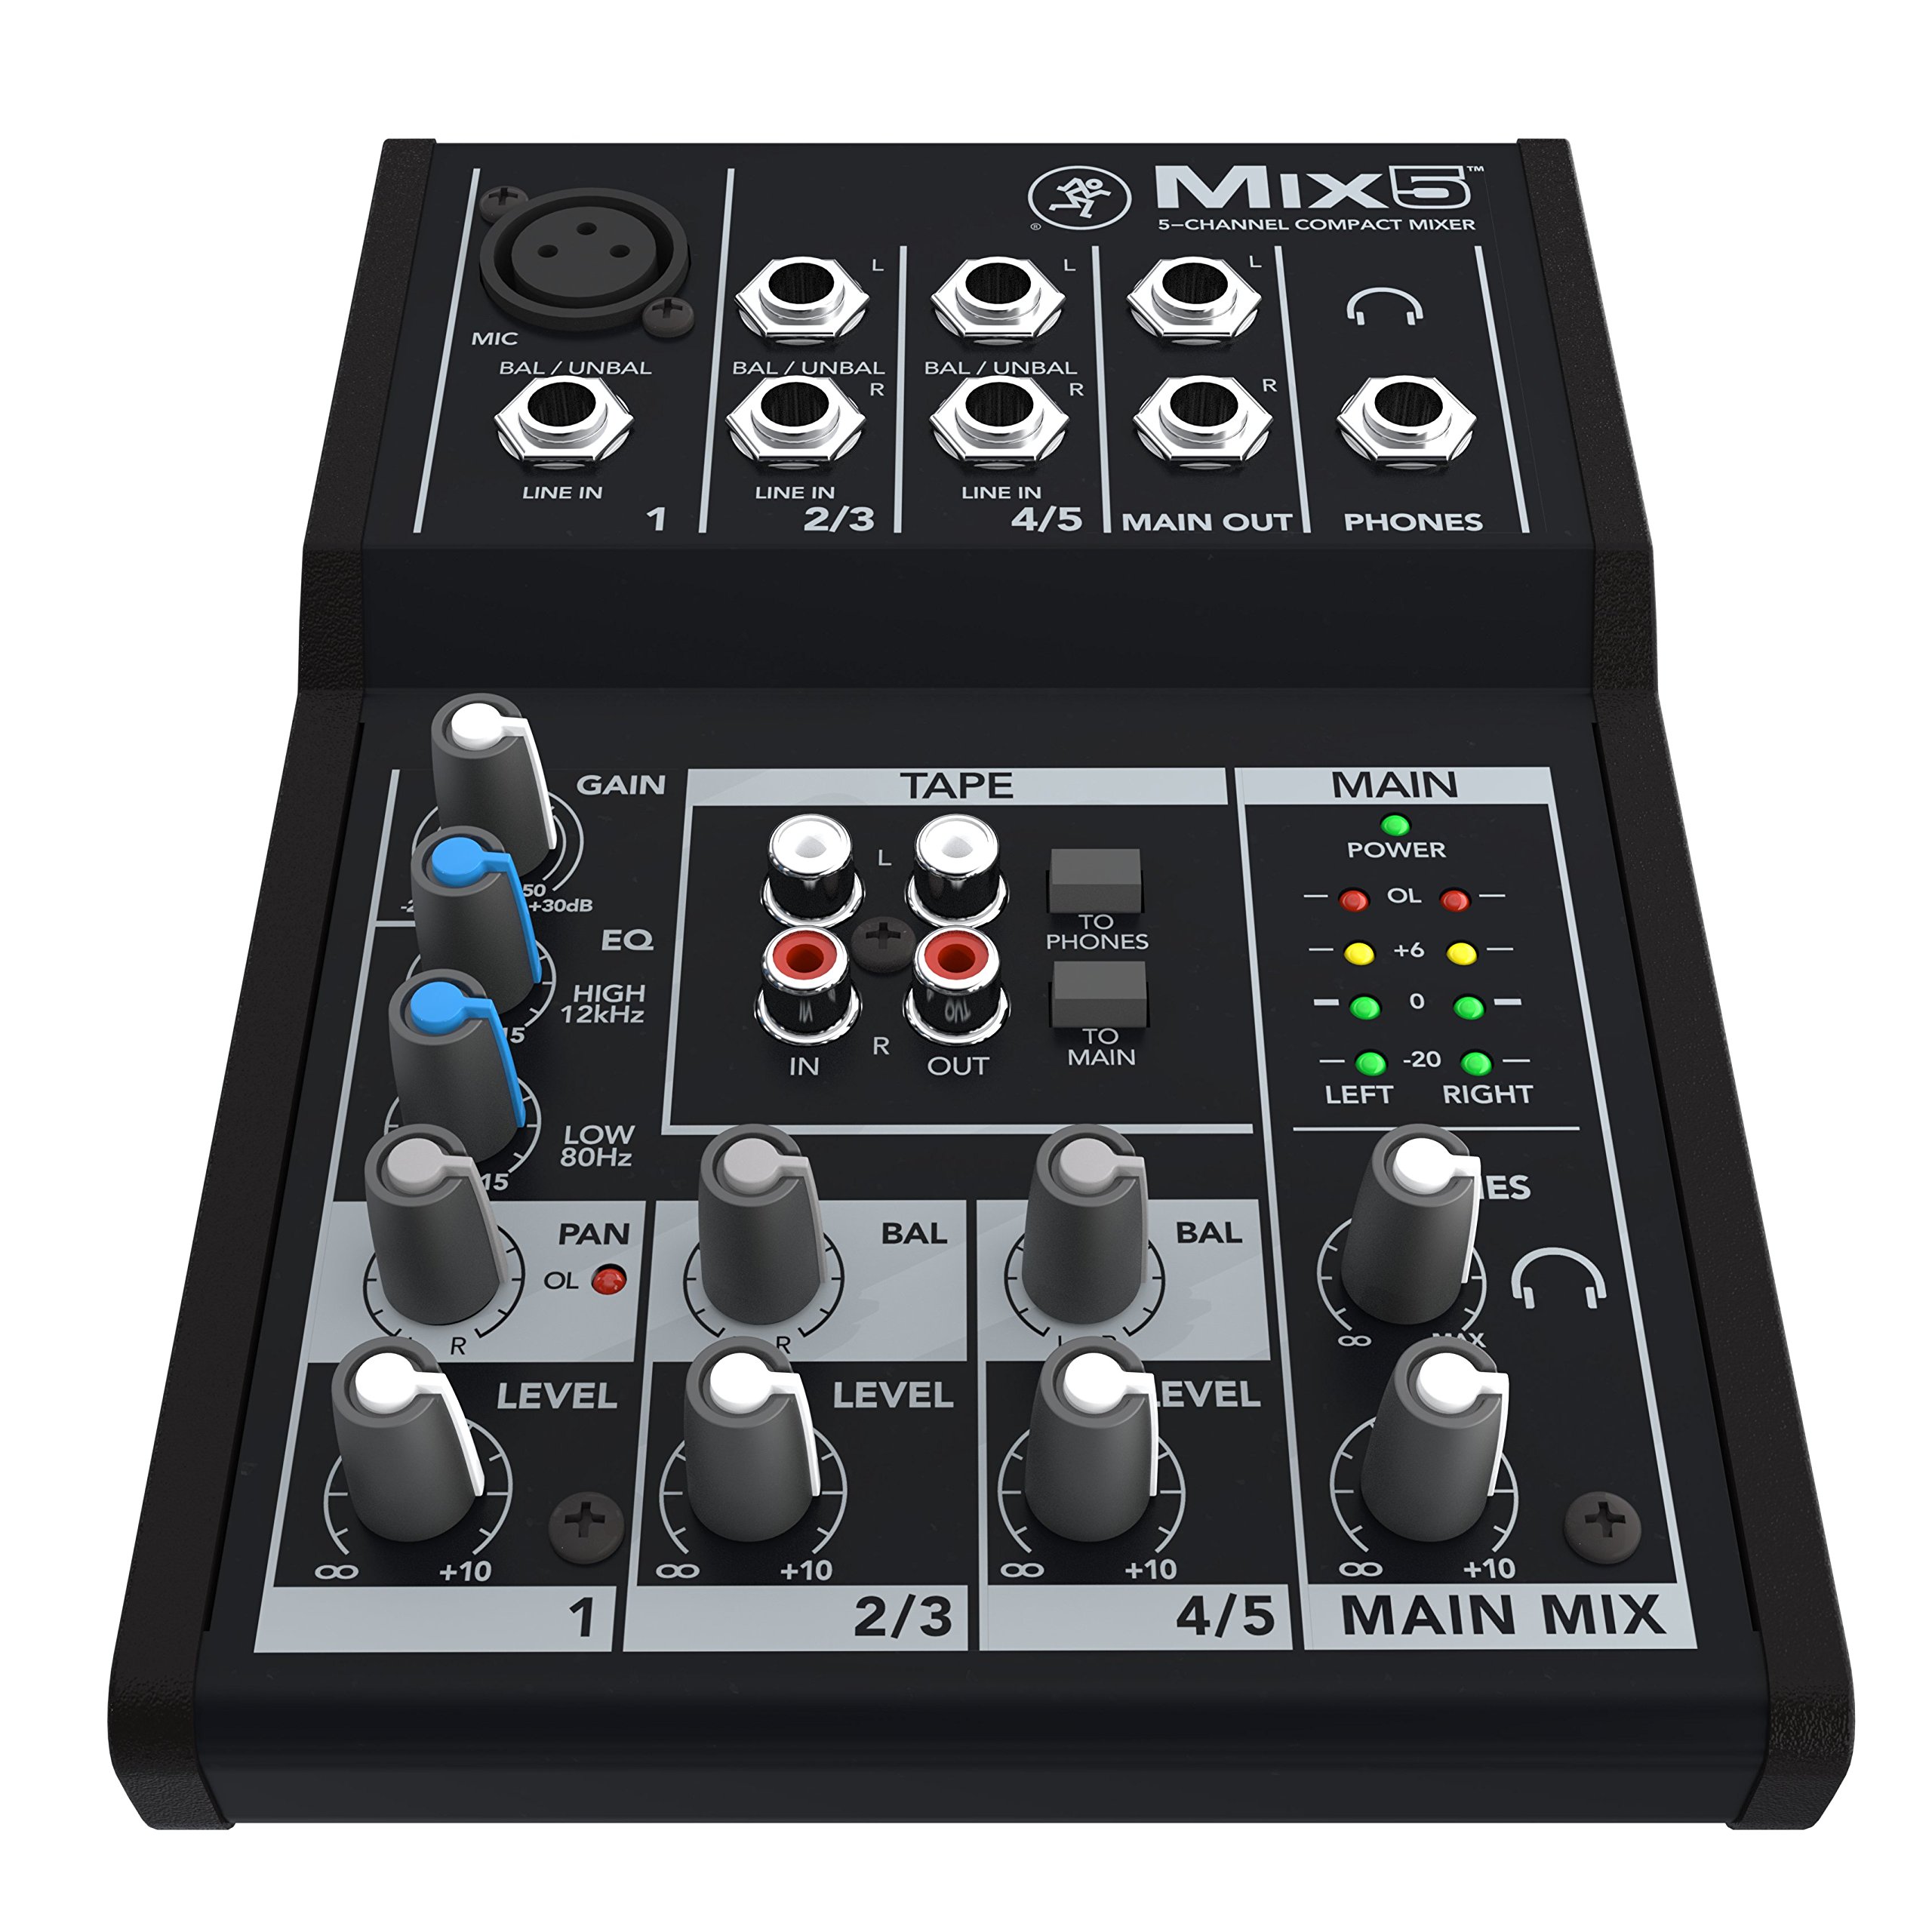
Image: Detailed top-down view of the MACKIE MIX5 front panel, showing all input jacks, control knobs, and output connections. This layout provides a clear understanding of the mixer's interface.
Channel 1 (Mono Mic/Line Input)
- MIC (XLR): Balanced/unbalanced input for microphones.
- LINE IN (1/4" TRS/TS): Balanced/unbalanced input for line-level instruments or devices.
- GAIN: Adjusts the input sensitivity for Channel 1.
- EQ (HIGH 12kHz, LOW 80Hz): Two-band equalizer to adjust the treble and bass frequencies for Channel 1.
- PAN: Adjusts the stereo position (left/right) of Channel 1 in the main mix.
- LEVEL: Controls the output level of Channel 1 to the main mix.
Channels 2/3 and 4/5 (Stereo Line Inputs)
- LINE IN L/R (1/4" TRS/TS): Stereo inputs for line-level devices like keyboards, drum machines, or audio players.
- BAL: Adjusts the balance between the left and right inputs of the stereo channel.
- LEVEL: Controls the output level of the respective stereo channel to the main mix.
TAPE Section
- IN L/R (RCA): Stereo RCA inputs for connecting playback devices (e.g., CD player, smartphone).
- OUT L/R (RCA): Stereo RCA outputs for connecting recording devices.
- TO PHONES button: Routes the Tape input signal to the headphone output.
- TO MAIN button: Routes the Tape input signal to the main outputs.
MAIN Section
- MAIN OUT L/R (1/4" TRS/TS): Main stereo outputs for connecting to powered speakers, amplifiers, or other audio equipment.
- MAIN MIX LEVEL: Controls the overall output level of the main stereo mix.
- PHONES (1/4" TRS): Stereo output for headphones.
- PHONES LEVEL: Controls the volume of the headphone output.
- MAIN Meter: LED indicators displaying the main output level (POWER, OL - Overload, +6, 0, -20 dB).
5.2 Basic Connection Examples
Here are some common connection scenarios:
- Microphone: Connect a microphone to the XLR input of Channel 1.
- Keyboard/Synthesizer: Connect the stereo outputs of a keyboard to the LINE IN L/R jacks of Channels 2/3 or 4/5.
- Smartphone/MP3 Player: Connect the headphone output of your device to the TAPE IN RCA jacks using an appropriate cable (e.g., 3.5mm to RCA).
- Powered Speakers/Amplifier: Connect the MAIN OUT L/R jacks to your powered speakers or the inputs of an amplifier.
- Headphones: Plug your headphones into the PHONES jack.
5.3 Adjusting Levels
Follow these steps for proper level setting:
- Before connecting any audio sources, ensure all LEVEL knobs (Channels 1, 2/3, 4/5, MAIN MIX, PHONES) are turned down to their minimum position.
- Connect all your audio sources and output devices as desired.
- For Channel 1, gradually increase the GAIN knob while speaking into the microphone or playing the instrument. Observe the MAIN Meter. Adjust GAIN so that the signal is strong, but the OL (Overload) LED only flashes occasionally on the loudest peaks.
- Gradually raise the LEVEL knob for each active channel (1, 2/3, 4/5) to achieve your desired mix balance.
- Slowly increase the MAIN MIX LEVEL knob to set the overall output volume for your speakers or amplifier.
- Adjust the PHONES LEVEL knob to set a comfortable listening volume for your headphones.
- Use the EQ knobs on Channel 1 to fine-tune the tone of that input.
- Use the PAN knob on Channel 1 and BAL knobs on stereo channels to position sounds in the stereo field.
6. Maintenance
6.1 Cleaning
To clean your MACKIE MIX5, use a dry, soft, lint-free cloth. Do not use liquid cleaners, abrasive cleaners, or solvents, as these can damage the finish and internal components.
6.2 Storage
When not in use for extended periods, store the mixer in a cool, dry place, away from direct sunlight and extreme temperatures. It is recommended to keep the original packaging for protection during storage or transport.
7. Troubleshooting
If you encounter issues with your MACKIE MIX5, refer to the following common troubleshooting steps:
7.1 No Power
- Ensure the power adapter is securely connected to the mixer's rear panel and a working AC power outlet.
- Test the power outlet with another device to confirm it is functional.
- Verify that the power adapter itself is not damaged.
7.2 No Sound Output
- Check all audio cable connections from your sources to the mixer, and from the mixer to your speakers/headphones. Ensure they are fully inserted and not damaged.
- Confirm that your input sources (microphone, instrument, playback device) are active and producing sound.
- Verify that the LEVEL knobs for the individual channels, MAIN MIX LEVEL, and PHONES LEVEL are turned up sufficiently.
- Ensure your connected speakers or headphones are powered on and their volume is turned up.
- If using the TAPE IN, ensure the TO MAIN or TO PHONES button is engaged.
7.3 Distorted Sound
- Reduce the GAIN knob for Channel 1 and the LEVEL knobs for all active channels. The OL LED on the MAIN Meter should only flash occasionally on the loudest peaks.
- Check for damaged or faulty audio cables.
- Ensure that the output level from your source devices is not excessively high.
7.4 Hum or Noise
- Ensure all audio cables are properly shielded and in good condition.
- Check for ground loops by trying to connect all audio equipment to the same power strip or by using a ground loop isolator.
- Try connecting the mixer to a different AC power outlet.
- Keep audio cables away from power cables and other sources of electromagnetic interference.
8. Specifications
| Brand | MACKIE |
| Model | MIX5 |
| Channels | 5 |
| Dimensions (D x W x H) | 19.6 cm x 14 cm x 4.3 cm (7.7 in x 5.5 in x 1.7 in) |
| Weight | 0.6 kg (1.3 lbs) |
| Power Source | External Power Adapter (18VAC~ 300mA) |
| Audio Inputs | 1x Mic/Line (XLR/1/4" TRS), 2x Stereo Line (1/4" TRS), 1x Stereo RCA |
| Audio Outputs | 1x Main L/R (1/4" TRS), 1x Stereo RCA, 1x Headphone (1/4" TRS) |
| UPC | 663961044935 |
| ASIN | B0129SXDLI |
9. Warranty and Support
For detailed warranty information, terms, and conditions, please refer to the official MACKIE website or the warranty card included with your product. Keep your proof of purchase (receipt or invoice) as it will be required for any warranty claims.
For technical support, service inquiries, or to find authorized service centers, please visit the MACKIE official website or contact your local MACKIE distributor. They can provide assistance with product operation, troubleshooting, and repairs.