
1. Introduction
Thank you for purchasing the MACKIE MIX8 8-Channel Compact Analog Mixer. This manual provides essential information for the safe and efficient operation of your mixer. The MIX8 is designed to deliver high-quality audio performance in a compact and durable package, suitable for various audio applications.
2. Safety Information
WARNING: To reduce the risk of fire or electric shock, do not expose this equipment to rain or moisture. Do not remove cover. Refer servicing to qualified personnel.
- Read these instructions.
- Keep these instructions.
- Heed all warnings.
- Follow all instructions.
- Do not use this apparatus near water.
- Clean only with dry cloth.
- Do not block any ventilation openings. Install in accordance with the manufacturer's instructions.
- Do not install near any heat sources such as radiators, heat registers, stoves, or other apparatus (including amplifiers) that produce heat.
- Protect the power cord from being walked on or pinched, particularly at plugs, convenience receptacles, and the point where they exit from the apparatus.
- Only use attachments/accessories specified by the manufacturer.
- Unplug this apparatus during lightning storms or when unused for long periods of time.
3. Package Contents
Please check that your package contains the following items:
- MACKIE MIX8 8-Channel Compact Analog Mixer
- Power Adapter
- This User Manual (or link to digital version)
4. Product Overview
4.1 Front Panel Controls and Connections
The front panel of the MIX8 provides all the controls and input/output connections for audio mixing.
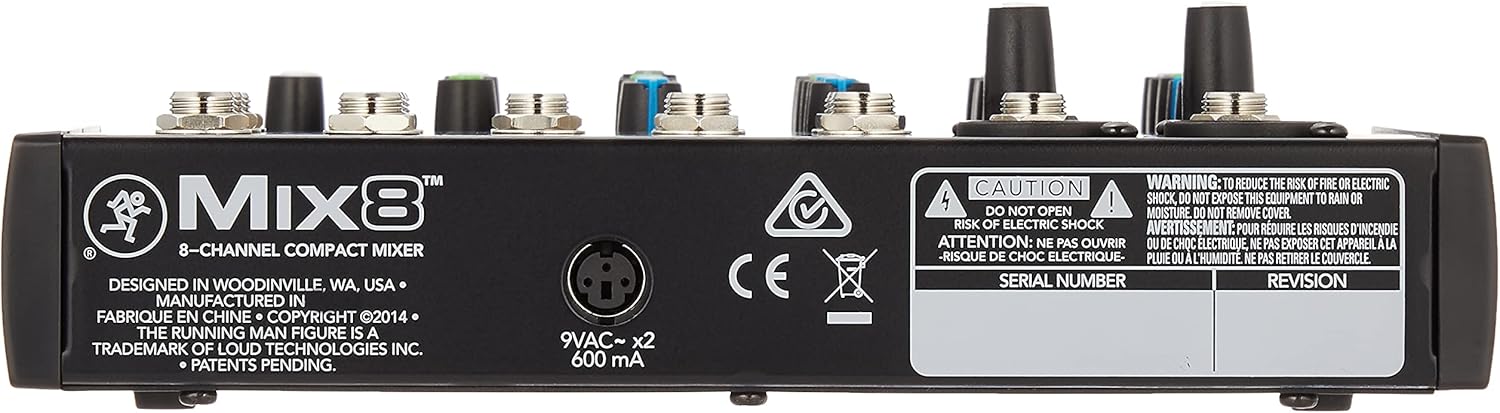
Figure 1: Detailed view of the MACKIE MIX8 front panel, showing all input channels, EQ sections, auxiliary controls, and master output controls.
- MIC/LINE Inputs (Channels 1-2): XLR for microphones and 1/4" TRS for line-level signals.
- GAIN (Channels 1-2): Adjusts the input sensitivity for microphones and line-level sources.
- LINE IN (Channels 3/4, 5/6): 1/4" TRS inputs for stereo line-level signals.
- EQ (All Channels): 3-band equalizer (High, Mid, Low) to shape the tone of each channel.
- AUX (All Channels): Sends a portion of the channel signal to the AUX Send output for external effects or monitoring.
- PAN (Channels 1-2): Positions the mono signal in the stereo field (left to right).
- BAL (Channels 3/4, 5/6): Adjusts the balance between the left and right signals of stereo channels.
- LEVEL (All Channels): Controls the output level of each channel to the main mix.
- TAPE IN/OUT: RCA connectors for connecting external recording devices or playback sources.
- POWER LED: Indicates when the mixer is powered on.
- +48V Phantom Power: Button to activate +48V phantom power for condenser microphones on channels 1 and 2.
- MAIN MIX: Controls the overall output level of the main stereo mix.
- PHONES: Headphone output with dedicated level control.
- MAIN OUT: 1/4" TRS outputs for connecting to main speakers or amplifiers.
- CR OUT (Control Room Out): 1/4" TRS outputs for connecting to control room monitors.
- AUX SEND/RETURN: 1/4" TRS jacks for connecting external effects processors.
4.2 Rear Panel Connections
The rear panel houses the power input and serial number information.

Figure 2: Rear view of the MACKIE MIX8, showing the power input, serial number label, and safety warnings.
- 9VAC~ x2 600mA: Power input connector for the included AC adapter.
- SERIAL NUMBER: Unique identifier for your unit.
5. Setup
5.1 Power Connection

Figure 3: The power adapter for the MACKIE MIX8 mixer.
- Ensure the MIX8 is turned off (unplugged).
- Connect the output of the supplied power adapter to the 9VAC~ input on the rear panel of the MIX8.
- Plug the power adapter into a suitable AC power outlet. The POWER LED on the front panel will illuminate.
5.2 Connecting Inputs
- Microphones: Connect microphones to the XLR inputs of Channels 1 and 2. If using condenser microphones, press the +48V phantom power button.
- Line-Level Devices (Mono): Connect instruments or other mono line-level sources to the 1/4" TRS inputs of Channels 1 and 2.
- Line-Level Devices (Stereo): Connect stereo keyboards, media players, or other stereo line-level sources to the 1/4" TRS inputs of Channels 3/4 and 5/6.
- Tape In: Connect the output of a playback device (e.g., CD player, smartphone) to the RCA TAPE IN jacks.
5.3 Connecting Outputs
- Main Speakers: Connect the 1/4" TRS MAIN OUT jacks to your main powered speakers or amplifier inputs.
- Headphones: Plug your headphones into the 1/4" PHONES jack.
- Control Room Monitors: Connect the 1/4" TRS CR OUT jacks to your control room monitors.
- Recording Device: Connect the RCA TAPE OUT jacks to the input of your recording device.
- External Effects: Connect the AUX SEND jack to the input of your external effects processor, and the output of the processor to the AUX RETURN jack.
6. Operating Instructions
6.1 Input Channels (1-2)
- Set the GAIN knob to its minimum position.
- Connect your microphone or line-level source.
- Slowly increase the GAIN until the signal is strong without clipping (distortion).
- Adjust the EQ (HIGH, MID, LOW) to shape the tone.
- Use the AUX knob to send signal to external effects or monitors.
- Adjust the PAN knob to position the sound in the stereo field.
- Use the LEVEL knob to control the channel's contribution to the main mix.
6.2 Stereo Input Channels (3/4, 5/6)
- Connect your stereo line-level source.
- Adjust the EQ (HIGH, MID, LOW) as desired.
- Use the AUX knob for sends.
- Adjust the BAL knob to balance the left and right signals.
- Use the LEVEL knob to control the channel's contribution to the main mix.
6.3 Main Mix and Monitoring
- Ensure all channel LEVEL knobs are at their minimum.
- Slowly raise the MAIN MIX knob to a comfortable listening level.
- Adjust the PHONES level for headphone monitoring.
- If using control room monitors, adjust their volume separately.
7. Maintenance
- Cleaning: Disconnect power before cleaning. Use a soft, dry cloth to wipe the exterior. Do not use liquid cleaners or solvents.
- Storage: Store the mixer in a cool, dry place away from direct sunlight and extreme temperatures.
- Ventilation: Ensure proper ventilation around the unit to prevent overheating.
8. Troubleshooting
8.1 No Sound Output
- Check if the mixer is powered on (POWER LED illuminated).
- Ensure all input sources are connected and active.
- Verify that channel LEVEL knobs and the MAIN MIX knob are turned up.
- Check connections to main speakers/amplifiers and ensure they are powered on and their volume is up.
- Test with headphones to isolate the issue to the main outputs or speakers.
8.2 Hum or Noise
- Ensure all cables are properly shielded and connected.
- Check for ground loops by trying different power outlets or using a ground lift adapter (if safe and necessary).
- Reduce GAIN settings if they are too high, as this can introduce noise.
- Keep audio cables away from power cables.
8.3 Distorted Sound
- Reduce input GAIN if the signal is clipping.
- Ensure output levels (channel LEVEL, MAIN MIX) are not too high, causing distortion in connected speakers/amplifiers.
- Check if any EQ settings are excessively boosted.
9. Specifications

Figure 4: Diagram illustrating the compact dimensions of the MACKIE MIX8 mixer.
| Feature | Specification |
|---|---|
| Brand | MACKIE |
| Model | MIX8 |
| Channels | 8 |
| Dimensions (D x W x H) | 24.4 cm x 19.8 cm x 5.3 cm (9.6 x 7.8 x 2.1 inches) |
| Weight | 1.1 kg (2.4 lbs) (excluding power supply) |
| Connectivity Technology | AUX |
| Power Source | Power Adapter (9VAC~ x2 600mA) |
| Audio Inputs | XLR, 1/4" TRS, RCA |
| Output Connector Type | RCA, 1/4" TRS |
| Phantom Power | +48V (Channels 1-2) |
10. Warranty and Support
MACKIE products are built for reliability. For warranty information, please refer to the warranty card included with your product or visit the official MACKIE website. For technical support, troubleshooting assistance, or service inquiries, please contact MACKIE customer support through their official channels.