MOOER Groove Loop X2
MOOER Groove Loop X2 Looper and Drum Machine User Manual
Model: Groove Loop X2
1. Introduction
The MOOER Groove Loop X2 is a versatile guitar effect pedal combining a looper and a drum machine. It allows musicians to record and layer guitar phrases while providing a rhythmic accompaniment. This manual provides detailed instructions for setting up, operating, maintaining, and troubleshooting your Groove Loop X2.
2. Key Features
- Integrated Looper and Drum Machine functionalities.
- Dedicated controls for Loop and Drum volume.
- Adjustable drum speed (tempo).
- Multiple drum genres and patterns.
- Save functionality for recorded loops.
- Compact and durable metal casing.
3. Product Overview
Familiarize yourself with the various components and controls of the Groove Loop X2.

Figure 3.1: Front Panel Controls
This image displays the front panel of the Groove Loop X2 pedal, showing the "LOOP" and "DRUM" volume knobs, "SPEED" and "GENRE" knobs for drum settings, and the "PATTERN" knob. Below these are the "SAVE" button and the two footswitches labeled "REC/PLAY/DUB" and "STOP/TAP". LED indicators are visible on the left side.
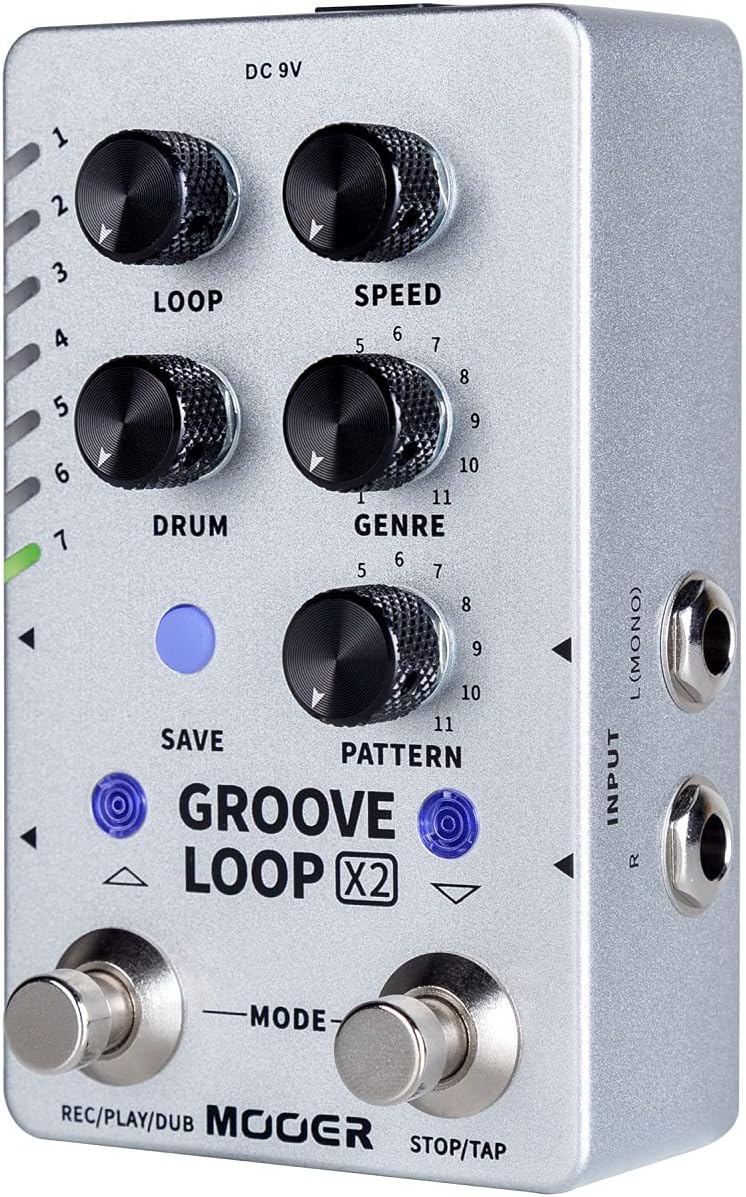
Figure 3.2: Side Panel (Input)
This image shows the right side of the Groove Loop X2 pedal, featuring the "INPUT" jacks labeled "L (MONO)" and "R" for connecting your instrument.

Figure 3.3: Top Panel (Output and Genre List)
This image displays the top panel of the Groove Loop X2 pedal, showing the "OUTPUT" jacks labeled "L (MONO)" and "R", and an "EXT CTRL" jack. A list of drum genres (Pop, Funk, Blues, Rock, Metal, Jazz, Fusion, Punk, Latin, Hip-pop, Disco) is printed on the casing.

Figure 3.4: Rear Panel (Power and USB)
This image shows the rear panel of the Groove Loop X2 pedal, featuring the "USB" port (Type-C) and the "DC 9V 300mA" power input jack.
4. Setup
4.1 Power Connection
Connect a standard 9V DC power adapter (center negative, 300mA minimum) to the "DC 9V" input jack on the rear of the pedal. Ensure the power supply meets the specified requirements to prevent damage.
4.2 Audio Connections
- Input: Connect your instrument (e.g., guitar) to the "INPUT L (MONO)" jack on the right side of the pedal using a standard 1/4-inch instrument cable. If using a stereo setup, connect the right channel to the "INPUT R" jack.
- Output: Connect the "OUTPUT L (MONO)" jack on the top of the pedal to your amplifier or audio interface using a standard 1/4-inch instrument cable. For stereo output, connect both "OUTPUT L (MONO)" and "OUTPUT R" to your stereo amplifier or mixer.
4.3 USB Connection (Optional)
The USB-C port on the rear of the pedal can be used for firmware updates or managing saved loops via a computer. Connect a USB-C cable from the pedal to your computer.
5. Operating Instructions
5.1 Basic Looper Operation
- Record: Press the "REC/PLAY/DUB" footswitch once to start recording your loop. The LED indicator will change color to indicate recording mode.
- Play: Press the "REC/PLAY/DUB" footswitch again to stop recording and immediately start playback of your loop.
- Overdub: While the loop is playing, press the "REC/PLAY/DUB" footswitch once to enter overdub mode. You can now record additional layers over your existing loop. Press again to stop overdubbing and continue playback.
- Stop: Press the "STOP/TAP" footswitch once to stop loop playback.
- Undo/Redo: While playing, press and hold the "REC/PLAY/DUB" footswitch for 2 seconds to undo the last recorded layer. Hold again to redo.
- Clear: While the loop is stopped, press and hold the "STOP/TAP" footswitch for 2 seconds to clear the current loop.
5.2 Drum Machine Operation
- Activate/Deactivate: Press the "STOP/TAP" footswitch twice quickly to activate or deactivate the drum machine.
- Tempo (SPEED): Use the "SPEED" knob to adjust the tempo (BPM) of the drum pattern.
- Genre: Use the "GENRE" knob to select a drum genre. Refer to the list on the top panel (Figure 3.3) for available genres (Pop, Funk, Blues, Rock, Metal, Jazz, Fusion, Punk, Latin, Hip-pop, Disco).
- Pattern: Use the "PATTERN" knob to select a specific drum pattern within the chosen genre.
- Drum Volume: Use the "DRUM" knob to adjust the volume of the drum machine.
- Loop Volume: Use the "LOOP" knob to adjust the volume of the recorded loop.
5.3 Saving Loops
The Groove Loop X2 allows you to save your recorded loops to internal memory slots.
- After recording a loop, press the "SAVE" button (blue button above "GROOVE LOOP X2" text).
- Use the "REC/PLAY/DUB" and "STOP/TAP" footswitches (or the up/down arrows next to the SAVE button) to navigate through the available save slots (indicated by the LEDs on the left).
- Press the "SAVE" button again to confirm saving to the selected slot.
5.4 Loading Loops
To load a previously saved loop:
- Ensure the looper is stopped.
- Use the up/down arrows (or footswitches in a specific mode, refer to advanced manual if available) to select the desired loop slot.
- Press the "REC/PLAY/DUB" footswitch to load and play the loop.
6. Maintenance
- Cleaning: Use a soft, dry cloth to clean the pedal's surface. Do not use abrasive cleaners or solvents.
- Storage: Store the pedal in a dry environment, away from extreme temperatures and direct sunlight.
- Power Supply: Always use the correct power supply (9V DC, center negative, 300mA minimum) to prevent damage. Disconnect power when not in use for extended periods.
- Firmware Updates: Check the MOOER official website periodically for firmware updates to ensure optimal performance and access to new features. Use the USB-C port for updates.
7. Troubleshooting
| Problem | Possible Cause | Solution |
|---|---|---|
| No power | Incorrect power supply; loose connection | Ensure 9V DC, center negative, 300mA minimum power supply is used and connected securely. |
| No sound output | Incorrect audio connections; volume knobs set to zero; faulty cables | Check input/output cable connections. Ensure LOOP and DRUM volume knobs are not at minimum. Test with different cables. |
| Drum machine not playing | Drum machine deactivated; volume too low | Double-press "STOP/TAP" footswitch to activate. Increase DRUM volume knob. |
| Loop recording issues | Incorrect timing; memory full | Practice timing for recording. Clear old loops or save to a new slot if memory is full. |
8. Specifications
| Parameter | Value |
|---|---|
| Brand | MOOER |
| Model | Groove Loop X2 |
| Power Requirement | 9V DC, 300mA (center negative) |
| Dimensions (L x W x H) | 11.5" x 1.1" x 5.8" (approx.) |
| Item Weight | 1 Ounce (approx.) |
| Input | 1/4" Mono/Stereo Jack |
| Output | 1/4" Mono/Stereo Jack |
| USB Port | USB-C for firmware updates/data management |
9. Warranty and Support
For warranty information and technical support, please refer to the official MOOER website or contact your local distributor. Keep your purchase receipt for warranty claims.
Official MOOER Website: www.mooeraudio.com
Related Documents - Groove Loop X2
 |
Mooer GL100 Groove Loop Series Phrase and Drum Station Owner's Manual Comprehensive owner's manual for the Mooer GL100 Groove Loop Series Phrase and Drum Station, detailing features, controls, operation, and software integration. |
 |
Mooer GL100 Groove Loop Series Phrase and Drum Station Owner's Manual Comprehensive owner's manual for the Mooer GL100 Groove Loop Series Phrase and Drum Station, detailing its features, controls, operation, and software integration for musicians. |
 |
NUX DUAL LOOP STEREO Pedal: User Guide and Specifications Comprehensive guide to the NUX DUAL LOOP STEREO pedal, covering its features, control panel, input/output jacks, connection options, usage instructions, USB functionality, technical specifications, and package contents. Ideal for guitarists and singer-songwriters seeking creative looping and rhythm accompaniment. |
 |
Donner Circle Looper Firmware Upgrade Guide Step-by-step instructions for upgrading the firmware on the Donner Circle Looper guitar pedal, ensuring optimal performance and access to the latest features. |
 |
Mooer Looper X2 Stereo Looper Pedal - Owner's Manual This manual provides detailed instructions for the Mooer Looper X2 Stereo Looper Pedal, covering precautions, features, layout, connections, operation, software usage, and specifications. |
 |
NUX JTC Drum & Loop NDL-2: Mini Pedal User Manual User manual for the NUX JTC Drum & Loop NDL-2 mini pedal, detailing its features, controls, and operation for guitarists, including a 24-bit looper and drum machine with Smart Tap Tempo. |
Ask a question about this manual
Ask about setup, troubleshooting, compatibility, parts, safety, or missing instructions. Manuals+ will review the question and use this page’s manual context to help answer it.