1. Introduction
This manual provides comprehensive instructions for the installation, operation, and maintenance of the L-com PR175B16BLK 16-Port 1U BNC Patch Panel. Please read this manual thoroughly before using the product to ensure proper functionality and safety.
2. Product Overview
The L-com PR175B16BLK is a 1U rack-mountable BNC patch panel designed for efficient management and routing of coaxial signals. It features 16 BNC ports, providing a centralized connection point for various BNC-terminated devices within a rack environment. This panel is ideal for applications requiring organized and flexible BNC signal distribution.
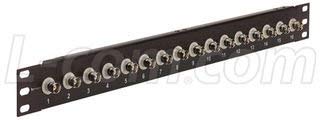
Figure 1: Front view of the L-com PR175B16BLK 16-Port 1U BNC Patch Panel. This image displays the front view of the L-com PR175B16BLK 16-Port 1U BNC Patch Panel. It features sixteen BNC connectors arranged horizontally across a black 1U rack-mountable chassis. Each port is numbered from 1 to 16 for easy identification. The panel is designed for efficient cable management and signal routing in rack environments.
3. Setup and Installation
Follow these steps for proper installation of the BNC patch panel:
- Unpacking: Carefully remove the patch panel from its packaging. Inspect for any signs of damage during transit.
- Rack Mounting: The PR175B16BLK is a 1U rack-mountable unit. Align the mounting holes on the patch panel with the corresponding holes on your standard 19-inch equipment rack. Secure the panel using appropriate rack screws (not included) on both sides.
- Cable Connection: Connect your BNC-terminated coaxial cables to the desired ports on the front of the patch panel. Ensure each BNC connector is fully inserted and twisted clockwise until it locks securely into place.
- Cable Management: Utilize proper cable management techniques (e.g., cable ties, cable management panels) to organize connected cables and prevent strain on the connectors.
4. Operating Instructions
The L-com PR175B16BLK patch panel operates passively, facilitating signal routing without requiring external power. Its primary function is to provide a convenient and organized interface for BNC connections.
- Connecting Cables: To connect a BNC cable, align the connector with the port, push it in, and twist clockwise until it clicks into place.
- Disconnecting Cables: To disconnect, twist the BNC connector counter-clockwise and pull it straight out from the port.
- Signal Routing: Use the numbered ports to clearly identify and manage your BNC signal paths.
5. Maintenance
Regular maintenance ensures optimal performance and longevity of your patch panel.
- Cleaning: Periodically clean the exterior of the patch panel with a soft, dry, lint-free cloth. Avoid using abrasive cleaners or solvents.
- Inspection: Routinely inspect all BNC connectors for signs of wear, corrosion, or damage. Ensure all cables are securely connected.
- Environmental Conditions: Ensure the patch panel is operated within a stable environment, free from excessive dust, moisture, and extreme temperatures.
6. Troubleshooting
If you encounter issues with signal transmission, consider the following troubleshooting steps:
- No Signal/Intermittent Signal:
- Verify that all BNC cables are securely connected to both the patch panel and the connected devices.
- Inspect cables for damage (e.g., kinks, cuts, loose connectors).
- Test cables individually if possible to isolate a faulty cable.
- Ensure the source device is transmitting a signal and the receiving device is properly configured.
- Loose Connections: Re-seat any BNC connectors that appear loose. Ensure they are twisted clockwise until fully locked.
7. Specifications
| Feature | Specification |
|---|---|
| Model Number | PR175B16BLK |
| Brand | L-com |
| Connector Type | BNC Patch Panel |
| Number of Ports | 16 |
| Rack Unit Height | 1U |
| Manufacturer | L-COM |
| Date First Available | July 15, 2015 |
8. Warranty and Support
Warranty information for the L-com PR175B16BLK patch panel is typically provided by the manufacturer at the time of purchase or can be found on the official L-com website. For technical support, product inquiries, or warranty claims, please contact L-com directly through their official support channels.
L-com Contact Information: Please refer to the official L-com website (www.l-com.com) for the most current contact details and support resources.