
QUICK CONNECT HT-2X2-SPL08
HaVACo 2'x2' Lay-In 3 Cone Supply Ceiling Diffuser User Manual
Brand: QUICK CONNECT | Model: HT-2X2-SPL08
1. Introduction
The HaVACo 2'x2' Lay-In 3 Cone Supply with 8" Pre-Molded Boot is a high-quality ABS plastic ceiling diffuser designed for efficient air distribution in heating, cooling, and ventilation systems. This manual provides essential information for the proper installation, operation, and maintenance of your new air supply grille, ensuring optimal performance and longevity.
Crafted for durability and ease of use, this diffuser resists rust, corrosion, and discoloration, offering a long-lasting aesthetic appeal unlike traditional metal units. Its patented design simplifies installation and maintenance, making it an ideal choice for commercial, light commercial, and retrofit applications.
2. Product Features
- Durable Construction: Made from high-quality ABS plastic, ensuring resistance to rust, corrosion, discoloration, and bending, even if accidentally dropped.
- Simple Installation: Features a patented easy-attach knob for effortless fitting without the need for additional tools. The smooth design minimizes the risk of injury during handling.
- Enhanced Aesthetics: Its elegant appearance provides a modern touch, improving the overall look of any space while serving essential heating, cooling, and ventilation needs.
- Easy Maintenance: Designed for simple disassembly and removal, allowing for quick and easy cleaning. The unit is also commercial dishwasher-safe for added convenience.
- Superior Performance: The 3-cone design optimizes airflow for effective air distribution.
- Made in USA: Proudly manufactured in the USA, ensuring quality and reliability.
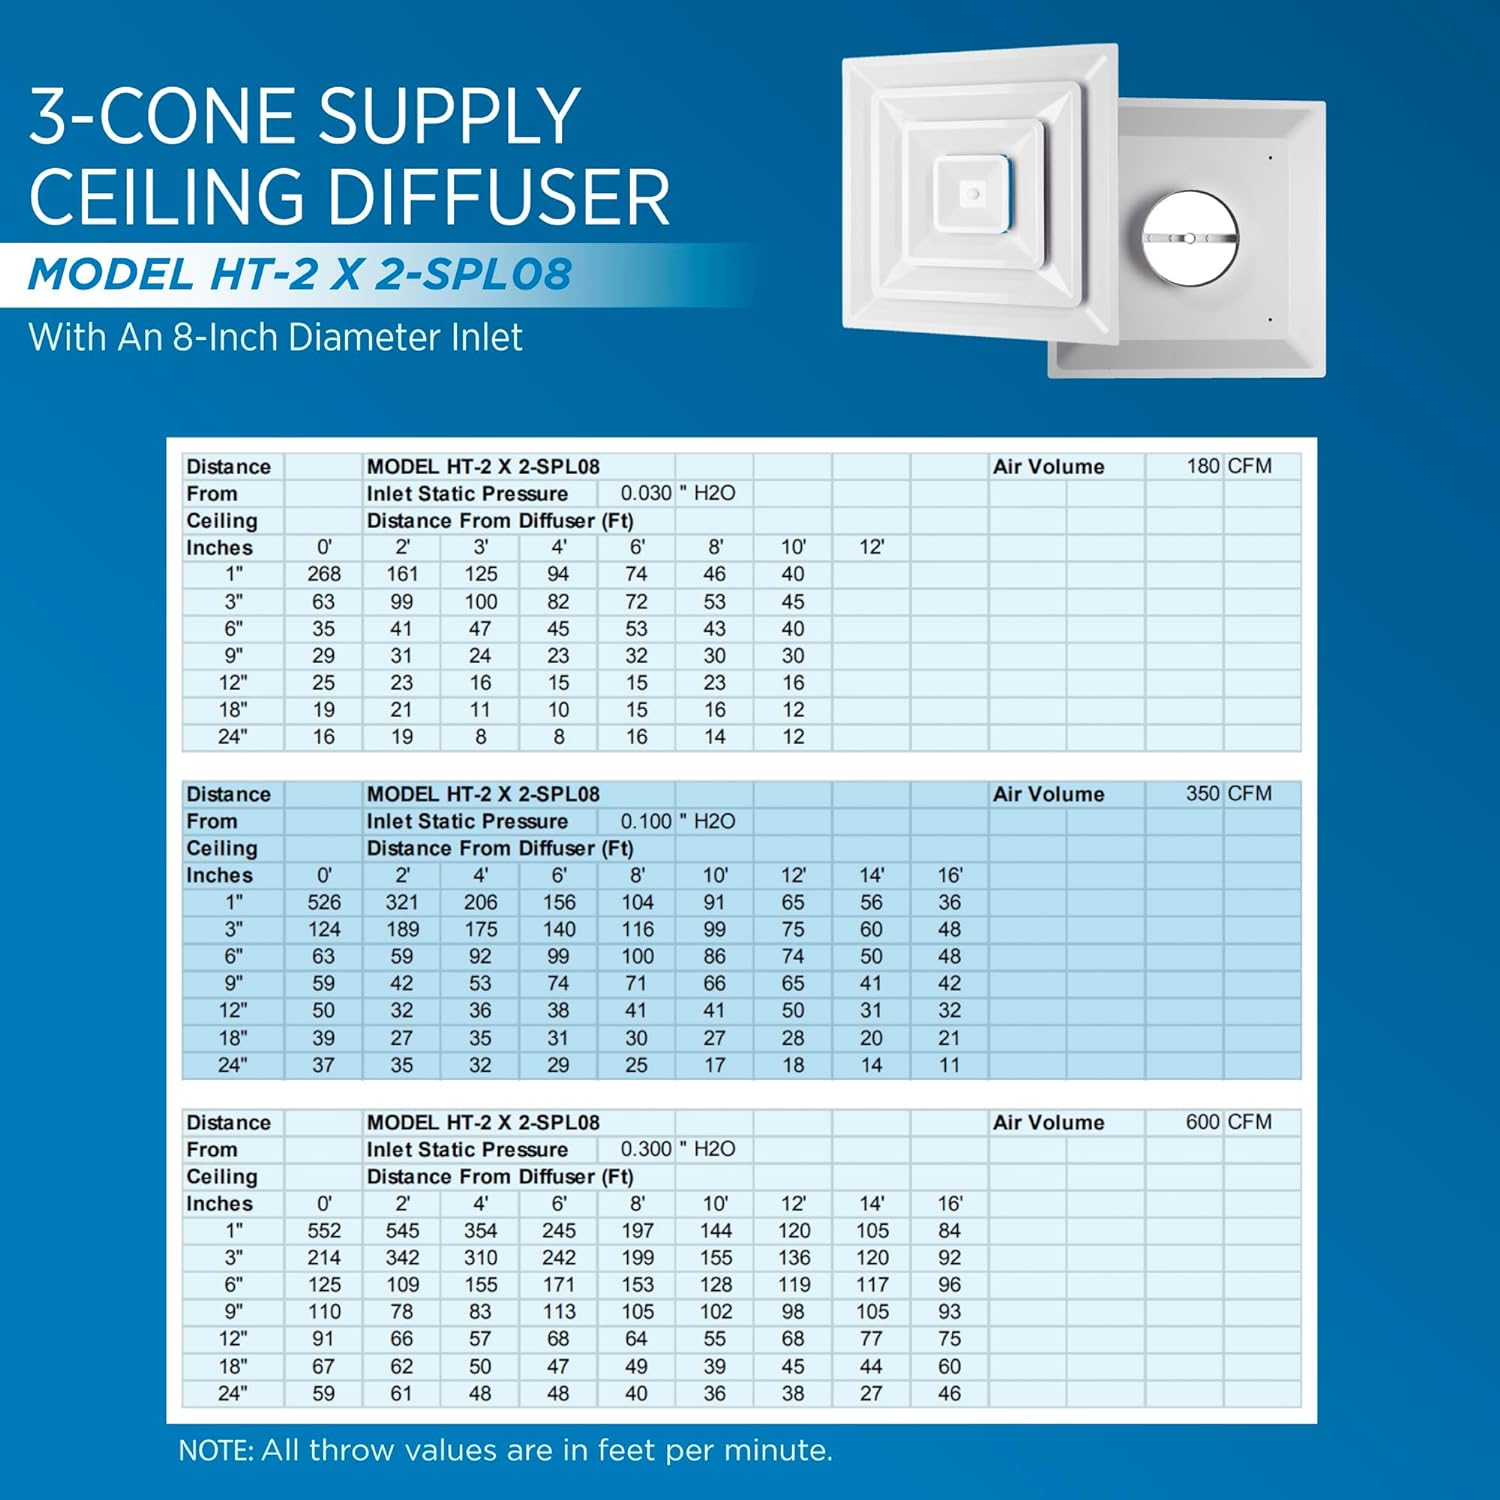
Image: Advantages of the plastic diffuser, highlighting ease of cleaning and installation.
3. Setup and Installation
The HaVACo 2'x2' Lay-In 3 Cone Supply is designed for straightforward installation in standard 2'x2' drop ceiling grids. Follow these steps for a secure and efficient setup:
- Prepare the Opening: Ensure the 2'x2' opening in your drop ceiling grid is clear and ready for the diffuser.
- Position the Diffuser: Carefully lift the diffuser and align it with the ceiling grid opening. The unit is designed to lay directly into the grid.
- Connect Ductwork: Attach your 8-inch ductwork to the pre-molded boot on the back of the diffuser. Ensure a secure and sealed connection to prevent air leaks.
- Secure the Diffuser: The diffuser's design allows it to rest securely within the grid. For additional stability, utilize the easy-attach knob to firmly seat the central cone assembly.

Image: Step-by-step installation of the diffuser into a ceiling grid.

Image: Rear view of the diffuser, highlighting the 8-inch pre-molded boot for duct connection.
4. Operation
The HaVACo 2'x2' Lay-In 3 Cone Supply functions as a passive air diffuser, distributing conditioned air from your HVAC system into the room. Its multi-cone design is engineered to provide optimal airflow patterns for effective heating, cooling, and ventilation.
Once installed and connected to your ductwork, the diffuser operates in conjunction with your HVAC system. No user adjustments are typically required for its basic operation. The performance characteristics, including air volume and throw distances, are dependent on the static pressure and airflow provided by your HVAC system.
Performance Data
Refer to the table below for typical air volume (CFM) and throw distances at various inlet static pressures for the HT-2X2-SPL08 model.

Image: Performance data table for the 3-cone supply ceiling diffuser.
5. Maintenance
Regular cleaning of your HaVACo ceiling diffuser will ensure optimal airflow and maintain its aesthetic appearance. The design allows for easy disassembly and cleaning.
- Disassembly: Gently pull down on the central cone assembly. It is designed to detach easily from the main frame.
- Cleaning: Clean the detached cone assembly and the main frame with mild soap and water. For thorough cleaning, the ABS plastic components are commercial dishwasher-safe.
- Drying: Ensure all components are completely dry before reassembly to prevent moisture buildup.
- Reassembly: Align the central cone assembly with the main frame and push it back into place until it clicks securely.
Image: Demonstration of easy cleaning for the diffuser components.
6. Troubleshooting
If you encounter any issues with your HaVACo ceiling diffuser, consider the following common troubleshooting steps:
- Reduced Airflow:
- Check for any obstructions within the diffuser cones or the connected ductwork.
- Ensure the diffuser is securely seated in the ceiling grid and the duct connection to the 8" boot is properly sealed.
- Verify that your HVAC system is operating correctly and supplying adequate airflow.
- Unusual Noises:
- Ensure all components of the diffuser are properly assembled and secured.
- Check for loose connections in the ductwork or ceiling grid.
- Condensation:
- While plastic diffusers minimize condensation compared to metal, ensure proper insulation of the ductwork leading to the diffuser, especially in humid environments.
- Verify that the supply air temperature is not excessively low for the ambient conditions.
For persistent issues not resolved by these steps, it is recommended to consult a qualified HVAC professional.
7. Specifications
| Specification | Detail |
|---|---|
| Material | ABS Plastic |
| Brand | QUICK CONNECT |
| Size | 2'x2' Lay-In (with 8-Inch Pre-Molded Boot) |
| Color | White |
| Style | 3 Cone Supply |
| Shape | Square |
| Product Dimensions | 24"L x 24"W x 4.3"Th |
| Surface Recommendation | Drop Ceiling |
| Manufacturer | Duratite/HAVACO |
| UPC | 811318020617 |
| Part Number | HT-2X2-SPL08 |
| Item Weight | 4.59 pounds |
| Usage | Heating, Cooling, Ventilation |
| Included Components | Supply Grille; Easy Attach Knob; Back with 8" Boot |
| Batteries Required? | No |
8. Warranty and Support
The HaVACo 2'x2' Lay-In 3 Cone Supply comes with a Lifetime Limited Warranty, ensuring peace of mind regarding its quality and durability. This warranty covers manufacturing defects under normal use and service.
For any product support, technical assistance, or to inquire about warranty claims, please contact QUICK CONNECT customer service. Please have your model number (HT-2X2-SPL08) and purchase information ready when contacting support.
For the most up-to-date contact information, please refer to the official QUICK CONNECT website or your purchase documentation.
Related documentsHT-2X2-SPL08


Ask a question about this manual
Ask about setup, troubleshooting, compatibility, parts, safety, or missing instructions. Manuals+ will review the question and use this page’s manual context to help answer it.