1. Important Safeguards
When using electrical appliances, basic safety precautions should always be followed to reduce the risk of fire, electric shock, and/or injury to persons, including the following:
- Read all instructions before operating the toaster oven.
- Do not touch hot surfaces. Use handles or knobs.
- To protect against electrical shock, do not immerse cord, plugs, or appliance in water or other liquid.
- Close supervision is necessary when any appliance is used by or near children.
- Unplug from outlet when not in use and before cleaning. Allow to cool before putting on or taking off parts.
- Do not operate any appliance with a damaged cord or plug, or after the appliance malfunctions or has been damaged in any manner. Return appliance to the nearest authorized service facility for examination, repair, or adjustment.
- The use of accessory attachments not recommended by the appliance manufacturer may cause injuries.
- Do not use outdoors.
- Do not let cord hang over edge of table or counter, or touch hot surfaces.
- Do not place on or near a hot gas or electric burner, or in a heated oven.
- Extreme caution must be used when moving an appliance containing hot oil or other hot liquids.
- Always attach plug to appliance first, then plug cord into the wall outlet. To disconnect, turn any control to “OFF”, then remove plug from wall outlet.
- Do not use appliance for other than intended use.
- Oversized foods or metal utensils must not be inserted in a toaster oven as they may create a fire or risk of electric shock.
- A fire may occur if the toaster oven is covered or touching flammable material, including curtains, draperies, walls, and the like, when in operation.
- Do not place any materials other than manufacturer’s recommended accessories in this oven when not in use.
- Do not place any of the following materials in the oven: paper, cardboard, plastic, and similar products.
- Do not cover crumb tray or any part of the oven with metal foil. This will cause overheating of the oven.
- Extreme caution must be exercised when removing tray or disposing of hot grease.
- Do not clean with metal scouring pads. Pieces can break off the pad and touch electrical parts, creating a risk of electric shock.
- To turn off this appliance, turn the timer knob to the “OFF” position.
2. Product Overview
The Oster TSSTTVCG02 Convection Toaster Oven is designed for versatile countertop cooking. Familiarize yourself with its components before use.
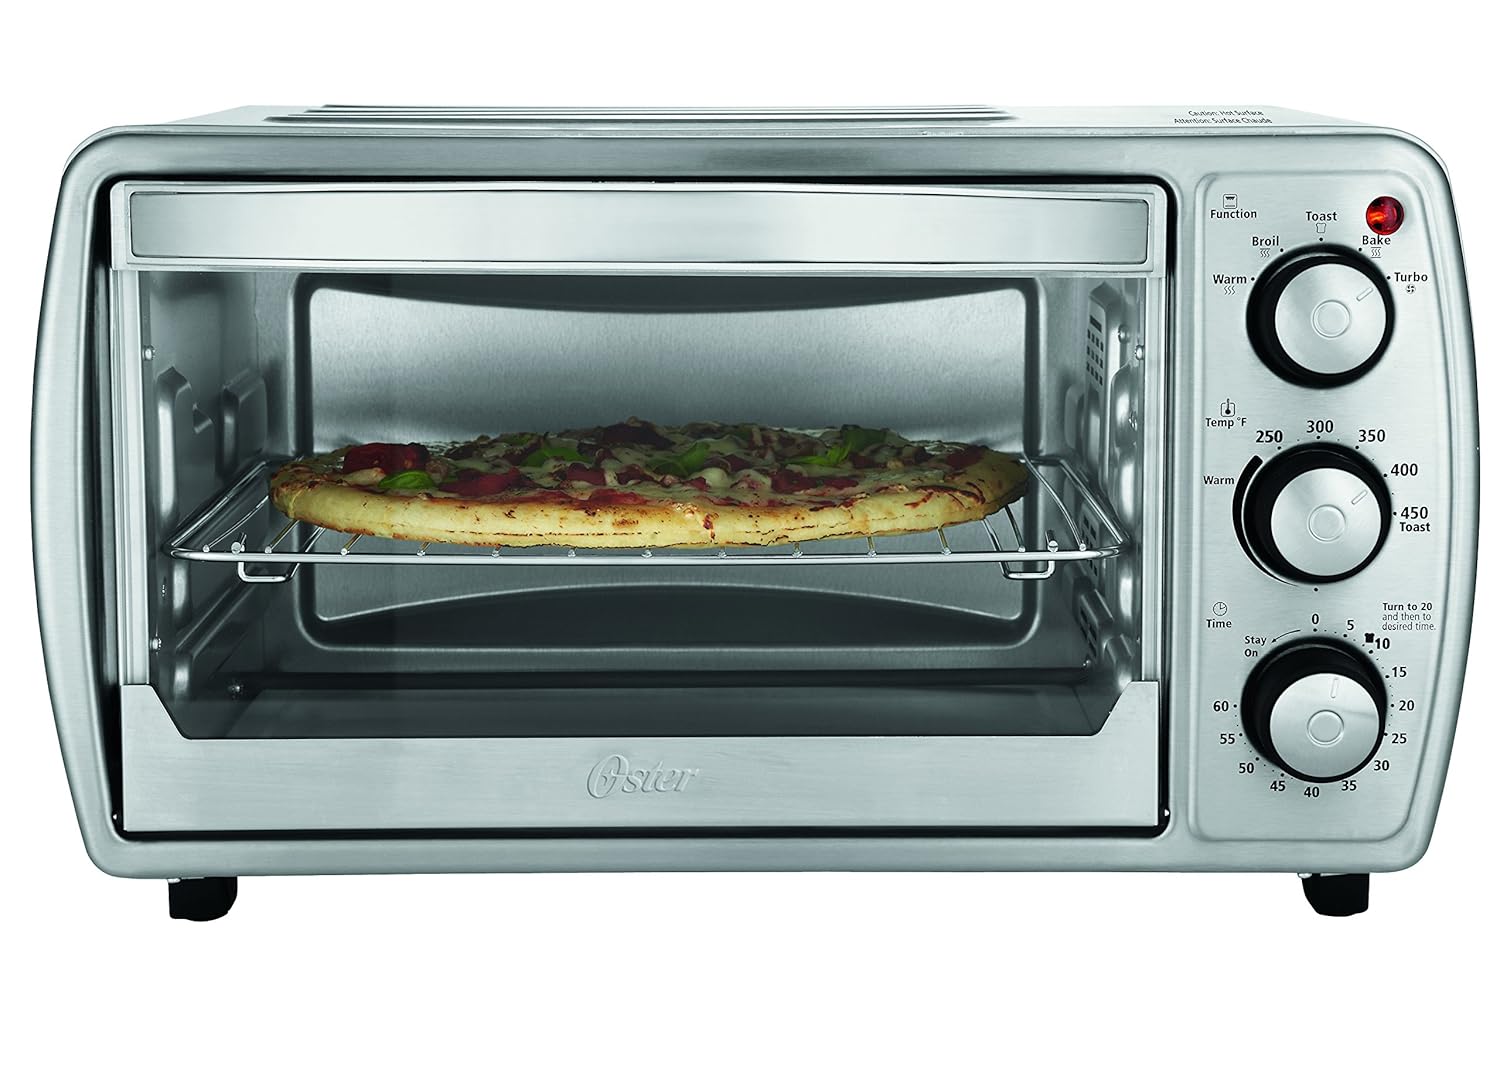
Figure 2.1: Front view of the Oster TSSTTVCG02 Toaster Oven with a pizza, highlighting the control panel and interior.
Key Components:
- Function Knob: Selects cooking mode (Toast, Broil, Bake, Warm).
- Temperature Knob: Adjusts cooking temperature (150-450°F).
- Timer Knob: Sets cooking time up to 60 minutes with auto shut-off and bell signal. Includes a "Stay On" option.
- Power Indicator Light: Illuminates when the oven is operating.
- Oven Rack: Adjustable to two positions for different cooking needs.
- Baking Pan/Broil Rack: Used for baking and broiling.
- Removable Crumb Tray: Collects crumbs for easy cleaning.
- Glass Door: Allows visibility of food during cooking.
3. Setup
Before using your new toaster oven, follow these steps for initial setup.
3.1 Unpacking
- Remove all packaging materials, including any internal packing or protective films.
- Check that all accessories are present: oven rack, baking pan, and removable crumb tray.
- Inspect the appliance for any damage. Do not use if damaged.
3.2 Placement
- Place the toaster oven on a flat, stable, heat-resistant surface.
- Ensure there is at least 6 inches (15 cm) of clearance on all sides of the oven for proper ventilation. Do not place directly under cabinets.
- Do not place near flammable materials such as curtains or walls.
3.3 Initial Cleaning
- Wipe the exterior of the oven with a damp cloth.
- Wash the oven rack, baking pan, and crumb tray in warm, soapy water. Rinse thoroughly and dry completely.
- Insert the crumb tray into the bottom of the oven.

Figure 3.1: The Oster TSSTTVCG02 Toaster Oven showing the oven rack and baking tray in position.
3.4 First Use (Burn-Off)
- Plug the power cord into a standard electrical outlet.
- Set the Function knob to BAKE, Temperature knob to 450°F (230°C), and Timer knob to 15 minutes.
- Allow the oven to operate for 15 minutes to burn off any manufacturing oils. A slight odor or smoke is normal during this process.
- Ensure the area is well-ventilated.
- After 15 minutes, turn the Timer knob to OFF and unplug the oven. Allow it to cool completely.
4. Operating Instructions
Your Oster TSSTTVCG02 Convection Toaster Oven offers multiple cooking functions. Follow these instructions for optimal results.
4.1 General Operation Tips
- Always preheat the oven for 5-10 minutes before placing food inside, especially for baking and broiling.
- Use oven-safe bakeware.
- The convection feature provides faster, more even cooking. Adjust cooking times and temperatures accordingly (often reducing temperature by 25°F and cooking time by 10-15%).
4.2 Toast Function
- Place food directly on the oven rack.
- Set the Function knob to TOAST.
- Turn the Temperature knob to the desired toast shade (usually indicated by toast icons or a specific setting).
- Turn the Timer knob past 10 minutes, then back to the desired toast shade. The oven will automatically shut off when the timer expires.
4.3 Bake Function
- Place food in an oven-safe baking pan on the oven rack.
- Set the Function knob to BAKE.
- Turn the Temperature knob to the desired baking temperature (150-450°F).
- Turn the Timer knob to the desired baking time. For continuous baking, turn to STAY ON.
- The oven will preheat. Once the desired temperature is reached, place food inside.
- When cooking is complete, turn the Timer knob to OFF and carefully remove food.

Figure 4.1: The Oster TSSTTVCG02 Toaster Oven in use, roasting a chicken with vegetables.
4.4 Broil Function
- Place food on the baking pan with the broil rack inserted, positioned on the upper rack for best results.
- Set the Function knob to BROIL.
- Turn the Temperature knob to the desired broiling temperature.
- Turn the Timer knob to the desired broiling time. For continuous broiling, turn to STAY ON.
- Monitor food closely as broiling can be very fast.
- When cooking is complete, turn the Timer knob to OFF and carefully remove food.
4.5 Warm Function
- Place food in an oven-safe dish on the oven rack.
- Set the Function knob to WARM.
- Turn the Temperature knob to the desired warming temperature.
- Turn the Timer knob to the desired warming time or STAY ON.
- When warming is complete, turn the Timer knob to OFF and carefully remove food.
4.6 Rack Positions
The oven features two rack positions to accommodate various food sizes and cooking methods:
- Upper Position: Ideal for broiling, toasting, or when cooking thinner items that require closer proximity to the top heating elements.
- Lower Position: Suitable for baking larger items like roasts, casseroles, or pizzas, allowing for more even heat distribution.
5. Care and Cleaning
Regular cleaning ensures the longevity and optimal performance of your toaster oven.
5.1 Before Cleaning
- Always turn the Timer knob to OFF and unplug the appliance from the electrical outlet.
- Allow the oven to cool completely before cleaning any part.
5.2 Cleaning the Interior
- Wipe the interior walls with a damp cloth and mild liquid soap. Avoid abrasive cleaners or scouring pads, as they can damage the non-stick coating.
- For stubborn stains, a non-abrasive cleaning pad can be used with caution.
- Ensure the interior is completely dry before next use.
5.3 Cleaning the Exterior
- Wipe the exterior surfaces with a damp cloth and mild liquid soap.
- Do not use abrasive cleaners or polishes that could scratch the stainless steel finish.
- Dry thoroughly with a soft cloth.
5.4 Cleaning Accessories
- The oven rack, baking pan, and removable crumb tray can be washed in warm, soapy water.
- For baked-on food, soak the accessories in warm, soapy water before cleaning.
- Rinse thoroughly and dry completely before returning to the oven.
5.5 Removable Crumb Tray
- Pull out the crumb tray from the bottom front of the oven.
- Discard accumulated crumbs.
- Wash the tray as described in section 5.4.
- Ensure the crumb tray is reinserted correctly before operating the oven.
6. Troubleshooting
If you encounter issues with your Oster TSSTTVCG02 Toaster Oven, refer to the following common problems and solutions.
| Problem | Possible Cause | Solution |
|---|---|---|
| Oven does not turn on. | Not plugged in. Power outlet not working. Timer not set. | Ensure the power cord is securely plugged into a working electrical outlet. Check household circuit breaker. Turn the Timer knob to the desired time or "STAY ON". |
| Food is not cooking evenly. | Incorrect rack position. Overcrowding the oven. Uneven food placement. | Adjust the oven rack to the appropriate position for the food type. Cook smaller batches if necessary. Arrange food in a single layer for even cooking. Rotate food halfway through cooking. |
| Smoke or odor during operation. | Food residue inside oven. Initial burn-off (first use). Flammable materials too close. | Clean the oven interior and crumb tray thoroughly. This is normal for first use; ensure good ventilation. Ensure proper clearance around the oven and remove any flammable items. |
| Timer does not advance or bell does not ring. | Timer mechanism issue. | Ensure the timer knob is turned past 10 minutes before setting for toast. If issues persist, contact customer support. |
If the problem persists after attempting these solutions, please contact Oster customer support for further assistance.
7. Specifications
Technical details for the Oster TSSTTVCG02 6-Slice Convection Toaster Oven.
- Model Number: TSSTTVCG02
- Brand: Oster
- Capacity: Accommodates 6 slices of toast or a 12-inch pizza
- Temperature Range: 150°F - 450°F (65°C - 230°C)
- Timer: 60-minute timer with auto shut-off and bell signal, plus "Stay On" function
- Special Features: Convection technology, Removable Crumb Tray, 2 Rack Positions
- Control Type: Knob
- Power Source: Electric
- Material: Stainless Steel
- Item Weight: Approximately 7 kg 10 g
- Item Dimensions (LxWxH): 41.9 x 52.3 x 32.8 Centimeters
- UPC: 034264455542
8. Warranty and Support
For warranty information and customer support, please refer to the documentation included with your purchase or visit the official Oster website.
- Warranty: Specific warranty terms and conditions are provided with the product at the time of purchase. Please retain your proof of purchase for warranty claims.
- Customer Support: For technical assistance, troubleshooting beyond this manual, or to inquire about parts and service, please contact Oster customer service. Contact details can typically be found on the product packaging or the official brand website.


