1. Product Overview
This manual provides instructions for the Master Airbrush Cool Runner II Airbrush Kit, a comprehensive system designed for various airbrushing applications. The kit includes a high-performance air compressor, three distinct airbrush models, a set of acrylic paints, and essential cleaning tools.

Image 1.1: Complete Master Airbrush Cool Runner II Airbrush Kit.
2. Kit Components
The Master Airbrush Cool Runner II Airbrush Kit (Model Kit-SP19-40) includes the following items:
- Master Airbrush Model TC-326T Cool Runner II Air Compressor: A 1/5 HP single-piston compressor with dual cooling fans and a 3-liter air storage tank.
- Master Airbrush Model G22 Dual-Action Airbrush: Features a 1/3 oz. gravity feed fluid cup and a 0.3mm tip.
- Master Airbrush Model S68 Precision Dual-Action Siphon Feed Airbrush: Equipped with a 0.35mm tip and a 3/4 oz. siphon bottle.
- Master Airbrush Model E91 Single-Action Siphon Feed Airbrush: Includes a 0.8mm tip and two 3/4 oz. siphon bottles.
- U.S. Art Supply Primary Colors Water-Based Acrylic Airbrush Paint Set: Six 1 oz. bottles of opaque colors (bright sapphire blue, grass green, bright yellow, bright red, deep black, white), plus reducer and cleaner.
- Airbrush Cleaning Brush Set: For maintenance of airbrushes.
- 6-Foot Air Hose: With 1/8" BSP female fittings.
- How-To-Airbrush Manual & Guide Booklet: Provides initial guidance.
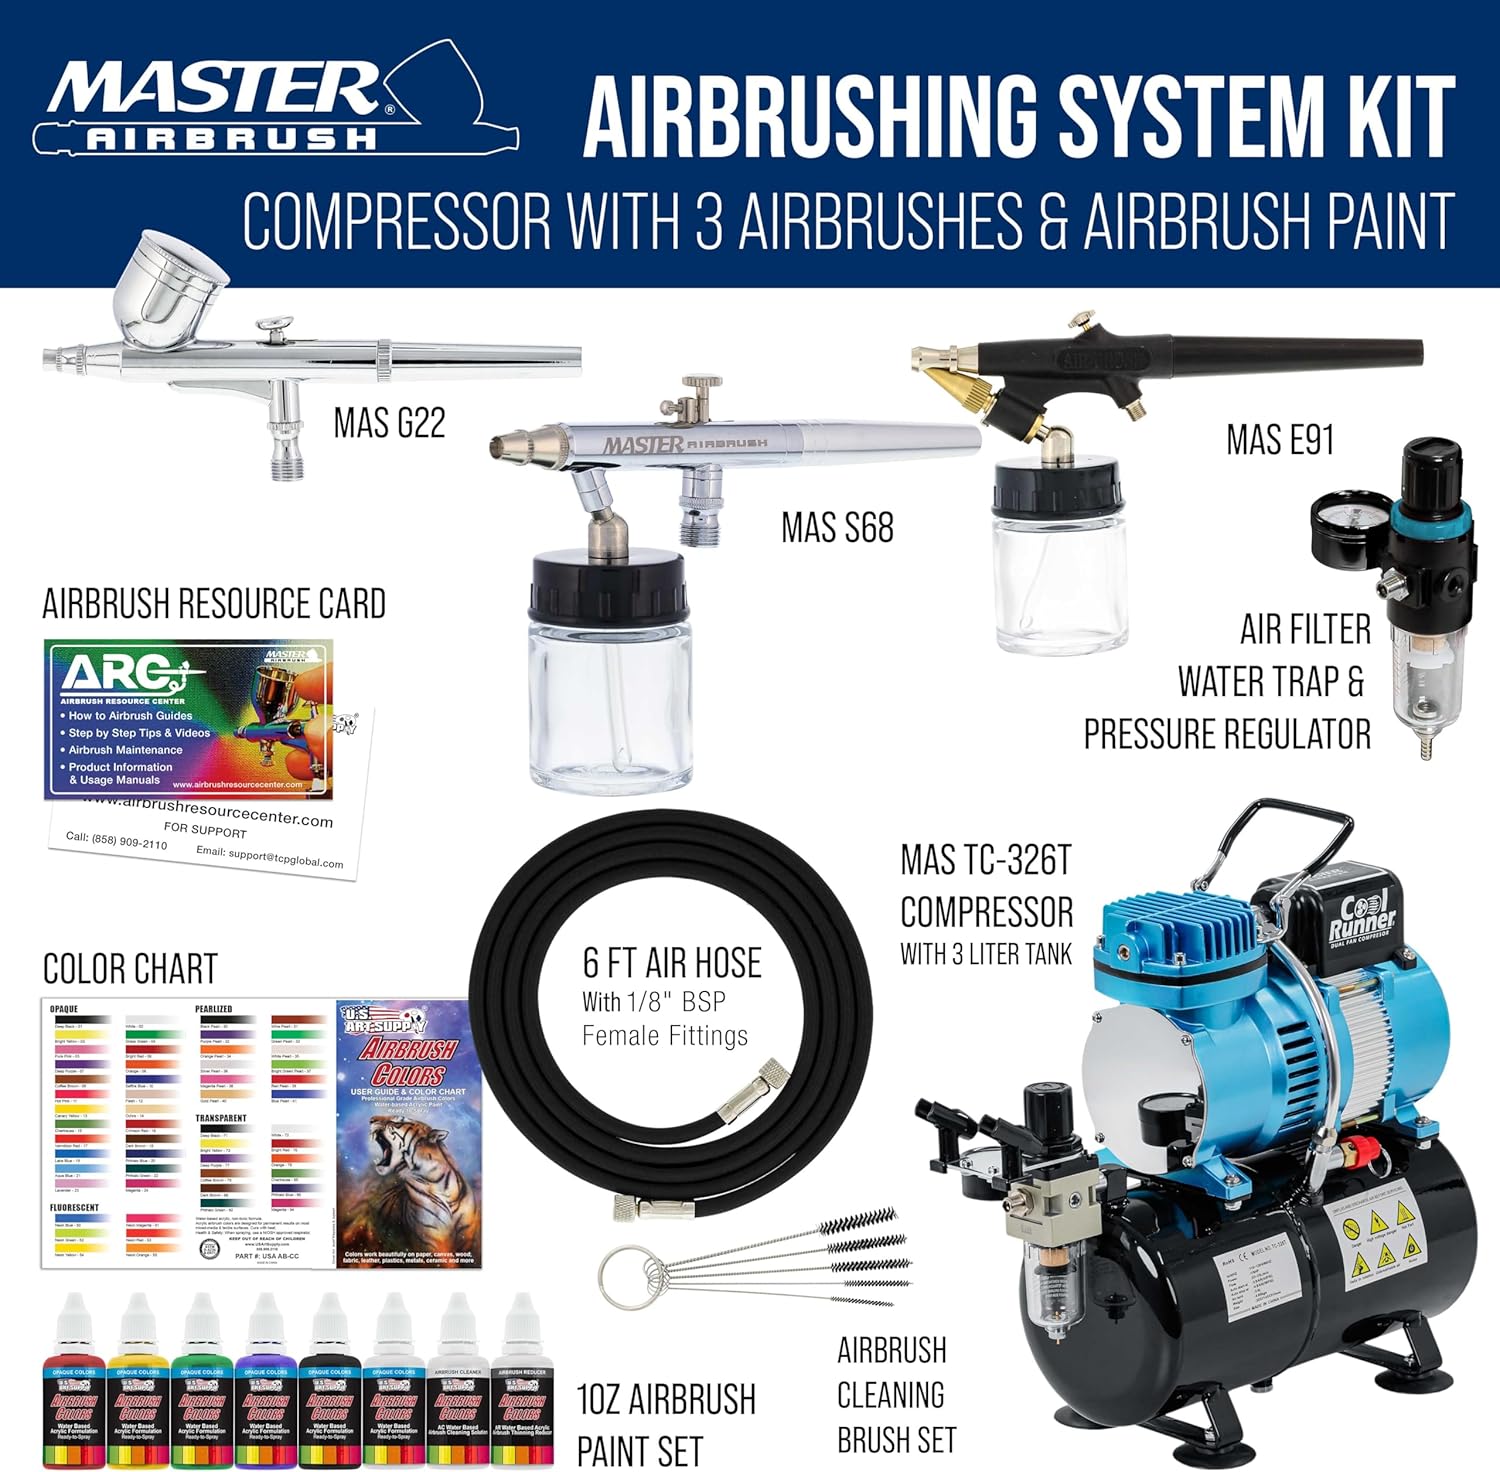
Image 2.1: Labeled components of the airbrushing system kit.
3. Setup Instructions
- Unpack Components: Carefully remove all items from the packaging and inspect for any damage.
- Position Compressor: Place the TC-326T compressor on a stable, level surface in a well-ventilated area. Ensure adequate space around the unit for airflow.
- Connect Air Hose: Attach one end of the 6-foot air hose to the air outlet on the compressor's pressure regulator. Securely fasten the other end to the desired airbrush.
- Prepare Airbrush: Depending on the airbrush model (G22, S68, or E91), attach the appropriate fluid cup or siphon bottle.
- Add Paint: Pour the desired water-based acrylic paint into the airbrush's fluid cup or siphon bottle. If necessary, thin the paint using the included reducer for optimal flow and spray consistency.
- Power On: Plug the compressor into a standard electrical outlet. Turn on the compressor using the power switch. The compressor will build pressure and then automatically shut off when the tank is full. It will restart automatically when pressure drops during use.

Image 3.1: Master Airbrush TC-326T Cool Runner II Compressor with key features.
4. Operating Instructions
Familiarize yourself with the operation of each airbrush type:
4.1. Dual-Action Airbrushes (Models G22, S68)
- Air Control: Press down on the trigger to release air.
- Paint Control: Pull back on the trigger to release paint. The further back you pull, the more paint is released.
- Spray Adjustment: Adjust the air pressure on the compressor's regulator for desired spray patterns. Practice on scrap material to achieve consistent results.
4.2. Single-Action Airbrush (Model E91)
- Air and Paint Control: Pressing the trigger releases both air and a fixed amount of paint simultaneously.
- Spray Adjustment: Paint flow is primarily controlled by adjusting the air pressure on the compressor and the paint's viscosity.
4.3. General Tips
- Always test your spray pattern and paint consistency on a test surface before applying to your project.
- Maintain a consistent distance from the surface for even coverage.
- Keep the airbrush moving to avoid paint buildup and overspray.

Image 4.1: Three types of Master Airbrushes included in the kit.
5. Maintenance
Proper maintenance ensures the longevity and optimal performance of your airbrush kit.
5.1. Airbrush Cleaning
- After Each Use: Empty any remaining paint from the fluid cup/siphon bottle. Spray airbrush cleaner through the airbrush until it sprays clear.
- Deep Cleaning: Periodically disassemble the airbrush components (needle, nozzle, cap) and clean them thoroughly using the provided cleaning brushes and airbrush cleaner. Refer to the individual airbrush manuals for detailed disassembly instructions.
- Lubrication: Apply a small amount of airbrush lubricant to the needle and trigger mechanism as needed.
5.2. Compressor Maintenance
- Drain Moisture Trap: Regularly drain any accumulated moisture from the water trap filter on the compressor.
- Air Tank Drainage: Periodically drain the 3-liter air storage tank to remove any condensation. Consult the compressor manual for specific instructions.
- Filter Inspection: Check the air filter for cleanliness and replace if necessary.
6. Troubleshooting
Common issues and their solutions:
| Problem | Possible Cause | Solution |
|---|---|---|
| No air flow | Compressor off, hose disconnected, clogged airbrush. | Check power, reconnect hose, clean airbrush. |
| Inconsistent spray / Spattering | Paint too thick, clogged nozzle, low air pressure. | Thin paint, clean nozzle, increase air pressure. |
| No paint flow | Clogged nozzle/needle, empty paint cup, air cap loose. | Clean nozzle/needle, refill paint, tighten air cap. |
| Airbrush leaks | Loose components, damaged O-rings. | Tighten parts, inspect and replace O-rings. |
7. Specifications
- Brand: Master Airbrush
- Model Number: Kit-SP19-40
- Compressor Model: TC-326T Cool Runner II
- Compressor Horsepower: 1/5 HP
- Air Tank Capacity: 3 Liters
- Air Volume: 0.8 CFM (25 Liters/Min)
- Airbrush Models Included: G22 (0.3mm tip), S68 (0.35mm tip), E91 (0.8mm tip)
- Paint Type: Water-Based Acrylic
- Item Weight: 11.8 Pounds
- Material: Metal, Plastic
- UPC: 848849016055
8. Safety Information
WARNING:
- Keep out of reach of children.
- Avoid contact with skin and eyes.
- Do not ingest.
- Always wear appropriate safety gear (e.g., gloves, eye protection, respirator) when using this product.
- Keep away from heat and open flames.
- Store in a cool, dry place.
- Always follow the manufacturer's instructions for safe use and maintenance.
9. Warranty and Support
Master Airbrush is a trusted brand dedicated to customer satisfaction. For any questions, technical support, or warranty inquiries regarding your Master Airbrush Cool Runner II Airbrush Kit, please refer to the contact information provided in the included How-To-Airbrush Manual & Guide Booklet or visit the official Master Airbrush website.


