1. Introduction
This manual provides detailed instructions for the proper installation, operation, and maintenance of your CRT Mike CB Radio. Please read this manual thoroughly before using the device to ensure optimal performance and safety. Keep this manual for future reference.
2. Package Contents
Verify that all items listed below are included in your package. If any items are missing or damaged, please contact your retailer.
- CB Radio Unit
- CB Radio Microphone
- Microphone Clip Holder
- Support Station Mount
- Power Cord
3. Product Overview
Familiarize yourself with the components of your CRT Mike CB Radio.

Figure 3.1: The CRT Mike CB Radio unit connected to its microphone. The radio unit is compact, designed for mobile or desktop use, and the microphone features an integrated display and controls.

Figure 3.2: Front view of the CRT Mike microphone, showing the display screen and primary control buttons such as MEM, FRQ, VOL-, VOL+, SC/M3, AF/M4, EMG/M1, DW/M2, and MT/SET.
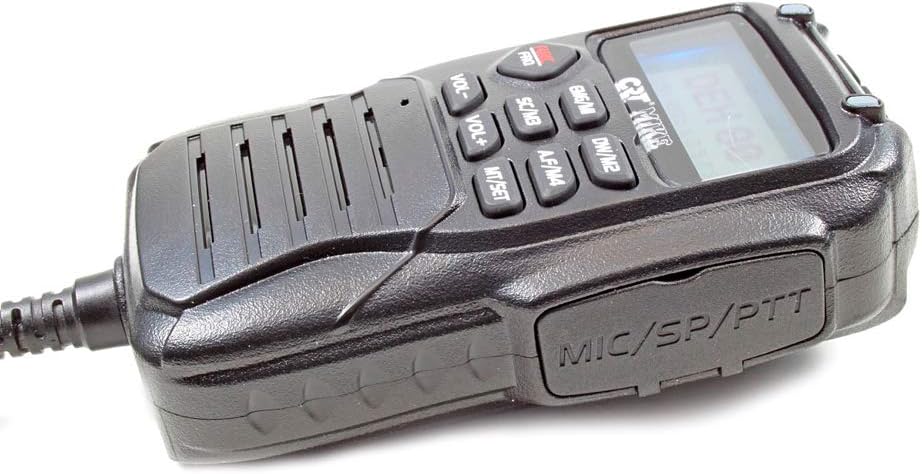
Figure 3.3: Side view of the CRT Mike microphone, highlighting the speaker grille and the MIC/SP/PTT port for external connections and the Push-To-Talk button.

Figure 3.4: Top view of the CRT Mike microphone, displaying the UP, POW (Power), and DN (Down) buttons for channel selection and power control.
4. Setup
Follow these steps to set up your CRT Mike CB Radio for first use.
- Power Connection: Connect the provided power cord to the 12V power supply input on the CB radio unit. Ensure the power source is a stable 12V DC supply.
- Antenna Connection: Connect a suitable CB antenna (not included) to the antenna port on the rear of the CB radio unit. Ensure a good quality coaxial cable is used.
- Microphone Connection: Plug the microphone cable securely into the designated microphone port on the CB radio unit.
- Mounting: Use the provided support station mount to secure the CB radio unit in a stable location. The microphone clip holder can be used to conveniently store the microphone when not in use.
5. Operating Instructions
This section details the basic and advanced functions of your CB radio.
5.1 Basic Operation
- Power On/Off: Press the 'POW' button on the top of the microphone to turn the unit on or off.
- Volume Adjustment: Use the 'VOL+' and 'VOL-' buttons on the microphone to adjust the speaker volume.
- Channel Selection: Use the 'UP' and 'DN' buttons on the top of the microphone to change channels.
- AM/FM Band Type: Press the 'AF/M4' button to switch between AM and FM broadcast bands.
- Transmit (PTT): Press and hold the Push-To-Talk (PTT) button on the side of the microphone to transmit. Release to receive.
5.2 Special Features
- ASQ - Automatic Squelch: This feature automatically adjusts the squelch level to suppress background noise. Activate or deactivate via the menu or dedicated button if available.
- Dual Watch: Allows monitoring of two channels simultaneously. Press 'DW/M2' to activate and select the second channel.
- Channel Scanning: Automatically scans through active channels. Press 'SC/M3' to initiate channel scanning.
- RF Gain: Adjusts the receiver sensitivity to optimize signal reception, especially in areas with strong or weak signals.
- Keyboard Lock: Prevents accidental changes to settings. Activate via the menu or a dedicated button.
- NB Noise Blanker and ANL (Automatic Noise Limiter): These features reduce impulse noise (e.g., from vehicle ignition systems) and continuous background noise for clearer reception.
- Multi-color Display: The display can show information in blue, purple, or orange. Use the 'COLOR' button on the microphone to cycle through display colors.
- Emergency Channel Button (9/19): Quickly switches to emergency channels 9 (for roadside assistance) or 19 (for highway information).
- Memory Channels: The unit supports 4 memory channels. Use the 'MEM' button to store and recall frequently used channels.
6. Maintenance
Proper care and maintenance will extend the life of your CB radio.
- Cleaning: Use a soft, dry cloth to clean the exterior of the unit and microphone. Do not use abrasive cleaners or solvents.
- Storage: When not in use for extended periods, store the radio in a cool, dry place away from direct sunlight and extreme temperatures.
- Connections: Periodically check all cable connections (power, antenna, microphone) to ensure they are secure and free from corrosion.
7. Troubleshooting
If you encounter issues with your CRT Mike CB Radio, refer to the following common problems and solutions.
- No Power:
- Check the power cord connection to the unit and the 12V power source.
- Ensure the power source is active and providing 12V DC.
- Verify the 'POW' button on the microphone has been pressed.
- No Reception/Poor Signal:
- Check the antenna connection. Ensure it is properly installed and tuned.
- Adjust the RF Gain control.
- Increase the volume.
- Adjust the squelch (ASQ) level. If squelch is set too high, it may block weak signals.
- Distorted Audio:
- Check microphone connection.
- Adjust volume to an appropriate level.
- Ensure NB and ANL features are correctly set for your environment.
- Buttons Unresponsive:
- Check if the Keypad Lock feature is active. Deactivate it if necessary.
- Power cycle the unit (turn off and on again).
8. Specifications
Detailed technical specifications for the CRT Mike CB Radio.
| Feature | Specification |
|---|---|
| Frequency Range | 26.965 - 27.405 MHz |
| Broadcast Band Type | AM-FM |
| Channels | 40 |
| Power Supply | 12 V DC |
| Emission Power | 4W |
| Speaker Power | 2W |
| Max Absorbed Current | 1.3A |
| Station Dimensions (L x H x D) | 110 x 140 x 29 mm |
| Microphone Dimensions (L x H x D) | 405 x 63 x 30 mm |
| Item Weight | 880 Grams |
| Display Type | Multi-color (blue / purple / orange) |
| Special Features | Dual Watch, Channel Scanning, RF Gain, ASQ, Keypad Lock, NB Noise Blanker, ANL, Emergency Channel 9/19, 4 Channel Memory |
| Material Type | Mixed materials |
9. Warranty and Support
Your CRT Mike CB Radio is covered by a manufacturer's warranty.
- Warranty Period: This product comes with a 2-year warranty from the date of purchase. Please retain your proof of purchase for warranty claims.
- Support: For technical assistance, troubleshooting beyond this manual, or warranty service, please contact your authorized CRT dealer or the manufacturer's customer support. Refer to the product packaging or CRT's official website for contact information.


