
BAOFENG UV-82HP
Contents
BAOFENG UV-82HP High Power Dual Band Radio User Manual
Model: UV-82HP | Brand: BAOFENG
Product Overview
The BAOFENG UV-82HP is a high-power dual-band radio designed for amateur (Ham) and general use. It offers versatile communication capabilities across VHF (136-174 MHz) and UHF (400-520 MHz) frequency ranges with selectable high, medium, and low power settings (7W/4W/1W).
Key features include:
- High / Med / Low Power Settings (7W/4W/1W)
- Frequency Range: VHF: 136-174 MHz (Rx/Tx), UHF: 400-520 MHz (Rx/Tx)
- Broad (Wide) / Narrowband (Narrow) Selectable
- VOX Talk Around Mode
- Busy Channel Lock-Out (BCLO)
- Transmission Time Out
- Channel Receive Only (TX OFF)
- Frequency Reverse
- Squelch Tail Elimination (STE)
- Work Mode (Selectable VFO/ Menu Lockout)
- Alpha Numeric Channel Storage
- PC Programmable (PC03 FTDI Cable recommended for CHIRP Software)
Package Contents
Your BAOFENG UV-82HP package includes the following items:
- UV-82HP Radio Unit
- 1800mAh Battery
- V85 Dual Band Antenna
- CH-8 Charger Cradle
- CH-8 110V AC Adapter
- Earpiece Kit
- Wrist Strap
- Belt Clip
- User Manual

Figure 1: Complete package contents of the UV-82HP radio.
Setup Guide
1. Battery Installation
- Align the battery pack with the grooves on the back of the radio unit.
- Slide the battery upwards until it clicks securely into place.
- To remove, press the battery release latch (located at the bottom of the battery compartment) and slide the battery downwards.

Figure 2: Rear view of the radio with the battery removed, highlighting the battery contacts.
2. Antenna Attachment
- Locate the antenna connector on the top of the radio.
- Screw the V85 Dual Band Antenna clockwise onto the connector until it is finger-tight. Do not overtighten.
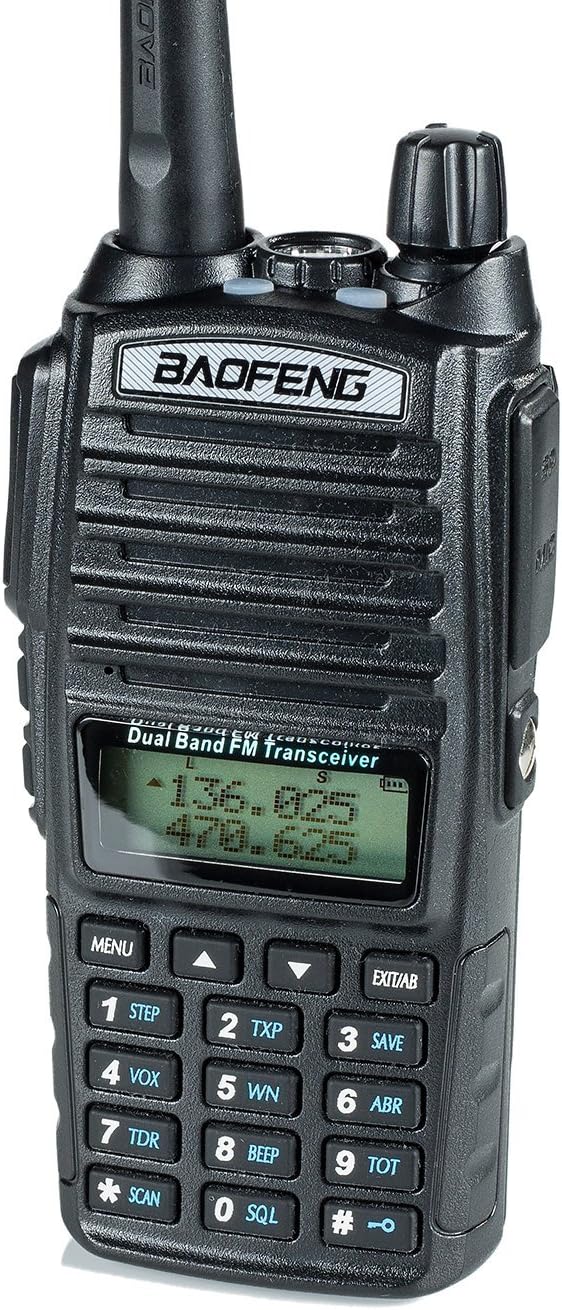
Figure 3: Front view of the UV-82HP radio with antenna attached.
3. Charging the Battery
- Connect the CH-8 110V AC Adapter to the CH-8 Charger Cradle.
- Plug the AC adapter into a standard wall outlet.
- Place the radio with the installed battery into the charger cradle. Ensure the charging contacts align.
- The indicator light on the charger will show the charging status (typically red for charging, green for fully charged).

Figure 4: Radio unit in the charging cradle.
4. PC Programming
The UV-82HP is PC programmable, allowing for advanced customization of channels and settings. The PC03 FTDI Cable is recommended for easy computer programming using CHIRP Software. Refer to the CHIRP software documentation for detailed programming instructions.
Operating Instructions
1. Power On/Off and Volume Control
To power on the radio, rotate the top knob clockwise. Continue rotating to increase the volume. Rotate counter-clockwise to decrease volume and power off the unit.

Figure 5: Top view of the radio, highlighting the power/volume knob.
2. Dual Band Operation (A/B Buttons)
The UV-82HP features dual-band FM transceiver capabilities, allowing you to monitor two different frequencies simultaneously. The 'A' and 'B' buttons on the side of the radio correspond to the upper and lower display frequencies, respectively. Pressing 'A' will set the upper frequency as the primary transmit frequency, while pressing 'B' will set the lower frequency as the primary transmit frequency. This allows you to listen to both bands but transmit on a selected one.

Figure 6: Side view of the radio with A/B buttons.
3. Push-to-Talk (PTT) and Accessory Ports
The large button on the side of the radio is the Push-to-Talk (PTT) button. Press and hold this button to transmit on the selected frequency. Release to receive. The radio also features a two-pin Kenwood connection port for accessories such as headsets or external microphones, located under a protective cover on the side.

Figure 7: Side view of the radio showing the PTT button and accessory ports.
4. Flashlight and FM Radio Function
The UV-82HP includes a built-in flashlight and an FM radio function. Press the 'M' button on the side to activate the flashlight. Press the 'F' button to switch to FM radio mode, allowing you to listen to local FM broadcasts.
Maintenance
General Care
- Keep the radio clean by wiping it with a soft, damp cloth. Avoid harsh chemicals.
- While the radio has a "Waterproof" rating in specifications, it is generally advised to protect it from excessive moisture to ensure longevity.
- Store the radio in a cool, dry place when not in use.
Battery Care
- Charge the battery fully before first use.
- Avoid overcharging or completely draining the battery to prolong its lifespan.
- If storing for extended periods, charge the battery to about 50% and remove it from the radio.
Troubleshooting
Radio Does Not Power On
- Ensure the battery is properly installed and fully charged.
- Verify the power/volume knob is rotated clockwise sufficiently to turn on the unit.
- If the issue persists, try using a different battery if available, or ensure the charger is functioning correctly.
Programming Issues with CHIRP Software
- Ensure you are using a genuine PC03 FTDI Cable, as some generic cables may cause connectivity issues.
- Install the correct drivers for your programming cable.
- Try restarting the CHIRP software and reconnecting the radio.
- Verify the radio is powered on and in the correct mode for programming.
Specifications
| Feature | Detail |
|---|---|
| Brand | BAOFENG |
| Model Number | UV-82HP |
| Product Dimensions | 2.5 x 8.1 x 7 inches (2.5"D x 7"W x 8.1"H) |
| Item Weight | 1.17 pounds |
| Batteries | 1 Lithium Ion battery required (included) |
| Number of Channels | 128 |
| Frequency Range | 136 - 174 MHz (VHF), 400 - 520 MHz (UHF) |
| Talking Range Maximum | 60 Mile (theoretical, depends on conditions) |
| Tuner Technology | UHF, VHF |
| Voltage | 8.4 Volts |
| Water Resistance Level | Waterproof (as per specifications, refer to manual for limitations) |
| Special Features | VOX Talk Around Mode, Battery Saver Mode, Flashlight |
| Date First Available | June 8, 2015 |
Warranty and Support
BAOFENG products, including the UV-82HP, are supported by BTECH in the USA. This ensures access to local support and warranty services. BTECH specializes in engineering and developing radio products, providing dedicated focus on quality and customer assistance.
For support inquiries, please refer to the contact information provided in your product's user manual or visit the official BTECH website.
Documents and downloads
Ask a question about this manual
Ask about setup, troubleshooting, compatibility, parts, safety, or missing instructions. Manuals+ will review the question and use this page’s manual context to help answer it.