1. Product Overview
The VILTROX JY-120-C1 is a wireless remote shutter release system designed to operate your camera remotely, minimizing camera shake and enhancing image sharpness. It utilizes a 2.4MHz frequency for reliable wireless control and features a low power consumption design for extended use.
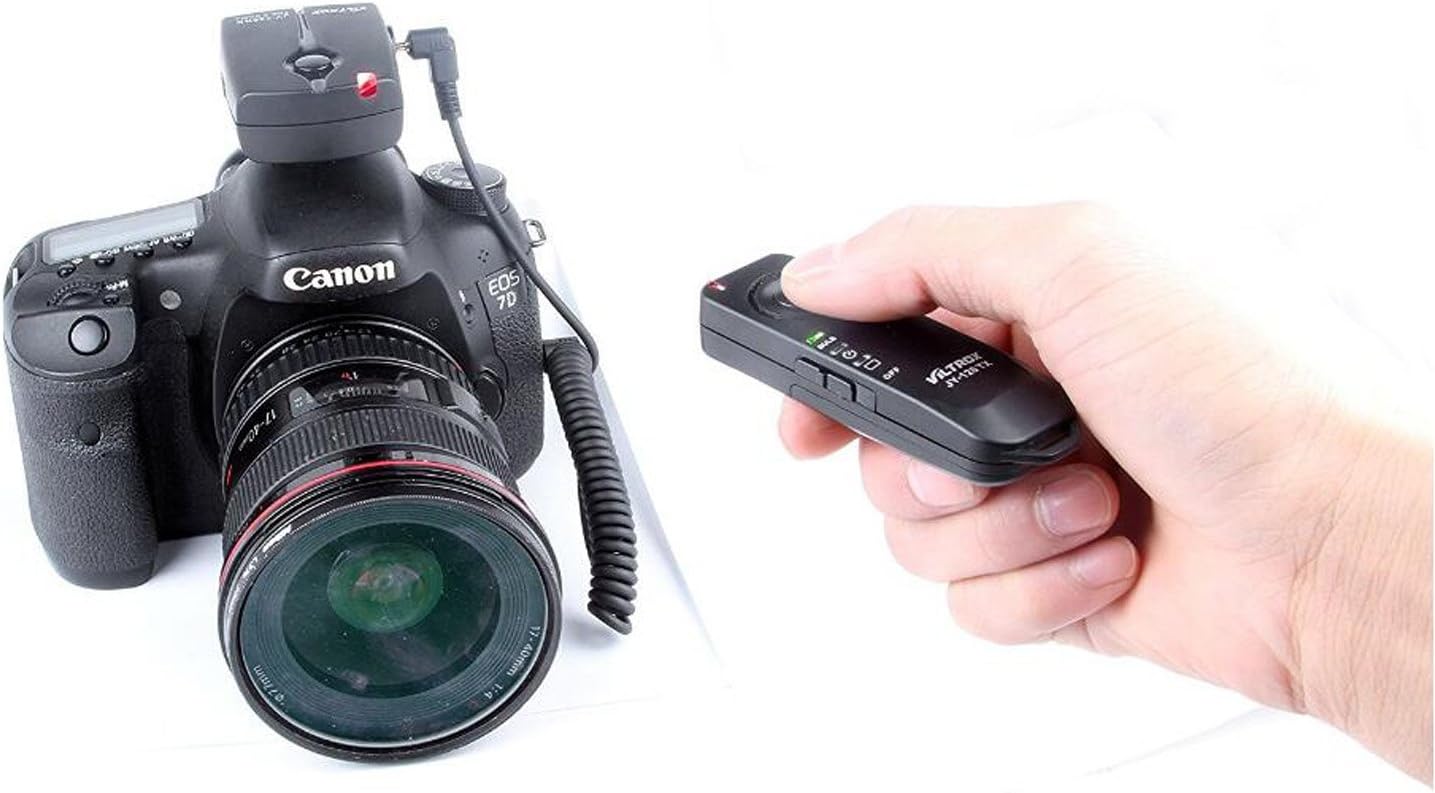
Image: The VILTROX JY-120-C1 wireless remote shutter release system, showing the receiver mounted on a Canon EOS camera and the transmitter held in a user's hand.
2. Package Contents
- 1 x Transmitter (JY-120 TX)
- 1 x Receiver (JY-120 RX)
- 1 x Camera Connection Cable
- User Manual (this document)
3. Components Identification
3.1. Transmitter (JY-120 TX)
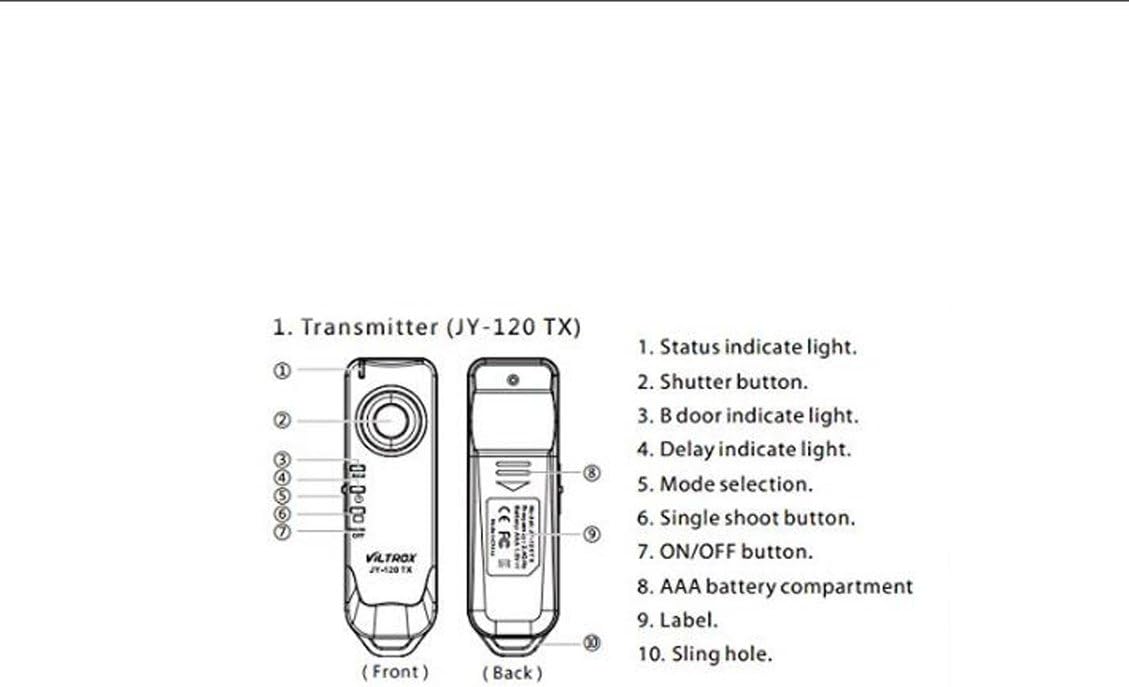
Image: Diagram illustrating the front and back views of the JY-120 TX Transmitter with numbered components.
- Status Indicator Light
- Shutter Button (two-stage: focus/shutter)
- Bulb Mode Indicator Light
- Delay Indicator Light
- Mode Selection Switch
- Single Shoot Button
- ON/OFF Button
- AAA Battery Compartment
- Label
- Sling Hole
3.2. Receiver (JY-120 RX)
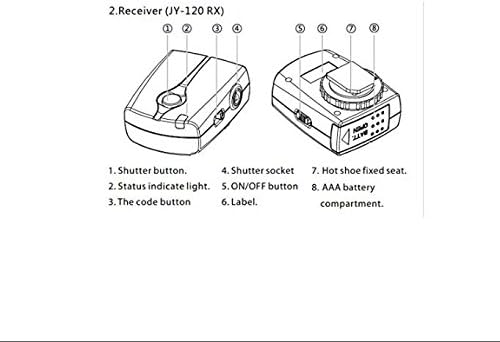
Image: Diagram illustrating the top and side views of the JY-120 RX Receiver with numbered components.
- Shutter Button (manual trigger)
- Status Indicator Light
- Code Button (for pairing)
- Shutter Socket (for camera connection cable)
- ON/OFF Button
- Label
- Hot Shoe Fixed Seat
- AAA Battery Compartment
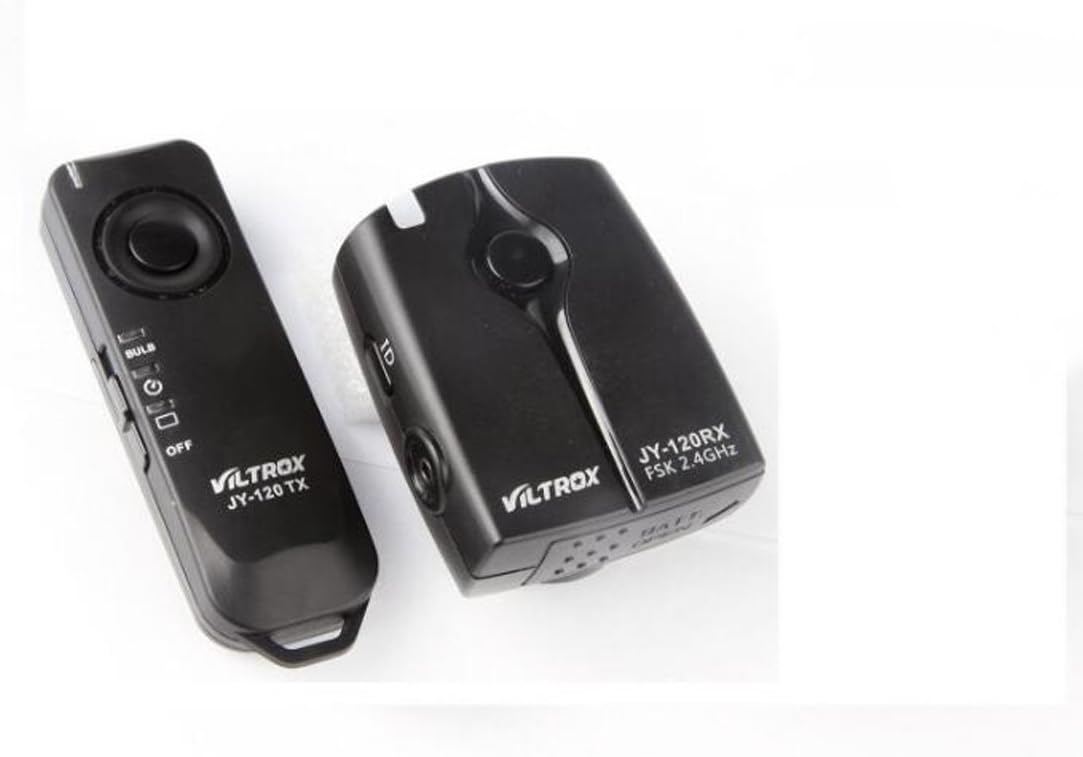
Image: The VILTROX JY-120 TX Transmitter and JY-120 RX Receiver shown together.
4. Setup
4.1. Battery Installation
The Transmitter (JY-120 TX) requires 1x AAA 1.5V battery. The Receiver (JY-120 RX) requires 2x AAA 1.5V batteries.
- Open the battery compartment cover on both the Transmitter and Receiver.
- Insert the AAA batteries according to the polarity indicators (+/-) inside the compartments.
- Close the battery compartment covers securely.
4.2. Connecting to Camera
- Mount the Receiver (JY-120 RX) onto your camera's hot shoe. Use the hot shoe fixed seat (7) to secure it.
- Connect one end of the provided camera connection cable to the Shutter Socket (4) on the Receiver.
- Connect the other end of the cable to your camera's remote control terminal.

Image: The VILTROX JY-120-C1 receiver attached to a Canon EOS camera, demonstrating the setup.
4.3. Pairing (Code Setting)
The Transmitter and Receiver are typically pre-paired. If interference occurs or if you are using multiple units, you may need to re-pair them.
- Ensure both the Transmitter and Receiver are powered OFF.
- Turn ON the Receiver (JY-120 RX) using its ON/OFF button (5). The Status Indicator Light (2) will flash green.
- Within 30 seconds of powering on the Receiver, press and hold the Code Button (3) on the Receiver. The Status Indicator Light will change to alternating red and green flashes.
- While the Receiver's light is flashing red/green, turn ON the Transmitter (JY-120 TX) using its ON/OFF button (7) and press its Shutter Button (2).
- After approximately 3-5 seconds, the Receiver's Status Indicator Light will change to a flashing orange, indicating successful pairing.
5. Operating Instructions
5.1. Basic Shutter Release
- Ensure both Transmitter and Receiver are powered ON and paired.
- Press the Shutter Button (2) on the Transmitter halfway down to activate autofocus. The Transmitter's Status Indicator Light (1) will turn green.
- Press the Shutter Button (2) fully down to trigger the camera's shutter. The Transmitter's Status Indicator Light will turn orange.
5.2. Mode Selection (Transmitter)
The Transmitter (JY-120 TX) features a Mode Selection Switch (5) to choose between different shooting modes:
- Single Shot Mode: For taking a single photo with each full press of the shutter button.
- Continuous Shooting Mode: For taking multiple photos as long as the shutter button is held down. (Camera must also be set to continuous shooting mode).
- Bulb Mode: For long exposure photography.
- Set your camera to Bulb mode.
- Set the Transmitter's Mode Selection Switch (5) to the "Bulb" position.
- Press the Shutter Button (2) fully down once to open the shutter. The Bulb Mode Indicator Light (3) will illuminate.
- Press the Shutter Button (2) fully down again to close the shutter.
- 2-Second Delay Mode: For a delayed shutter release.
- Set the Transmitter's Mode Selection Switch (5) to the "2S" position.
- Press the Shutter Button (2) fully down. The Delay Indicator Light (4) will illuminate, and the shutter will trigger after 2 seconds.

Image: A detailed view of the VILTROX JY-120 TX Transmitter, highlighting its controls.
6. Maintenance
- Keep the device dry. Do not expose it to water or high humidity.
- Clean the device with a soft, dry cloth. Do not use strong detergents or solvents.
- Avoid dropping or subjecting the device to strong impacts.
- Remove batteries if the device will not be used for an extended period to prevent leakage.
- Store in a cool, dry place away from direct sunlight.
7. Troubleshooting
| Problem | Possible Cause | Solution |
|---|---|---|
| Device does not power on. | Batteries are dead or incorrectly installed. | Check battery polarity and replace with fresh AAA batteries. |
| Shutter does not trigger. |
|
|
| Interference with other devices. | Frequency conflict. | Re-pair the units to reset the communication code. |
8. Specifications
| Feature | Detail |
|---|---|
| Working Frequency | 2449.86 MHz |
| Transmitter Battery | 1x AAA 1.5V |
| Receiver Battery | 2x AAA 1.5V |
| Transmitter Size (L x W x H) | 85 x 26 x 16 mm |
| Receiver Size (L x W x H) | 60 x 47 x 35 mm |
| Battery Life | Supports approx. 1000 launches within normal range |
| Transmitting Distance | Approx. 100 meters (under open and uninvolved environment) |
| Transmitter Weight | 16g (excluding battery) |
| Receiver Weight | 34g (excluding batteries) |
| Compatible Cameras | Canon EOS 1100D, 1000D, 650D, 600D, 550D, 500D, 450D, 400D, 350D, 300D, 60D, 60Da, 70D, 700D, 100D, 1200D, 760D, T6s, T6i, T5i, T3i, T5, T3 (and others compatible with C1 type remote) |

Image: A table detailing the technical specifications of the VILTROX JY-120-C1.
9. Warranty and Support
For warranty information and technical support, please refer to the official VILTROX website or contact your local distributor. Keep your purchase receipt as proof of purchase.
Official VILTROX Store: VILTROX Official Store


