1. Introduction
The Intel NUC Kit NUC5PPYH is a compact, barebones mini PC designed for various computing needs. This kit provides the foundation for a complete system, allowing users to customize memory and storage components. Its small form factor integrates a quad-core Intel Pentium processor, offering performance suitable for everyday tasks, entertainment, and productivity in a space-saving design.
2. Package Contents
Verify that all items are present in the package before proceeding with installation.
- Intel NUC Kit NUC5PPYH Chassis
- Power Adapter with regional plugs
- VESA Mounting Bracket with screws
- Integrated Fan and Heat Sink (pre-installed)
3. Product Overview
The NUC5PPYH features a robust set of connectivity options and internal expansion capabilities within its compact chassis. Key features include 802.11ac Wireless, Intel HD Graphics, and support for DDR3L SODIMM memory.

Figure 3.1: Intel NUC Kit NUC5PPYH. This image displays the overall compact design of the NUC unit.
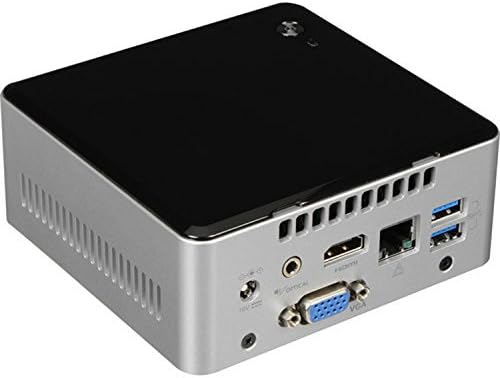
Figure 3.2: Rear Panel Connectivity. Features include HDMI 1.4b, VGA, Gigabit Ethernet, two USB 3.0 ports, and a TOSLINK audio jack.
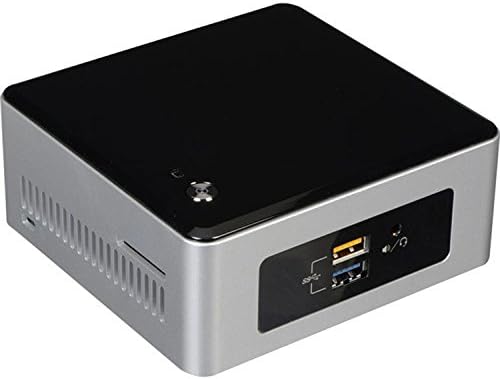
Figure 3.3: Front Panel Connectivity. Includes two USB 3.0 ports (one with fast charging), a 3.5mm audio jack, and a consumer infrared sensor.
4. Setup
4.1 Installing Memory (RAM)
- Unscrew the four bottom screws and remove the bottom cover of the NUC chassis.
- Locate the DDR3L SODIMM slots on the motherboard.
- Align the notch on the SODIMM module with the notch in the slot.
- Insert the SODIMM module at a 45-degree angle and push down until the clips on both sides snap into place.
- Repeat for the second SODIMM module if installing two.
4.2 Installing a 2.5-inch SSD or HDD
- With the bottom cover removed, locate the 2.5-inch drive bay and SATA connector.
- Gently slide the 2.5-inch SSD or HDD into the drive bay, ensuring it connects securely to the SATA data and power connector.
- Secure the drive with the provided screws, if applicable, to the drive caddy.
4.3 Reassembling the NUC
- Carefully replace the bottom cover, aligning it with the chassis.
- Secure the bottom cover with the four screws removed earlier.
4.4 Initial Power On and Operating System Installation
Connect the power adapter, a display via HDMI or VGA, and a USB keyboard/mouse. Power on the NUC. You will need to install an operating system (OS) such as Windows 10 or a Linux distribution. For Windows 7 installation, specific USB 3.0 drivers may need to be integrated into the installation media due to the NUC's exclusive USB 3.0 ports.
5. Operating Instructions
5.1 Powering On/Off
- Power On: Press the power button located on the top panel of the NUC.
- Power Off: Use the operating system's shutdown function. Alternatively, press and hold the power button for 4 seconds to force a shutdown (use only when necessary).
5.2 Connecting Peripherals
Utilize the available USB 3.0 ports for keyboards, mice, and other USB devices. Connect displays via the HDMI or VGA ports. Audio can be output through HDMI, the 3.5mm audio jack, or the TOSLINK optical audio port.
6. Maintenance
6.1 Cleaning
Regularly clean the exterior of the NUC with a soft, dry cloth. Ensure ventilation openings are free from dust and obstructions to maintain optimal airflow and cooling performance.
6.2 Firmware and Driver Updates
Periodically check the official Intel support website for the NUC5PPYH model for the latest BIOS firmware and driver updates. Keeping these components updated ensures system stability, performance, and compatibility.
7. Troubleshooting
- No Display Output: Ensure the display cable (HDMI or VGA) is securely connected to both the NUC and the monitor. Verify the monitor is set to the correct input source.
- Operating System Installation Issues (Windows 7): The NUC5PPYH features only USB 3.0 ports. Windows 7 installation media may require integrated USB 3.0 drivers to recognize USB peripherals (keyboard/mouse) during setup. Refer to Intel's support resources for specific tools or instructions.
- Wireless Connectivity Problems: Ensure Wi-Fi drivers are installed. If experiencing interference with wireless keyboards/mice, try using a USB extension cable for the wireless dongle to move it away from the NUC chassis.
- Excessive Fan Noise: Ensure the NUC's ventilation openings are clear. Update BIOS firmware, as fan control algorithms are often improved. If the issue persists, contact Intel support.
- System Not Powering On: Verify the power adapter is correctly connected to both the NUC and a working power outlet. Test with a different power outlet if possible.
8. Specifications
| Feature | Specification |
|---|---|
| Model Number | NUC5PPYH |
| Processor | Intel Pentium (Quad-core, 2.4 GHz) |
| Graphics | Intel HD Graphics (Integrated) |
| Memory Type | DDR3L SODIMM, 1.35V |
| Memory Speed | 1333/1600 MHz |
| Max Memory | 8GB |
| Storage Support | Internal 2.5" HDD or SSD (ATA-4 interface) |
| Video Output | HDMI 1.4b, VGA |
| Max Resolution | 3840x2160 (HDMI) |
| USB Ports | 4x USB 3.0 (2 front, 2 rear) |
| Wireless | 802.11ac, Bluetooth 4.0 |
| Audio Output | 3.5mm Headphone/Microphone, TOSLINK Optical |
| Network | Gigabit Ethernet |
| Dimensions (LxWxH) | 5.39 x 4.92 x 4.52 inches |
| Item Weight | 2.57 pounds |
9. Warranty and Support
The Intel NUC Kit NUC5PPYH is covered by Intel's standard warranty. For detailed warranty information, technical support, driver downloads, and troubleshooting resources, please visit the official Intel support website. Keep your proof of purchase for warranty claims.
Online Support: Intel NUC Support


