Rolls PM55 Personal Monitor Amp User Manual
Model: PM55
1. Introduction
The Rolls PM55 Personal Monitor Amp is a versatile device designed to provide musicians and performers with a personal monitoring solution. It allows you to hear your own microphone signal combined with a monitor or guide track, delivering the mix directly to your headphones. This manual provides essential information for the safe and effective use of your PM55 unit.
2. Safety Instructions
- Power Source: Use only the specified AC adapter or a 9V battery. Ensure the power source matches the unit's requirements.
- Water and Moisture: Do not expose the unit to rain, moisture, or extreme humidity. Avoid placing liquid-filled objects on or near the unit.
- Heat: Keep the unit away from heat sources such as radiators, heat registers, stoves, or other heat-producing appliances.
- Ventilation: Do not block any ventilation openings. Ensure proper airflow around the unit.
- Servicing: Do not attempt to service this product yourself. Refer all servicing to qualified service personnel.
- Cleaning: Clean only with a dry cloth. Do not use liquid cleaners or aerosol cleaners.
- Hearing Protection: Prolonged exposure to high volume levels can cause permanent hearing damage. Always set volume levels to a comfortable listening level.
3. Package Contents
Upon unpacking your Rolls PM55 Personal Monitor Amp, please ensure all items are present:
- 1 x Rolls PM55 Personal Monitor Amp
- 1 x AC Power Adapter (if included with your specific package)
4. Product Overview
The PM55 features a compact design with intuitive controls for easy operation. Below are images illustrating the unit's front/top and rear panels with their respective controls and connections.

Figure 1: Front and Top View of the Rolls PM55 Personal Monitor Amp. This image displays the main controls and headphone outputs. On the top panel, from left to right, are the 'MIC THRU' and 'MIC IN' XLR connectors, 'Lift gnd' switch, 'ROLLS' branding, 'MONITOR IN' 1/4-inch input, and 'ster mon' switch. The front panel features the 'PHONES' 1/4-inch and 3.5mm headphone jacks, 'pwr' indicator LED, 'MIC LEVEL' control knob, and 'MONITOR LEVEL' control knob. The 'POWER' switch and 'BATTERY' compartment are visible on the left side.
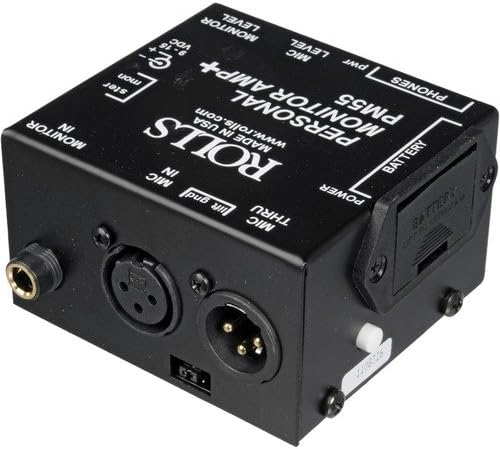
Figure 2: Rear and Side View of the Rolls PM55 Personal Monitor Amp. This image shows the rear panel connections and the battery compartment. The rear panel includes the 'MONITOR LEVEL' and 'MIC LEVEL' labels, the '9-15 VDC' power input jack, and the 'ster mon' switch. The 'MIC IN' and 'MIC THRU' XLR connectors are clearly visible, along with the 'Lift gnd' switch. The battery compartment is open on the side, revealing the battery slot.
5. Setup
Follow these steps to set up your PM55 Personal Monitor Amp:
- Power Connection:
- AC Power: Connect the included AC power adapter to the '9-15 VDC' input jack on the rear panel and plug it into a standard electrical outlet.
- Battery Power: If using battery power, open the battery compartment on the side of the unit and insert a fresh 9V battery, observing correct polarity.
- Microphone Connection: Connect your microphone's XLR cable to the 'MIC IN' XLR input on the top panel. If you need to pass the microphone signal to a mixer or other device, connect an XLR cable from the 'MIC THRU' output to that device.
- Monitor Input Connection: Connect the monitor feed (e.g., from a mixer's auxiliary send) to the 'MONITOR IN' 1/4-inch input jack on the top panel.
- Headphone Connection: Plug your headphones into either the 1/4-inch or 3.5mm 'PHONES' output jack on the front panel.
6. Operating Instructions
Once the unit is set up, follow these steps for operation:
- Power On: Flip the 'POWER' switch to the ON position. The 'pwr' indicator LED on the front panel should illuminate.
- Adjust Mic Level: Slowly turn the 'MIC LEVEL' control knob clockwise to increase the volume of your microphone in your headphones. Adjust to a comfortable level.
- Adjust Monitor Level: Slowly turn the 'MONITOR LEVEL' control knob clockwise to increase the volume of the monitor feed in your headphones. Adjust to blend with your microphone signal.
- 'Lift gnd' Switch: This switch helps eliminate hum or buzz caused by ground loops. If you experience hum, try flipping this switch to the 'Lift' position.
- 'ster mon' Switch: This switch determines how the monitor input is handled. In 'ster' (stereo) mode, a stereo signal will be heard in stereo. In 'mon' (mono) mode, a stereo signal will be summed to mono, or a mono signal will be sent to both ears.
- Optimal Mix: Experiment with the 'MIC LEVEL' and 'MONITOR LEVEL' controls to achieve your desired personal mix.
7. Maintenance
- Cleaning: Disconnect the unit from power before cleaning. Use a soft, dry cloth to wipe the exterior. Avoid abrasive cleaners or solvents.
- Battery Replacement: If using battery power and the 'pwr' LED dims or the audio quality degrades, replace the 9V battery. Ensure the unit is powered off before opening the battery compartment.
- Storage: When not in use for extended periods, store the unit in a cool, dry place. Remove the battery if storing for a long time to prevent leakage.
8. Troubleshooting
| Problem | Possible Cause | Solution |
|---|---|---|
| No sound in headphones | Unit not powered on; low battery; incorrect connections; volume knobs at minimum. | Ensure power is on and 'pwr' LED is lit. Replace battery if needed. Check all cable connections. Increase 'MIC LEVEL' and 'MONITOR LEVEL' knobs. |
| Hum or buzz in audio | Ground loop; faulty cable; interference. | Flip the 'Lift gnd' switch. Try different cables. Ensure power supply is stable. |
| Distorted sound | Input signal too high; headphone impedance mismatch; faulty headphones. | Reduce input signal level from microphone or monitor source. Try different headphones. |
| Microphone not heard | Microphone not connected to 'MIC IN'; 'MIC LEVEL' too low; faulty microphone/cable. | Ensure microphone is connected to 'MIC IN'. Increase 'MIC LEVEL'. Test with a different microphone or cable. |
| Monitor signal not heard | Monitor source not connected to 'MONITOR IN'; 'MONITOR LEVEL' too low; no signal from source. | Ensure monitor source is connected to 'MONITOR IN'. Increase 'MONITOR LEVEL'. Verify signal output from the monitor source. |
9. Specifications
| Feature | Detail |
|---|---|
| Model Name | PM55 |
| Connectivity Technology | Wired |
| Included Components | 1 x Personal Amplifier |
| Material | Metal, Plastic |
| Specific Uses For Product | Music |
| Recommended Uses For Product | Gaming, Music, Recording |
| Compatible Devices | Music Production Equipment, Microphones, Mixers, Amplifiers, Headphones |
| Control Type | Volume Control |
| Cable Feature | Without Cable |
| Number of Items | 1 |
| Controller Type | Push Button |
| Number of Power Levels | 2 |
| UPC | 639476429291 |
| Special Feature | Lightweight |
| Manufacturer | Rolls |
| Package Dimensions | 9.96 x 7.32 x 4.33 inches |
| Item Weight | 1.6 pounds |
| Item model number | PM55-1 |
| Date First Available | May 11, 2015 |
| Brand | Rolls |
| Color | Black |
| Headphones Jack | 3.5 mm Jack, 1/4 inch Jack |
10. Warranty Information
Warranty information for the Rolls PM55 Personal Monitor Amp is typically provided with the product packaging or can be found on the official Rolls website. Please refer to these resources for details regarding warranty coverage, terms, and conditions.
11. Support
For further assistance, technical support, or inquiries regarding your Rolls PM55 Personal Monitor Amp, please visit the official Rolls website or contact their customer service department. Contact information and support resources are usually available on the manufacturer's website.


