WarmlyYours Ember Glass 800W Radiant Panel Heater (24 x 47 in., Black)
Model: IP-EM-GLS-BLK-0800
1. Introduction
The WarmlyYours Ember Radiant Panel Heater provides efficient infrared heating for indoor spaces. Unlike traditional convection heaters that warm the air, this panel directly heats surfaces and objects, allowing for longer-lasting and more even warmth. This method results in a comfortable feeling even at lower ambient air temperatures. The Ember panel can serve as a primary or supplementary heating source and is designed for wall or ceiling mounting.
Key features include:
- Ultra-Efficient Infrared Heating: Delivers 99% infrared efficiency, directly warming people and objects.
- Sleek Glass Panel Design: Modern Glass Black finish with a slim 0.98-inch profile for wall installation.
- Whisper-Quiet & Allergy-Friendly: Operates silently with no moving parts, preventing dust and allergen circulation.
- Flexible Setup: Can be used as a plug-in unit or hardwired for a seamless look.
- Safe & Certified: cTUVus certified for safety, with an average surface temperature of 194°F and a 248°F safety limit.
2. Safety Information
Please read and understand all safety instructions before installing or operating this heater. Failure to follow these instructions may result in electric shock, fire, property damage, or personal injury.
- Always ensure the heater is properly grounded.
- Do not cover the heater while it is in operation.
- Keep flammable materials (e.g., furniture, curtains, bedding) at least 3 feet (0.9 meters) from the front of the heater.
- Do not operate any heater with a damaged cord or plug, or after the heater malfunctions or has been dropped or damaged in any manner.
- Do not use outdoors. This heater is intended for indoor use only.
- The heater's surface can become hot. Keep children and pets away from the heater to avoid burns.
- Ensure the electrical supply matches the voltage requirements of the heater (120 Volts).
- For hardwired installations, consult a qualified electrician.
3. Package Contents
Verify that all components are present before beginning installation:
- WarmlyYours Ember Glass Radiant Panel Heater (24 x 47 in., Black)
- Installation Template
- Mounting Hardware (screws, wall anchors)
- Felt Pads with Self-Adhesive Backing
- Power Cord (9-foot, with removable plastic cover for plug)
4. Setup and Installation
This section provides detailed instructions for mounting your Ember Radiant Panel Heater. Ensure you have basic tools such as a hammer, drill, level, and pencil.
4.1. Planning the Installation
Determine the desired location for your heater on the wall. The installation template is the same size as the unit, allowing you to visualize its appearance. Note the position of the power connection box on the template, as this is where the power cord will exit.
4.2. Using the Installation Template
- Attach the installation template to the wall using the self-adhesive stickers on its back.
- Use a level to ensure the template is perfectly horizontal or vertical, depending on your desired orientation. Secure one end with tape, adjust the other end until level, and then secure it.
- Identify the correct mounting holes on the template based on your desired orientation (vertical or horizontal). For vertical mounting, use the green holes. For horizontal mounting, use the yellow holes.
- Using one of the provided screws, gently tap through the center of each marked hole on the template with a hammer to create a small indentation on the wall.
- Carefully remove the template from the wall.
4.3. Drilling and Anchoring
- Drill four holes at the marked locations.
- Insert the supplied wall anchors into the drilled holes. If you cannot locate a wall stud, use all four wall anchors.
- Screw the supplied screws into the anchors. Adjust each screw so that it protrudes 15mm (19/32") from the wall.
4.4. Attaching Felt Pads
The hardware kit includes four felt pads with self-adhesive backing. These pads prevent the unit from scratching the wall.
- Peel off the backing from each felt pad.
- Place each pad onto the mounting base of the heater, aligning the cross-hatch with the corresponding area on the base.
4.5. Mounting the Heater
It is recommended to have a helper for this step.
- Carefully lift the Ember panel. Align the slots on the back of the heater with the protruding screws on the wall.
- Slide the heater down onto the screws until it is securely seated.
4.6. Power Connection
The heater comes with a 9-foot power cord for plug-in operation. For a hardwired installation, the plug can be removed by a qualified electrician.
- For plug-in use: Remove the plastic cover from the power cord plug and insert it into a nearby electrical outlet.
- For hardwired installation: Consult a qualified electrician to remove the plug and hardwire the unit according to local electrical codes.
4.7. Installation Video Guide
For a visual guide on the installation process, please refer to the official video:
Video: How to Install an Ember Radiant Heating Panel. This video demonstrates the step-by-step process of mounting the Ember panel on a wall, including using the template, drilling, anchoring, and final placement.
5. Operating Instructions
The WarmlyYours Ember Radiant Panel Heater operates with a single speed (on/off). It does not include an integrated thermostat, allowing for flexible control options.
- Power On/Off: Once connected to power (either plugged in or hardwired), the unit will begin to heat. Disconnect from power or use an external control device to turn off.
- External Thermostat (Recommended): For precise temperature control and energy management, it is highly recommended to use an external plug-in thermostat or a hardwired thermostat (if hardwired). This allows you to set desired temperatures and schedules.
- Direct Warming: The heater warms objects and surfaces directly. You may feel comfortable even if the ambient air temperature is slightly lower than with convection heating.
5.1. Product Overview Video
Learn more about the features and benefits of the Ember Radiant Panels:
Video: WarmlyYours Ember Electric Infrared Radiant Panels Overview. This video provides a comprehensive look at the Ember panels, highlighting their design, efficiency, and various applications.
6. Maintenance
The WarmlyYours Ember Radiant Panel Heater is designed for low maintenance. Follow these guidelines for optimal performance and longevity:
- Cleaning: Ensure the heater is unplugged or disconnected from power before cleaning. Wipe the glass surface with a soft, damp cloth. Do not use abrasive cleaners or solvents.
- Inspection: Periodically inspect the power cord (if plug-in) for any signs of damage. If damage is found, discontinue use and contact customer support.
- No Moving Parts: As there are no moving parts, there are no filters to clean or mechanical components to lubricate.
7. Troubleshooting
If your Ember Radiant Panel Heater is not operating as expected, please refer to the following common issues and solutions:
- Heater Not Turning On:
- Check if the unit is properly plugged into a working outlet or if the hardwired connection is secure.
- If using an external thermostat, ensure it is powered on and set to a temperature above the current room temperature.
- Insufficient Heat:
- Verify that the heater's wattage is appropriate for the room size (refer to Specifications section).
- Ensure there are no obstructions blocking the radiant heat.
- Infrared heat warms objects directly; the ambient air temperature may feel cooler than expected.
- Unusual Noises:
- The heater operates silently due to no moving parts. If you hear unusual noises, disconnect power immediately and contact customer support.
If troubleshooting steps do not resolve the issue, please contact WarmlyYours Customer Support.
8. Specifications
| Feature | Detail |
|---|---|
| Brand | WarmlyYours |
| Model Number | IP-EM-GLS-BLK-0800 |
| Color | Glass Black |
| Form Factor | Panel |
| Product Dimensions | 0.98"D x 23.6"W x 47.2"H |
| Item Weight | 40.7 pounds |
| Mounting Type | Wall Mount (also ceiling mountable with kit) |
| Heating Coverage | 114 sq.ft. |
| Burner Type | Radiant |
| Fuel Type | Electric |
| Voltage | 120 Volts |
| Amperage | 6.7 Amps |
| Included Components | Radiant panel, Installation Template, Mounting Hardware |
8.1. Heating Coverage Chart
Refer to this chart to understand the warming coverage based on radiant panel wattage:

Image: Heating Coverage Chart. This table details the warming coverage in square feet for various Ember radiant panel wattages, including 300W, 500W, 600W, 700W, and 800W.
8.2. Product Dimensions Diagram
A visual representation of the product's dimensions:
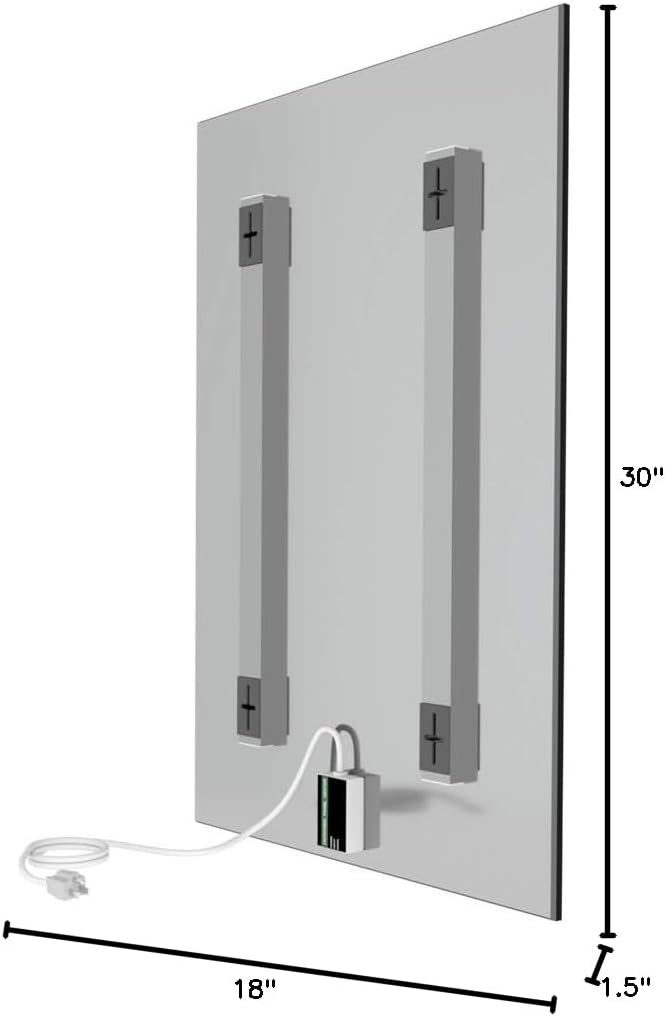
Image: Dimensions Diagram. This diagram illustrates the height, width, and depth of the Ember Radiant Panel Heater, along with the placement of its mounting brackets.
9. Accessories
Enhance the functionality and versatility of your Ember Radiant Panel Heater with optional accessories:
- Towel Bars: Convert your vertically mounted panel into a towel warmer. Towel bars must be purchased separately.
- Ceiling Mounting Kit: Allows for ceiling installation of the radiant panel. Must be purchased separately.
10. Warranty & Support
The WarmlyYours Ember Radiant Panel Heater is backed by a 5-year warranty for peace of mind.
For any questions, technical assistance, or warranty claims, please contact WarmlyYours Customer Support.
Contact Information:
- Phone: (800) 875-5285
- Website: www.WarmlyYours.com


