1. Introduction
This manual provides comprehensive instructions for the installation, operation, and maintenance of your Offgridtec RV Solar Energy System SPR-F 240W 12V. This high-performance solar system is designed to provide reliable power for your motorhome, ensuring energy independence and optimal battery charging. Please read this manual thoroughly before installation and operation to ensure safe and efficient use of your solar system.
2. Safety Information
Always observe the following safety precautions to prevent personal injury and damage to the equipment.
General Safety Precautions
- Ensure all electrical connections are made by qualified personnel.
- Do not attempt to modify the solar modules or other components.
- Keep children and unauthorized persons away from the installation area.
- Wear appropriate personal protective equipment (PPE) during installation, including gloves and eye protection.
Handling Solar Modules
- Handle solar modules with care to avoid damage to the glass or frame.
- Do not step on or place heavy objects on the modules.
- Avoid scratching the module surface.
Electrical Connections
- Disconnect all power sources before making or breaking electrical connections.
- Ensure correct polarity when connecting batteries and other components.
- Use only specified cables and connectors.
- Protect cables from sharp edges and excessive heat.
3. Package Contents
Verify that all components listed below are included in your package:
- 2 x Offgridtec 110 W High-Performance Flexible Solar Modules (Back-Contact)
- 1 x Votronic MPP 250 Duo Digital Solar Charge Regulator
- 1 x Votronic LCD Solar Computer S/Remote Control
- 1 x Cable Grommet (White)
- 1 x Roof Spoiler Set for Attaching the Solar Modules 55 cm (TÜV) (Black)
- 1 x 8 m Solar Cable (2 x 4 mm² Conductor in a Cable)
- Complete Connection Wedge
- 1 x 85 x 85 m x4.9 1 m Battery Cable with Fuse and EBL Connection Cable
- Mounting Glue Set with Instructions and Necessary Accessories for Pre-treatment
- 1 x MC4-Y Connector (Power Strip) Pair
- 2 x 50 cm MC4 Connection Cable

Image: Complete Offgridtec RV Solar Energy System kit, showing two flexible solar panels, a Votronic charge controller, LCD display, cables, mounting glue, and connectors.
4. Setup and Installation
4.1 Mounting the Solar Modules
The flexible solar modules are designed for surface mounting. They can be simply glued directly to the vehicle roof or, if the surface is uneven, to separately available substructures like aluminum dibond panels. The supplied adhesive ensures optimal grip on both GRP (fiberglass reinforced plastic) and aluminum surfaces. Ensure the mounting surface is clean, dry, and free of grease before applying the adhesive.
4.2 Wiring the System
Connect the solar modules to the Votronic MPP 250 Duo Digital Solar Charge Regulator using the provided MC4 connectors and solar cables. The charge controller then connects to your RV's onboard battery and starter battery. Ensure all connections are secure and correctly polarized. Use the cable grommet for a watertight entry point into the vehicle.
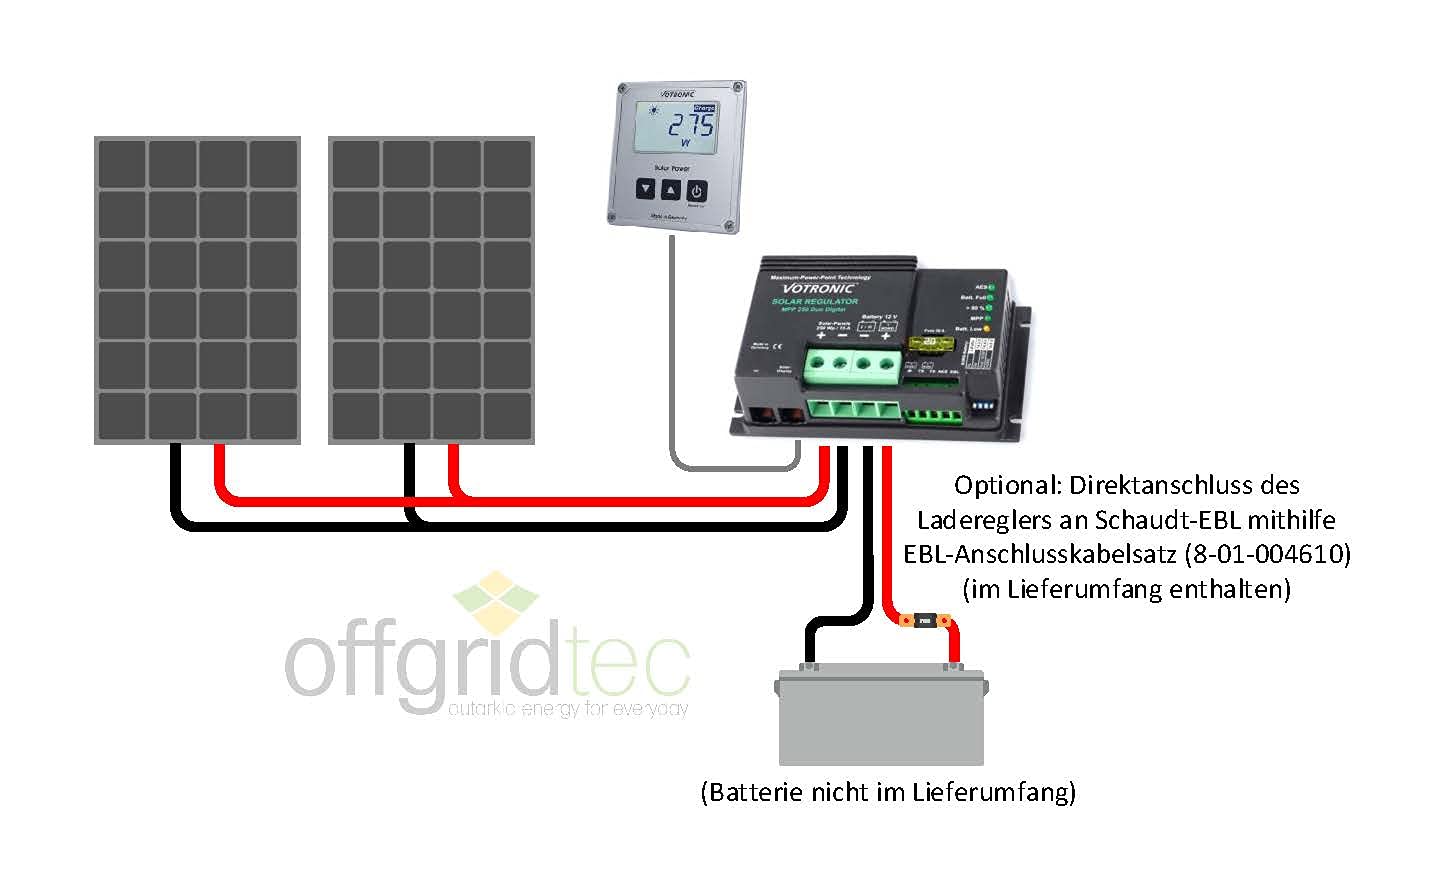
Image: Wiring diagram illustrating the connection of two solar panels to the Votronic solar regulator, which then connects to the battery. An optional EBL connection is also shown.
4.3 EBL Connection (Optional)
The included EBL connection cable allows for convenient integration with your RV's Schaudt Electric Block (EBL). This enables the display panel built into the power block to show solar system data. Refer to your EBL manual for specific connection details.
5. Operation
5.1 Charge Controller Functionality
The Votronic MPP 250 Duo Digital charge controller efficiently manages the power from your solar panels to charge both your onboard battery and the starter battery. It features an AES (Automatic Energy Selector) exchange output, which can automatically switch refrigerators (e.g., Electrolux/Dometic) from gas to 12V operation when there is sufficient excess solar energy.
5.2 LCD Solar Computer
The Votronic LCD Solar Computer comes with a 5-meter connection cable, allowing you to place the controller near the battery while monitoring all parameters remotely. This display provides real-time information on solar power generation, battery charge status, and other system metrics.
6. Maintenance
Regular maintenance ensures the longevity and optimal performance of your solar system.
- Cleaning Solar Panels: Periodically clean the surface of the solar panels with a soft cloth and mild, non-abrasive cleaner to remove dirt, dust, and debris. A clean panel ensures maximum sunlight absorption.
- Checking Connections: Annually inspect all electrical connections for tightness and corrosion. Loose or corroded connections can lead to power loss or safety hazards.
- Battery Health: Monitor your RV batteries regularly. Ensure they are properly charged and maintained according to their manufacturer's guidelines.
- Visual Inspection: Routinely check the solar modules and mounting system for any signs of damage, wear, or loosening.
7. Troubleshooting
Common Issues and Solutions
- Low Power Output: Check for shading on the solar panels. Ensure panels are clean. Verify all connections are secure. Check the charge controller display for error codes.
- No Charging: Confirm that the solar panels are receiving sunlight. Check the fuse on the battery cable. Ensure the charge controller is powered on and correctly connected to both panels and batteries.
- Display Issues: If the LCD Solar Computer is not displaying information, check its connection cable to the charge controller.
If you encounter persistent issues or require further assistance, please refer to the Warranty and Support section for contact information.
8. Technical Specifications
| Feature | Specification |
|---|---|
| Maximum Power | 240 Watts |
| Upper Temperature Rating | 85 Degrees Celsius |
| Maximum Voltage | 12 Volts (DC) |
| AC Adapter Current | 20 Amps |
| Included Components | Solar System Kit |
| Connector Type | MC4 |
| Efficiency | High Efficiency |
| Product Dimensions (Solar Module) | 107 x 54 x 0.2 cm |
| Material | Polycrystalline or Crystal Silicon |
| Manufacturer | Offgridtec |
| Item Model Number | 5425 |
| Country of Origin | China |
9. Warranty and Support
Offgridtec is committed to providing excellent customer service. If you have any technical questions, issues, or require assistance with changes or adjustments to your solar system, the Offgridtec customer service team is available to help you at any time.
Please refer to your purchase documentation or the Offgridtec official website for specific warranty terms and contact information.


