1. Introduction
The Vortice CA 200 WE D E is a high-performance radial duct fan designed for external wall mounting. This unit is engineered to provide efficient air extraction or supply in various environments, offering robust construction and reliable operation. It features a nominal diameter of 200 mm, a maximum power consumption of 100 Watts, and a maximum air flow of 680 m³/h. The fan is also rated IPX5 for protection against jet water, making it suitable for outdoor installation.
This manual contains important information regarding the safe installation, operation, and maintenance of your Vortice fan. Please read it thoroughly before using the product and keep it for future reference.
2. Safety Information
Always adhere to the following safety guidelines to prevent injury and damage to the unit:
- Installation and electrical connections must be performed by qualified personnel in accordance with local regulations and standards.
- Ensure the power supply is disconnected before any installation, maintenance, or cleaning procedures.
- Do not operate the fan if any part is damaged or if the casing is open.
- Keep hands, hair, and loose clothing away from moving parts.
- This appliance is not intended for use by persons (including children) with reduced physical, sensory or mental capabilities, or lack of experience and knowledge, unless they have been given supervision or instruction concerning use of the appliance by a person responsible for their safety.
- Do not block the air inlets or outlets.
- The fan is designed for air ventilation only. Do not use it to extract flammable, explosive, or corrosive gases.
3. Setup and Installation
The Vortice CA 200 WE D E fan is designed for external wall mounting. Proper installation is crucial for optimal performance and safety.
3.1 Unpacking
Carefully remove the fan from its packaging. Inspect the unit for any signs of damage during transit. Report any damage to your supplier immediately.
3.2 Mounting Location
Choose a suitable external wall location that allows for proper ducting and access for maintenance. Ensure the wall material can support the weight of the unit.
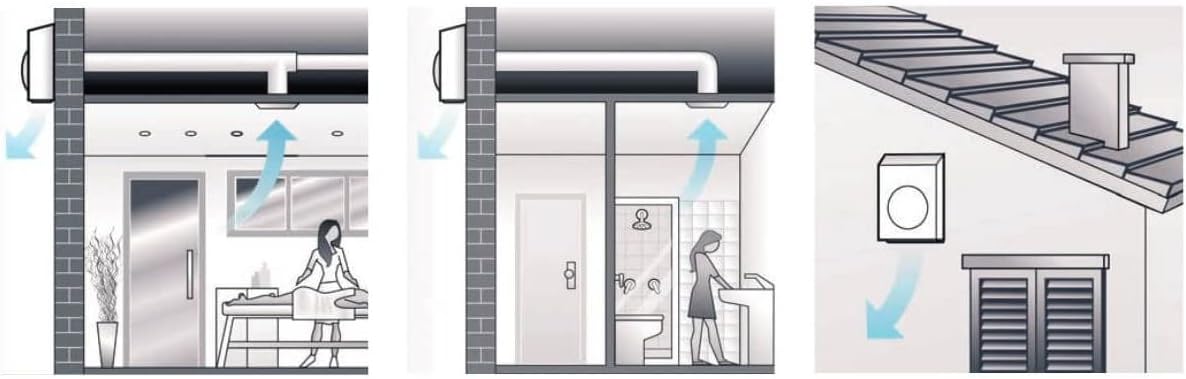
Figure 3.1: Diagram illustrating typical installation scenarios for the fan, including residential and commercial applications, showing air flow paths.
3.3 Mechanical Installation
- Mark the drilling points on the wall using the fan's mounting holes as a template.
- Drill holes and insert appropriate wall plugs (not supplied).
- Secure the fan to the wall using suitable screws, ensuring it is level and firmly attached.
- Connect the ductwork to the fan's inlet/outlet. Ensure all connections are airtight to prevent air leakage.

Figure 3.2: Front view of the Vortice external wall radial duct fan, showing its compact design and the Vortice logo.
3.4 Electrical Connection
All electrical work must be carried out by a qualified electrician.
- Ensure the main power supply is switched off at the circuit breaker.
- Open the electrical connection box on the fan unit.
- Connect the power supply cable to the terminal block inside the fan, following the wiring diagram provided with the unit. Ensure proper grounding.
- Close the connection box securely.
- Optional speed controllers and sensors (sold separately) can be integrated into the wiring as per their respective manuals.
4. Operating Instructions
Once installed and electrically connected, the Vortice CA 200 WE D E fan is ready for operation.
4.1 Powering On/Off
Switch on the main power supply to the fan. The fan will begin operation. To turn off the fan, switch off the power supply.
4.2 Speed Control (Optional)
If an optional speed controller has been installed, refer to its specific instructions for adjusting the fan's airflow and speed. The fan's performance can be optimized based on ventilation requirements.
5. Maintenance
Regular maintenance ensures the longevity and efficient operation of your Vortice fan. Always disconnect the power supply before performing any maintenance.
5.1 Cleaning the Fan
Periodically inspect the fan blades and casing for dust and debris accumulation. Clean with a soft, damp cloth. Do not use abrasive cleaners or solvents.
5.2 Inspecting Connections
Occasionally check all mechanical and electrical connections to ensure they remain secure. Tighten any loose screws or terminals.

Figure 5.1: Top-down view of the Vortice fan unit, showing the internal components and the duct connection area, which should be kept clear of debris.
6. Troubleshooting
If you encounter issues with your Vortice fan, refer to the following table for common problems and solutions.
| Problem | Possible Cause | Solution |
|---|---|---|
| Fan does not start | No power supply Loose electrical connection Motor fault | Check power switch and circuit breaker Verify all electrical connections (ensure power is off) Contact qualified service personnel |
| Reduced airflow | Blocked inlet/outlet Dirty fan blades Duct leakage | Clear any obstructions Clean fan blades Check duct connections for leaks |
| Unusual noise/vibration | Loose mounting Debris in fan Motor bearing issue | Tighten mounting screws Inspect and clean fan interior Contact qualified service personnel |
If the problem persists after attempting these solutions, please contact qualified service personnel or Vortice customer support.
7. Specifications
Technical specifications for the Vortice CA 200 WE D E Radial Duct Fan:
| Attribute | Value |
|---|---|
| Brand | Vortice |
| Model Number | 8010300160894 |
| Nominal Diameter | 200 mm |
| Max. Power Consumption | 100 Watt |
| Max. Air Flow | 680 m³/h |
| Ingress Protection (IP) Rating | IPX5 (Jet Water Protected) |
| Color | White |
| Material | Metal |
| ASIN | B00VWBIDJ6 |
| First Available on Amazon.de | February 21, 2019 |
8. Warranty and Support
For warranty information, please refer to the documentation provided at the time of purchase or contact your retailer. Vortice products are designed for durability and performance. In case of technical issues or for further assistance, please contact Vortice customer support or an authorized service center.


