1. Introduction
The GRS Adjustable Height Bracket, Model 004-666, is a precision tool accessory designed to enhance your workbench setup by providing additional vertical work support. This bracket allows for height adjustments in 1/2-inch increments, adding up to 4 inches to your work support, thereby improving ergonomics and versatility for various tasks.
2. Safety Information
Please read and understand all safety instructions before installing or operating the GRS Adjustable Height Bracket. Failure to follow these instructions may result in injury or damage to the product.
- Always wear appropriate personal protective equipment (PPE), such as safety glasses, when working with tools and installing this bracket.
- Ensure the bracket is securely mounted to a stable surface before applying any load.
- Do not exceed the recommended weight capacity of your workbench or the bracket itself.
- Keep hands and fingers clear of moving parts during height adjustment.
- Verify that all fasteners are tightened before use.
3. Package Contents
Carefully unpack the box and ensure all items are present and in good condition.
- 1x GRS Adjustable Height Bracket (Model 004-666)
- Mounting Hardware (screws, washers, etc. - verify upon unboxing)
4. Setup and Installation
Follow these steps to properly install your GRS Adjustable Height Bracket:
- Identify Mounting Location: Choose a suitable, stable location on your workbench or fixture. Ensure the surface is robust enough to support the bracket and any tools or workpieces that will be placed on it.
- Mark Drilling Points: Position the bracket against the chosen surface and use a pencil or marker to accurately mark the drilling points through the mounting holes on the main plate.
- Drill Pilot Holes: If necessary, drill pilot holes according to the size of your mounting screws. This helps prevent wood splitting and ensures a secure fit.
- Secure the Bracket: Align the bracket with the pilot holes and securely fasten it using appropriate screws and tools. Ensure all screws are tightened firmly to prevent any movement or instability during use.
5. Operating Instructions
The GRS Adjustable Height Bracket is designed for easy height adjustment to suit your specific needs.
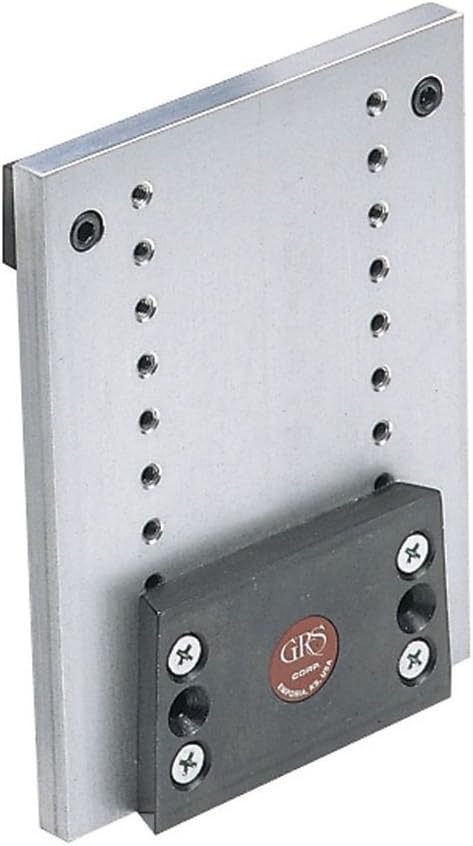
- Loosen Adjustment Screws: To change the height, locate the four screws securing the adjustable black block to the main silver plate. Use an appropriate screwdriver to loosen these screws sufficiently, allowing the block to slide.
- Adjust Height: Carefully slide the adjustable block up or down along the main plate to your desired height. The bracket offers precise 1/2-inch incremental adjustments, providing up to 4 inches of additional work support.
- Secure Adjustment: Once the desired height is achieved, align the screws with the corresponding holes on the main plate. Securely tighten all four screws. Ensure the adjustable block is firmly fixed and does not move before placing any load on it.

6. Maintenance
Proper maintenance ensures the longevity and optimal performance of your GRS Adjustable Height Bracket.
- Regular Inspection: Periodically inspect the bracket for any signs of wear, damage, or loose fasteners.
- Cleaning: Keep the bracket clean and free from dust, debris, and metal shavings. Wipe with a dry, soft cloth. Avoid using harsh chemicals or abrasive cleaners that may damage the finish.
- Fastener Check: Ensure all mounting screws and adjustment screws remain tight. Re-tighten if any looseness is detected.
7. Troubleshooting
This section addresses common issues you might encounter with your GRS Adjustable Height Bracket.
- Issue: The bracket feels unstable or wobbly after installation or adjustment.
Solution: Verify that all mounting screws securing the bracket to your workbench are securely tightened. Also, ensure the four screws on the adjustable block are firmly fastened after setting the desired height. Confirm that the mounting surface itself is stable and rigid. - Issue: Difficulty in sliding the adjustable block to change height.
Solution: Ensure the four screws on the adjustable block are sufficiently loosened before attempting to slide it. Check for any debris or obstructions that might be preventing smooth movement along the main plate. Clean the area if necessary.
8. Specifications
| Feature | Detail |
|---|---|
| Manufacturer | GRS |
| Model Number | 004-666 |
| Part Number | 004-666 |
| Item Weight | 1.87 pounds |
| Package Dimensions | 7.8 x 5.39 x 2.24 inches |
| Item Package Quantity | 1 |
| Adjustable Height Added | Up to 4 inches |
| Adjustment Increments | 1/2 inch |
9. Warranty and Support
For specific warranty information regarding your GRS Adjustable Height Bracket, please refer to the documentation included with your purchase or visit the official GRS website. For technical assistance or customer support, please contact GRS directly. Retain your purchase receipt as proof of purchase for any warranty claims.


