
Soundstream T4.1500L
Soundstream T4.1500L Tarantula Series 4-Channel Car Amplifier User Manual
Model: T4.1500L
Introduction
Thank you for choosing the Soundstream T4.1500L Tarantula Series 4-Channel Class A/B Car Amplifier. This amplifier is designed to deliver powerful and clear audio performance for your vehicle's sound system. The Tarantula series features a unique appearance with a 12-point RGB LED lighting system, allowing for customizable illumination to match your vehicle's interior or personal preference. This manual provides essential information for proper installation, operation, and maintenance of your amplifier to ensure optimal performance and longevity.
Safety Information
WARNING:
- Always disconnect the vehicle's battery before installing or servicing any electrical components.
- Ensure proper grounding to prevent electrical shock and damage to the amplifier.
- Use appropriate wire gauges for power, ground, and speaker connections as specified in the installation section to prevent overheating and fire hazards.
- Do not mount the amplifier in locations exposed to direct sunlight, excessive heat, moisture, or dust.
- Avoid placing the amplifier near fuel lines, brake lines, or other critical vehicle systems.
- Professional installation is recommended for optimal performance and safety.
- This product contains chemicals known to the State of California to cause cancer and birth defects or other reproductive harm (Proposition 65 warning).
Key Features
- Tarantula Series 4-Channel Class A/B Car Amplifier
- RMS Power Rating:
- 4 ohms: 120 watts x 4 channel
- 2 ohms: 180 watts x 4 channel
- Bridged: 4 ohms: 360 watts x 2 channels
- Max power output: 1,500 watts
- Pulse Width Modulated (PWM) MOSFET power supply with Audiophile Grade IRTM Transistors
- LED power (green) and protect (red) indicators for system status monitoring
- 12-point RGB LED lighting system with independent RGB control for customizable illumination
- Adjustable Crossover (HPF/LPF/FULL) and Bass Boost controls
Product Overview
The Soundstream T4.1500L amplifier features a robust design with accessible controls and connections for easy integration into your car audio system. Below are images illustrating the amplifier's various views and connection points.

Figure 1: Top view of the Soundstream T4.1500L amplifier, showcasing the Soundstream logo and Tarantula emblem with its default illumination.

Figure 2: Top view of the amplifier with the Tarantula emblem illuminated in white, demonstrating the customizable LED feature.

Figure 3: Top view of the amplifier with the Tarantula emblem illuminated in blue, highlighting another color option for the LED lighting system.
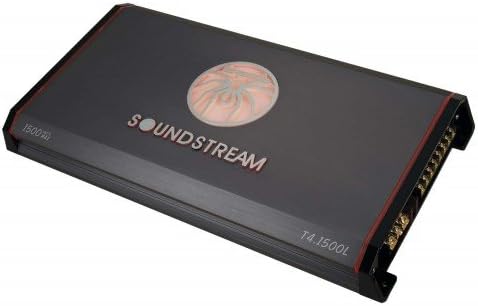
Figure 4: Top view of the amplifier with the Tarantula emblem illuminated in red, showcasing the vibrant red LED option.

Figure 5: Top view of the amplifier with the Tarantula emblem illuminated in green, demonstrating the green LED option.
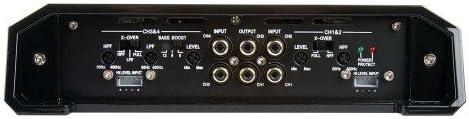
Figure 6: Rear panel view of the amplifier, showing the input and output connections for channels 1-4, crossover controls, and level adjustments.
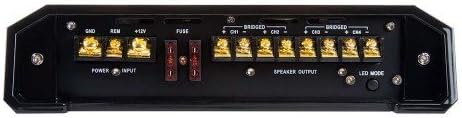
Figure 7: Front panel view of the amplifier, displaying the power (GND, REM, +12V) and speaker output terminals, fuse holders, and LED mode button.
Setup and Installation
1. Mounting Location
Choose a mounting location that is dry, well-ventilated, and away from direct heat sources. Ensure sufficient airflow around the amplifier for proper cooling. Common locations include under seats, in the trunk, or behind rear seats. The amplifier dimensions are approximately 21 x 11.4 x 4 inches.
2. Wiring Connections
Refer to Figure 7 for the power and speaker terminal panel, and Figure 6 for the input/output panel.
- Power (BATT +12V): Connect a direct wire from the positive terminal of your vehicle's battery to the +12V terminal on the amplifier. Use a fuse holder with an appropriate fuse (not included) as close to the battery as possible.
- Ground (GND): Connect a short wire (less than 3 feet) from the GND terminal to a clean, unpainted metal surface on the vehicle's chassis. Ensure a good electrical connection.
- Remote (REM): Connect this terminal to the remote turn-on output of your head unit. This will turn the amplifier on and off with your car's audio system.
- RCA Inputs (CH1/CH2, CH3/CH4): Connect RCA cables from your head unit's pre-amp outputs to the corresponding RCA input jacks on the amplifier.
- Speaker Outputs: Connect your speakers to the speaker output terminals. Ensure correct polarity (+ to + and - to -). For bridged operation, refer to the bridging diagram usually found on the amplifier itself or in a more detailed wiring diagram.
3. Initial Settings
- Level (Gain) Control: Start with the gain control set to minimum. Gradually increase it until the desired volume is achieved without distortion.
- Crossover (X-OVER):
- HPF (High Pass Filter): Allows frequencies above the set point to pass. Useful for full-range speakers.
- LPF (Low Pass Filter): Allows frequencies below the set point to pass. Useful for subwoofers.
- FULL: Allows all frequencies to pass.
- Bass Boost: Use this control sparingly to enhance bass frequencies. Excessive bass boost can lead to distortion and speaker damage.
Operating the Amplifier
Power Indicators
- Green LED: Indicates the amplifier is powered on and operating normally.
- Red LED (Protect): Indicates the amplifier has entered protection mode due to an issue such as overheating, short circuit, or low voltage. Turn off your audio system and vehicle, then check all connections and allow the amplifier to cool down before restarting.
RGB LED Lighting System
The Tarantula amplifier features a customizable RGB LED lighting system. A simple press of the end panel mounted switch (refer to Figure 7, "LED MODE" button) changes the color to one of several presets, slow-motion color change, or rapid flashing random color. For more custom installs, a single color can be selected during slow-motion color change.
Maintenance
- Cleaning: Use a soft, dry cloth to clean the amplifier's exterior. Do not use harsh chemicals or abrasive cleaners.
- Ventilation: Ensure that the amplifier's cooling fins are free from dust and debris to maintain proper heat dissipation. Periodically check for obstructions.
- Connections: Periodically check all wiring connections to ensure they are secure and free from corrosion. Loose connections can lead to poor performance or damage.
Troubleshooting
| Problem | Possible Cause | Solution |
|---|---|---|
| No Power (Green LED Off) | Blown fuse, loose power/ground/remote wire, no remote signal from head unit. | Check and replace fuses. Verify all power, ground, and remote connections are secure. Test remote wire for 12V signal when head unit is on. |
| Protection Mode (Red LED On) | Overheating, short circuit in speaker wiring, impedance too low, low voltage. | Allow amplifier to cool. Check speaker wires for shorts (bare wire touching chassis or other wires). Ensure speaker impedance matches amplifier's capabilities. Check vehicle's battery voltage. |
| No Sound Output | RCA cables disconnected/damaged, gain set too low, speaker wires disconnected, head unit issue. | Check RCA connections. Increase gain setting. Verify speaker wire connections. Test head unit with another amplifier or speakers. |
| Distorted Sound | Gain set too high, improper crossover settings, poor ground connection, damaged speakers. | Reduce gain. Adjust crossover settings. Ensure ground connection is solid. Inspect speakers for damage. |
| Engine Noise/Whine | Poor grounding, RCA cables too close to power wires, faulty ground loop. | Improve ground connection. Reroute RCA cables away from power wires. Install a ground loop isolator if necessary. |
Specifications
| Feature | Specification |
|---|---|
| Model Number | T4.1500L |
| Amplifier Class | Class A/B |
| Number of Channels | 4 |
| RMS Power Rating (4 ohms) | 120 watts x 4 channel |
| RMS Power Rating (2 ohms) | 180 watts x 4 channel |
| RMS Power Rating (Bridged 4 ohms) | 360 watts x 2 channels |
| Max Power Output | 1,500 watts |
| Power Supply | Pulse Width Modulated MOSFET w/ Audiophile Grade IRTM Transistors |
| Voltage | 16 Volts (DC) |
| Frequency Response | 10-50kHz |
| Total Harmonic Distortion (THD) | < 0.05% |
| Item Dimensions (L x W x H) | 21 x 11.4 x 4 inches |
| Item Weight | 9.9 pounds |
| Material | Plastic |
| Mounting Type | Surface Mount |
| UPC | 709483049901 |
Warranty and Support
Soundstream products are designed for reliability and performance. For specific warranty information, please refer to the warranty card included with your product or visit the official Soundstream website. For technical support or service inquiries, please contact Soundstream customer service or an authorized service center.
Please retain your proof of purchase for any warranty claims.
Related documentsT4.1500L


Ask a question about this manual
Ask about setup, troubleshooting, compatibility, parts, safety, or missing instructions. Manuals+ will review the question and use this page’s manual context to help answer it.