1. Introduction
Thank you for choosing the TOOLPORT 5x12m Party Tent PRO Smart PVC 700N. This manual provides essential information for the safe and correct assembly, operation, and maintenance of your party tent. Please read these instructions carefully before beginning assembly and retain them for future reference.

Image 1.1: The TOOLPORT 5x12m Party Tent fully assembled, showcasing its white PVC cover and arched windows.
This tent is designed to create a comfortable and protected space for various events and receptions. Its robust construction and high-quality PVC tarpaulins ensure durability and weather resistance.
2. Safety Instructions
- Always assemble the tent on a level and stable surface.
- Ensure all connections are securely fastened according to the instructions.
- Properly anchor the tent to the ground using the provided pegs and guy ropes to prevent wind damage.
- Do not use the tent in extreme weather conditions, such as strong winds, heavy snow, or thunderstorms. Disassemble the tent if severe weather is expected.
- Keep all heat sources, open flames, and electrical appliances away from the tent fabric to prevent fire hazards.
- Supervise children around the tent to prevent accidents.
- Regularly inspect the tent for any signs of wear or damage, especially before and after each use.
3. Package Contents
Before starting assembly, verify that all components are present and undamaged. The package for your 5x12m party tent includes:
- Galvanized steel frame construction with bolted connections.
- One-piece PVC roof tarpaulin.
- PVC side tarpaulins (multiple 2-meter sections).
- Gable ends, including one with a zippered entrance door.
- Elastic tension cords for securing tarpaulins.
- Ground pegs/stakes and guy ropes for anchoring.
- Assembly instructions and necessary assembly tools.

Image 3.1: Overview of tent components, highlighting side walls, gables, and elastic fasteners for easy assembly.
4. Setup (Assembly)
Assembly requires at least 2-4 people. Follow the numbered tubes and the provided assembly manual for quick and easy installation.
4.1. Frame Assembly
- Unpack all frame components. The frame consists of galvanized steel tubes (approx. 38mm diameter) and connectors (approx. 42mm diameter).
- Lay out the base frame according to the diagram. Connect the tubes using the bolted connections and wing screws.
- Attach the vertical poles to the base frame. Ensure the welded foot plates are oriented correctly for ground anchoring.
- Assemble the roof structure by connecting the roof poles to the vertical poles and ridge connectors. All connections are bolted for high load resistance.

Image 4.1: Detailed view of the tent's structural components, including galvanized steel tubes and secure bolted connections.

Image 4.2: Close-up of a bolted connection, demonstrating the secure assembly method for the frame.
4.2. Tarpaulin Installation
- Carefully unfold the one-piece PVC roof tarpaulin and place it over the assembled roof frame. Ensure it is centered and covers the entire structure.
- Attach the roof tarpaulin to the frame using the elastic tension cords. The roof features a single element design for stability and wind deflection.
- Install the side tarpaulins and gable ends. The side panels are modular (2m sections) and can be easily attached/removed using elastic bands.
- Secure the gable end with the zippered entrance door at your desired location.
4.3. Ground Anchoring
- Once the frame and tarpaulins are in place, secure the tent to the ground using the provided ground pegs/stakes through the foot plates.
- Attach and tension the guy ropes to further stabilize the tent against wind.
4.4. Estimated Assembly Time
| Tent Width | Estimated Time | Personnel Required |
|---|---|---|
| 3m | 1h 30min - 2h | 2 people |
| 4m | 1h 30min - 2h 30min | 3-4 people |
| 5m or more (e.g., 5x12m) | 2h - 3h 30min | 3-4 people |
5. Operation (Usage)
Your TOOLPORT Party Tent is designed for versatile use, providing a sheltered space for various outdoor activities.
5.1. Ventilation and Temperature Regulation
The side tarpaulins are equipped with wind deflectors and can be easily removed every two meters. This allows for optimal air circulation and temperature regulation inside the tent, enhancing comfort for occupants.
5.2. Access
The tent features two different sized entrance gables, one of which includes a robust zipper door for easy access and secure closure.
5.3. Capacity Guidelines
To estimate the available space:
- Seated Capacity: Tent surface area (m²) divided by 1.2. For a 5x12m tent (60m²), this is approximately 50 seated places.
- Standing Capacity: Tent surface area (m²) divided by 0.5. For a 5x12m tent (60m²), this is approximately 120 standing places.
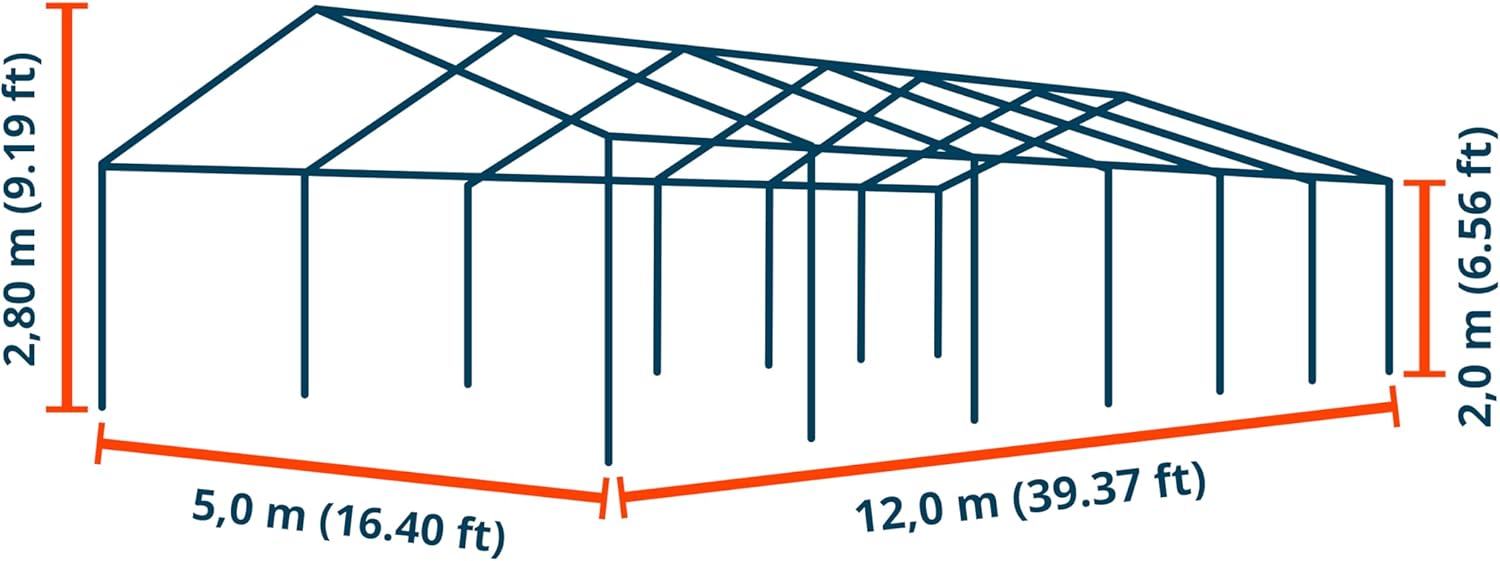
Image 5.1: Interior view of the tent, demonstrating the spacious environment and the window panels that allow natural light.
6. Maintenance
Proper maintenance will extend the lifespan of your TOOLPORT Party Tent.
6.1. Cleaning
- Clean PVC tarpaulins with mild soap and water. Avoid harsh chemicals or abrasive cleaners that could damage the material.
- Ensure tarpaulins are completely dry before folding and storing to prevent mold and mildew.
- Wipe down the galvanized steel frame with a damp cloth to remove dirt and debris.
6.2. Storage
- Store the disassembled tent in a cool, dry place, away from direct sunlight and extreme temperatures.
- Keep all components organized to facilitate future assembly.
6.3. Inspection
- Regularly check all frame connections for tightness.
- Inspect tarpaulins for any tears, punctures, or signs of wear. Repair minor damage promptly to prevent it from worsening.
- Ensure ground anchoring points and ropes are in good condition.
7. Troubleshooting
| Problem | Possible Cause | Solution |
|---|---|---|
| Tent unstable/wobbly | Insufficient ground anchoring; loose frame connections; strong winds. | Ensure all pegs are fully inserted and guy ropes are taut. Tighten all bolted connections. Disassemble in strong winds. |
| Water leakage | Tarpaulin not properly tensioned; damage to PVC fabric; improper roof installation. | Re-tension tarpaulin. Inspect for tears and repair if necessary. Ensure roof is correctly positioned and secured. |
| Difficulty with assembly | Incorrect part identification; insufficient personnel. | Refer to the numbered parts in the manual. Ensure enough people are assisting with assembly. |
| Zipper not closing smoothly | Dirt in zipper teeth; fabric caught in zipper. | Clean zipper teeth. Gently pull fabric away from zipper path. |
8. Specifications
- Model: PRO Smart
- Dimensions (L x W x H): 12 x 5 x 2 meters (approx. 39.37 x 16.40 x 6.56 feet)
- Floor Area: 60 square meters
- Weight: 168.2 kg
- Frame Material: Galvanized Alloy Steel (Tubes: approx. 38mm diameter, Connectors: approx. 42mm diameter)
- Cover Material: High-quality PVC 700 N (Roof and side walls)
- Color: White
- Water Resistance Level: Waterproof
- UV Protection: Yes (UV 50+)
- Temperature Resistance: -20°C to +50°C
- Closure Type: Zipper (for entrance door)
- Assembly Required: Yes
- Recommended Use: Marquee, Party Tent
- Manufacturer: TOOLPORT
- Country of Origin: Germany
Image 8.1: Dimensional diagram of the tent frame, indicating length, width, side height, and peak height.
9. Warranty & Support
For warranty information or technical support, please refer to the documentation included with your purchase or contact TOOLPORT customer service directly. Keep your proof of purchase for any warranty claims.
You can visit the TOOLPORT brand store for more information and contact details: TOOLPORT Brand Store


