1. Introduction
This manual provides instructions for the Code Alarm CATXMLC 5-Button 2-Way LCD Paging Replacement Transmitter Remote. This remote operates at 433.92MHz and is designed to replace original transmitters for compatible Code Alarm systems. It features a 2-way LCD for system status feedback.
2. Product Overview
The CATXMLC remote is a metal-cased, 5-button, 2-way LCD paging transmitter. It is identified by FCC ID: H50TR35 or H5OTR35. The 2-way communication allows the remote to receive alerts and status updates from the vehicle's alarm system.
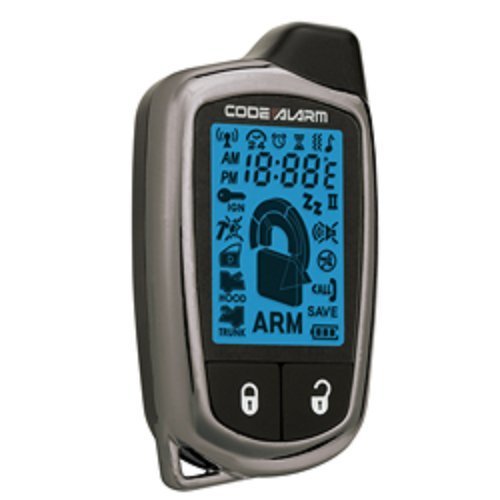
Image 1: Code Alarm CATXMLC 5-Button 2-Way LCD Paging Replacement Transmitter Remote. This image displays the front of the remote with its five buttons and LCD screen.
2.1 Button Functions
The remote typically features five buttons, each assigned a primary function. Specific functions may vary slightly based on the alarm system's configuration.
- Lock Button: Locks vehicle doors and arms the security system.
- Unlock Button: Unlocks vehicle doors and disarms the security system.
- Start Button: Initiates remote engine start (if equipped and enabled).
- Trunk/Aux Button: Opens the trunk or activates an auxiliary function.
- Panic/Function Button: Activates the panic alarm or cycles through remote functions.
3. Setup and Programming
The CATXMLC remote must be programmed to your vehicle's Code Alarm system to function. This remote is programmable to the following models: CA1550, CA1551, CA1552, CA1553, CA6550, CA6551, CA6552, CA6553.
3.1 Programming Procedure
Programming requires access to the vehicle's valet switch (also known as the programming or override button). The exact location of the valet switch varies by vehicle and alarm system installation, but it is typically found under the dashboard, near the fuse box, or in the glove compartment.
- Locate the Valet Switch: Identify the valet switch in your vehicle. Refer to your vehicle's alarm system installation manual if you cannot locate it.
- Enter Programming Mode:
- Turn the vehicle's ignition to the ON position.
- Within 5 seconds, press and release the valet switch a specific number of times (e.g., 1, 2, or 3 times) as indicated by your alarm system's manual. The system will typically respond with a chirp or light flash to confirm entry into programming mode.
- Program the Remote:
- While the system is in programming mode, press and hold the Lock button on the CATXMLC remote until the vehicle responds with a chirp or light flash. This indicates the remote has been programmed.
- If programming multiple remotes, repeat this step for each additional remote.
- Exit Programming Mode: Turn the vehicle's ignition to the OFF position. The system will exit programming mode automatically after a few seconds of inactivity or when the ignition is turned off.
Note: These are general programming steps. Always consult your specific Code Alarm system's installation or user manual for precise programming instructions, as the number of valet switch presses or specific button combinations may vary.
4. Operating Instructions
Once programmed, the CATXMLC remote operates your vehicle's security and convenience features.
- Arming/Locking: Press the Lock button once. The vehicle lights will flash, and doors will lock. The remote's LCD will display confirmation.
- Disarming/Unlocking: Press the Unlock button once. The vehicle lights will flash, and doors will unlock. The remote's LCD will display confirmation.
- Remote Start: Press and hold the Start button for approximately 2-3 seconds. The vehicle will start, and the remote's LCD will confirm engine status.
- Trunk Release: Press and hold the Trunk/Aux button for approximately 2-3 seconds. The trunk will open (if equipped).
- Panic Feature: Press and hold the Panic/Function button for approximately 3 seconds to activate the vehicle's alarm. Press any button to deactivate.
- 2-Way Paging: The LCD screen will display icons and text messages to indicate vehicle status (e.g., armed, disarmed, door open, alarm triggered). Refer to your alarm system's manual for a complete list of LCD icons and their meanings.
5. Maintenance
5.1 Battery Replacement
The CATXMLC remote is powered by an AAA battery. When the battery is low, the remote's performance may degrade, or the LCD may display a low battery indicator.
- Carefully open the remote casing.
- Remove the old AAA battery.
- Insert a new AAA battery, ensuring correct polarity (+/-).
- Close the remote casing securely.
Note: While product features indicate AAA battery power, some users have reported CR2450 battery usage. Please verify the battery type by inspecting your remote or consulting your alarm system's manual before purchasing a replacement.
5.2 General Care
- Avoid exposing the remote to extreme temperatures, direct sunlight for extended periods, or high humidity.
- Do not immerse the remote in water or other liquids.
- Clean the remote with a soft, dry cloth. Avoid using harsh chemicals or abrasive cleaners.
- Protect the remote from drops and impacts to prevent damage to the LCD or internal components.
6. Troubleshooting
If you experience issues with your CATXMLC remote, consider the following troubleshooting steps:
- Remote Not Responding:
- Check the battery. Replace if necessary.
- Ensure you are within range of the vehicle.
- Verify the remote is properly programmed to the system (refer to Section 3.1).
- Reduced Range:
- Replace the battery.
- Ensure there are no large obstructions between the remote and the vehicle.
- Avoid using the remote near sources of strong radio interference.
- LCD Not Displaying:
- Check or replace the battery.
- Ensure the remote has not sustained physical damage.
- Vehicle Not Responding to Remote Start:
- Ensure the vehicle doors are closed, hood is closed, and parking brake is engaged.
- Confirm the remote start feature is enabled and functioning correctly on your alarm system.
7. Specifications
| Feature | Detail |
|---|---|
| Model Number | CATXMLC |
| Brand | Code Alarm |
| FCC ID | H50TR35, H5OTR35 |
| Frequency | 433.92MHz |
| Modulation | AM, Superheterodyne (SAW) |
| Battery Type | AAA (as per product features) |
| Compatible Systems | CA1550, CA1551, CA1552, CA1553, CA6550, CA6551, CA6552, CA6553 |
| Item Weight | 2.39 ounces |
| Package Dimensions | 6 x 3 x 0.6 inches |
8. Warranty and Support
Specific warranty information for the Code Alarm CATXMLC remote is not provided in the available product data. For warranty details, please refer to the documentation included with your original Code Alarm system or contact Code Alarm customer support directly.
For technical support or further assistance with programming and operation, please contact the manufacturer or your authorized Code Alarm dealer.


