iReliev TENS + EMS Combination Unit Muscle Stimulator
Model: ET-7070
Introduction
This manual provides instructions for the safe and effective use of your iReliev TENS + EMS Combination Unit Muscle Stimulator, Model ET-7070. This device is designed to offer both Transcutaneous Electrical Nerve Stimulation (TENS) for pain relief and Electrical Muscle Stimulation (EMS) for muscle performance and recovery. It features 8 pre-programmed TENS modes and 6 EMS modes, allowing for customized therapy. The unit includes 25 adjustable intensity levels and a 60-minute adjustable therapy timer.

Image: The iReliev TENS + EMS Combination Unit, shown alongside its retail packaging, highlighting the device's compact design and the product branding.
Important Safety Information
WARNING: Do not use this System if you have a cardiac pacemaker, implanted defibrillators or any other implanted metallic or electronic device. Do not use this System if you have undiagnosed chronic pain. Not indicated for Children under the age of 18.
Legal Disclaimer: Do not use this system if you have a cardiac pacemaker, implanted defibrillator or any other implanted metallic or electronic device. This product is not suitable for people with heart rhythm problems. Do not use this product if you have undiagnosed chronic pain otherwise. Do not use if pregnant or in labor. Do not use if you have cancer. Not suitable for children under 16 years of age. Keep out of reach of children. Please see the full user manual for additional warnings and cautions. Individual symptoms, situations, circumstances, and results may vary. Please consult your physician or qualified health care provider regarding your condition and appropriate medical treatment. The information provided is not intended to be used for medical diagnosis or treatment or as a substitute for professional medical advice.
Setup
Follow these steps to prepare your iReliev TENS + EMS unit for first use:
- Unpack the System: Carefully remove all components from the packaging. Ensure you have the iReliev device, electrode pads (small and XL), lead wires, 3 AAA batteries, a removable belt clip, and a carry pouch.
- Insert Batteries: Open the battery compartment on the back of the device and insert the 3 included AAA batteries, ensuring correct polarity. Close the compartment securely.
- Attach Pads to Lead Wires: Connect the electrode pads to the lead wires by snapping them onto the connectors.
- Connect Lead Wires to Device: Plug the lead wires into the output ports (CH1 and CH2) at the top of the iReliev device.
- Apply Pads to Body: Clean and dry the skin area where you intend to place the pads. Remove the protective film from the electrode pads and firmly press them onto the skin. Ensure pads are placed on healthy, intact skin.
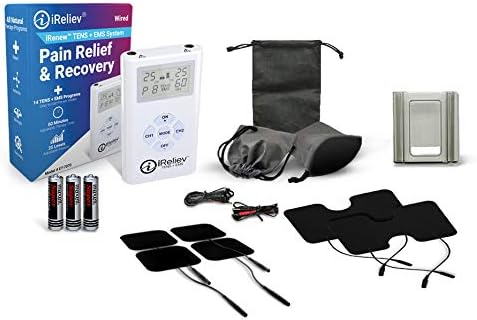
Image: All components included in the iReliev TENS + EMS kit, including the device, various electrode pads, lead wires, batteries, and a storage pouch.
Operating Instructions
Once the device is set up, follow these steps for operation:
- Power On: Press the 'ON +' button to turn on the device. The backlit display will illuminate.
- Select Mode: Press the 'MODE' button to cycle through the available TENS and EMS programs (P1-P8 for TENS, P1-P6 for EMS). Program P8 is specifically designed for Arthritis symptoms.
- Adjust Intensity: Use the 'ON +' button for Channel 1 (CH1) and 'CH2' button for Channel 2 (CH2) to increase the intensity. Use the 'OFF -' button to decrease intensity. Start with a low intensity and gradually increase until you feel a comfortable, yet strong, sensation. The device offers 25 levels of adjustable intensity.
- Set Timer: The device has a default 60-minute therapy timer. Refer to the full user manual for instructions on adjusting the timer if needed.
- Lock Function: The device features a lock function to prevent accidental changes to settings during use. Consult the full user manual for details on how to activate and deactivate this feature.
- Pad Placement: Proper pad placement is crucial for effective therapy. Refer to the diagrams below for recommended placements for both small and XL pads.

Image: A close-up of the iReliev device's display, showing program P8 (TENS) and intensity levels, along with buttons for power, mode selection, and channel control.

Image: A visual guide illustrating recommended placements for small electrode pads on various body parts, including ankle, calves, elbow, feet, shoulder, knee, lower back, quads, wrist, upper back, and upper arm.

Image: A visual guide illustrating recommended placements for XL electrode pads on various body parts, including upper back, abs, calves, lower back, upper arm, shoulder, and knee.

Image: A person sitting, holding the iReliev device, with an electrode pad applied to their upper arm, demonstrating typical use.

Image: A person walking outdoors with a child and a dog, wearing the iReliev device clipped to their clothing, with an electrode pad on their upper arm, illustrating the device's portability.

Image: A person performing push-ups, with an iReliev electrode pad placed on their shoulder, demonstrating the use of the device during physical activity or for muscle recovery.
Maintenance
Proper maintenance ensures the longevity and effectiveness of your iReliev device:
- Cleaning the Device: Wipe the device with a soft, damp cloth. Do not use abrasive cleaners or immerse the device in water.
- Cleaning Electrode Pads: Gently wipe the adhesive side of the pads with a damp cloth or a small amount of water to remove any debris. Allow them to air dry completely before reapplying the protective film. Do not use soap or alcohol.
- Storage: Store the device and pads in the provided carry pouch in a cool, dry place, away from direct sunlight and extreme temperatures.
- Battery Replacement: Replace batteries when the low battery indicator appears on the display. Always use new AAA batteries.
Troubleshooting
If you encounter issues with your iReliev device, refer to the following common solutions:
- Device Not Turning On:
- Check if the batteries are inserted correctly and are not depleted. Replace with new AAA batteries if necessary.
- Ensure the battery compartment is securely closed.
- No Sensation or Weak Sensation:
- Increase the intensity level using the 'ON +' or 'CH2' buttons.
- Ensure the electrode pads are firmly attached to clean, dry skin.
- Check that the lead wires are securely connected to both the pads and the device.
- The electrode pads may be worn out. Replace them with new pads if they no longer adhere well or provide consistent sensation.
- Pads Not Sticking:
- Clean the skin area thoroughly before application.
- Gently clean the adhesive side of the pads with a damp cloth and let them air dry.
- If pads are old or have lost their adhesiveness, replace them.
- Irregular or Uncomfortable Sensation:
- Ensure both pads for a channel are making full contact with the skin.
- Try a different program mode.
- Reduce the intensity level.
Specifications
| Feature | Detail |
|---|---|
| Model Number | ET-7070 |
| Product Dimensions | 2.14 x 5.5 x 7.08 inches |
| Item Weight | 11.2 ounces |
| Power Source | Battery Powered (3 AAA batteries, included) |
| Material | Acrylonitrile Butadiene Styrene |
| Therapy Modes | 8 Pre-Programmed TENS Modes, 6 EMS Modes (14 total) |
| Intensity Levels | 25 Adjustable Levels |
| Timer | Up to 60 Minutes Adjustable Therapy Timer |
| Use For | Whole Body (Back, Abs, Knee, Shoulder, Ankles, Hips, Wrist, Elbow) |
Warranty and Support
For detailed warranty information, please refer to the documentation included with your product or visit the official iReliev website. If you require technical assistance, have questions about your device, or need to inquire about replacement parts, please contact iReliev customer support directly. Contact information can typically be found on the product packaging or the official brand website.


