
1. Introduction
This manual provides essential information for setting up, operating, and maintaining your Arduino Official Starter Kit Deluxe Bundle. Designed for beginners, students, and makers, this kit offers a comprehensive introduction to electronics and programming using the Arduino platform. It includes an Arduino Uno R3 board, various electronic components, and project guides to help you build interactive projects.
2. What's in the Box
Your Arduino Official Starter Kit Deluxe Bundle contains the following components:

Figure 2.1: Overview of the Arduino Official Starter Kit Deluxe Bundle contents.
- 1 Projects Book (170 pages)
- 1 Official Arduino Uno R3 Board
- 1 USB Cable
- 1 Breadboard (400 points)
- 70 Solid Core Jumper Wires
- 1 Easy-to-Assemble Wooden Base
- 1 9V Battery Snap
- 1 Stranded Jumper Wire (Black)
- 1 Stranded Jumper Wire (Red)
- 6 Phototransistors
- 3 Potentiometers (10 kOhm)
- 10 Pushbuttons
- 1 Temperature Sensor (TMP36)
- 1 Tilt Sensor
- 1 Alphanumeric LCD (16x2 Characters)
- 1 Bright White LED
- 1 RGB LED
- 8 Red LEDs
- 8 Green LEDs
- 8 Yellow LEDs
- 3 Blue LEDs
- 1 Small DC Motor (6/9V)
- 1 Small Servo Motor
- 1 Piezo Capsule (PKM22EPP-40)
- 1 H-Bridge Motor Driver (L293D)
- 1 Optocoupler (4N35)
- 2 MOSFET Transistors (IRF520)
- 3 Capacitors (100 uF)
- 5 Diodes (1N4007)
- 3 Transparent Gels (Red, Green, Blue)
- 1 Male Pin Strip (40x1)
- 20 Resistors (220 Ohm)
- 5 Resistors (560 Ohm)
- 5 Resistors (1 kOhm)
- 5 Resistors (4.7 kOhm)
- 20 Resistors (10 kOhm)
- 5 Resistors (1 MOhm)
- 5 Resistors (10 MOhm)
- MAKE: Getting Started with Arduino Training Book/material
- SPEED-KITS Arduino R3 Pin-out chart for handy reference

Figure 2.2: A selection of electronic components from the kit.
3. Setup
To begin using your Arduino Starter Kit, follow these general setup steps:
- Unpack Components: Carefully remove all items from the kit box. Organize them for easy access.
- Assemble Wooden Base (Optional): If desired, assemble the provided wooden base to mount your Arduino Uno R3 board and breadboard.
- Install Arduino IDE: Download and install the latest version of the Arduino Integrated Development Environment (IDE) from the official Arduino website (www.arduino.cc/en/software). This software is essential for writing and uploading code to your Arduino board.
- Connect Arduino Uno R3: Connect your Arduino Uno R3 board to your computer using the provided USB cable.Ensure the necessary drivers are installed. If you encounter issues, refer to the troubleshooting section or the Arduino official website for driver installation guides specific to your operating system.

Figure 3.1: The Arduino Uno R3 board, central to the kit.
- Explore Project Books: Begin with the "Projects Book" or "MAKE: Getting Started with Arduino Training Book" to guide you through your first circuits and programming examples. These resources provide step-by-step instructions for various projects.

Figure 3.2: The "Make: Getting Started with Arduino" book, a key learning resource.
4. Operating Instructions
Operating the Arduino Starter Kit involves a cycle of circuit building, code writing, and uploading. Always refer to the project books for detailed instructions on specific projects.
- Circuit Assembly: Use the breadboard and jumper wires to connect components according to the circuit diagrams provided in your project book. Pay close attention to polarity for components like LEDs and diodes.
- Code Development: Open the Arduino IDE. Write your program (sketch) in the IDE or load an example sketch from the project book. The Arduino programming language is based on C/C++.
- Verify and Upload:
- Click the "Verify" button (checkmark icon) in the Arduino IDE to check your code for syntax errors.
- Select the correct Arduino board (Arduino Uno) and the correct serial port from the "Tools" menu.
- Click the "Upload" button (arrow icon) to compile your code and transfer it to the Arduino Uno R3 board.
- Observe and Debug: After uploading, observe the behavior of your circuit. If it doesn't work as expected, review your wiring and code. Use the Serial Monitor in the Arduino IDE for debugging output.
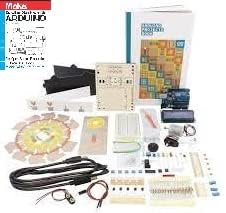
Figure 4.1: Arduino Uno R3 Pin Quick Reference for easy identification of board connections.
5. Maintenance
Proper care and maintenance will extend the life of your Arduino Starter Kit components.
- Storage: Store all components in a dry, dust-free environment, preferably in their original packaging or a dedicated storage box. Avoid extreme temperatures.
- Handling: Handle electronic components with care. Avoid bending pins excessively. Static electricity can damage sensitive components, so discharge yourself by touching a grounded metal object before handling.
- Cleaning: Use a soft, dry cloth to clean the Arduino board and other components. For stubborn dust, a can of compressed air can be used. Do not use liquid cleaners directly on electronic parts.
- Cable Care: Avoid sharp bends or kinks in the USB cable and jumper wires. Store them neatly to prevent damage.
6. Troubleshooting
If you encounter issues while using your Arduino Starter Kit, consider the following troubleshooting steps:
- Arduino IDE Not Connecting/Uploading:
- Check USB Connection: Ensure the USB cable is securely connected to both the Arduino board and your computer.
- Select Correct Board and Port: In the Arduino IDE, go to Tools > Board and select "Arduino Uno". Then, go to Tools > Port and select the correct serial port (it might be labeled "Arduino Uno" or similar).
- Driver Installation: If the port is not visible, you may need to install or update the Arduino USB drivers. Refer to the official Arduino website for specific instructions for your operating system. This often involves checking Device Manager on Windows.
- Restart IDE/Computer: Sometimes, simply restarting the Arduino IDE or your computer can resolve connection issues.
- Circuit Not Working as Expected:
- Review Wiring: Double-check all connections on your breadboard against the circuit diagram in your project book. Ensure wires are firmly seated.
- Check Polarity: Verify that polarized components (LEDs, diodes, capacitors) are connected with the correct orientation.
- Component Functionality: Test individual components if possible. For example, swap an LED if it's not lighting up.
- Power Supply: Ensure the Arduino board is receiving power (the "ON" LED should be lit). If using an external power supply, ensure it meets the voltage requirements (7-12V).
- Code Errors:
- Compiler Messages: Read the error messages in the Arduino IDE's console. They often provide clues about what went wrong.
- Syntax: Ensure correct syntax, including semicolons, curly braces, and variable declarations.
- Logic: If the code compiles but doesn't behave correctly, the issue is likely in the program's logic. Use
Serial.print()statements to output variable values and track program flow.
For more detailed troubleshooting and community support, visit the official Arduino forums or consult the "MAKE: Getting Started with Arduino" book.
7. Specifications
Key specifications for the Arduino Official Starter Kit Deluxe Bundle (Model ASC-MAB):
| Feature | Detail |
|---|---|
| Product Dimensions | 9.6 x 6.5 x 2.4 inches |
| Item Weight | 2.55 pounds |
| Item Model Number | ASC-MAB |
| Brand | Arduino |
| Model Name (Board) | Uno R3 |
| Connectivity Technology | USB |
| Date First Available | March 8, 2015 |
| Included Components | Arduino Uno R3 board, USB cable, breadboard, jumper wires, potentiometers, tilt sensor, photoresistors, pushbuttons, temperature sensor, LEDs (red, green, yellow, blue, RGB), piezo capsule, diode, transistor, DC motor, servo motor, LCD screen, various resistors and capacitors, H-bridge motor driver, optocoupler, plastic storage box, 170-page project book, wooden base, MAKE: Getting Started with Arduino Training Book/material, SPEED-KITS Arduino R3 Pin-out chart. |
8. Warranty Information
Specific warranty details for the Arduino Official Starter Kit Deluxe Bundle are not provided in this manual. For information regarding product warranty, please refer to the official Arduino website or contact Arduino customer support directly. Optional protection plans may be available from your retailer at the time of purchase.
9. Support
For further assistance, technical support, or to explore more projects and resources, please visit the official Arduino website and community forums:
- Official Arduino Website: www.arduino.cc
- Arduino Forums: forum.arduino.cc
- Arduino Store on Amazon: Arduino Store
The "MAKE: Getting Started with Arduino" book and the included "Projects Book" are also invaluable resources for learning and support.