
1. Introduction
This manual provides detailed instructions for the safe installation, operation, and maintenance of your Jeremiah 1015C-BNK 5 Light Mini Chandelier. This elegant lighting fixture, part of the Craftmade family of brands, features clear crystal accents and a brushed nickel finish, designed to enhance various indoor spaces. Please read this manual thoroughly before beginning installation or use to ensure proper function and safety.

Figure 1: Jeremiah 1015C-BNK 5 Light Mini Chandelier. This image displays the complete chandelier with its five light sources, brushed nickel frame, and hanging clear crystal accents.
2. Safety Information
Always follow basic safety precautions when installing or using electrical products to reduce the risk of fire, electric shock, and personal injury.
- WARNING: This product contains chemicals known to the State of California to cause cancer and birth defects or other reproductive harm. Please check your local laws before purchasing this product.
- Disconnect power at the circuit breaker or fuse box before installation or servicing.
- All electrical connections must be in accordance with local codes, ordinances, or the National Electric Code (NEC). Consult a qualified electrician if you are unfamiliar with electrical wiring.
- Do not exceed the maximum wattage specified for the light bulbs (60 watts per bulb, 120 volts total).
- Ensure the mounting surface can support the weight of the fixture.
- Handle crystal components with care to prevent breakage.
- Keep packaging materials away from children.
3. Package Contents
Carefully unpack your chandelier and identify all components. Keep all packaging materials until you are sure all parts are present and in good condition. If any parts are missing or damaged, do not attempt to assemble or install the fixture.
- Chandelier Body (Model: 1015C-BNK)
- Mounting Chain
- Canopy/Ceiling Plate
- Mounting Hardware (screws, wire nuts, etc.)
- Clear Crystal Accents (pre-attached or separate for assembly)
- Instruction Manual
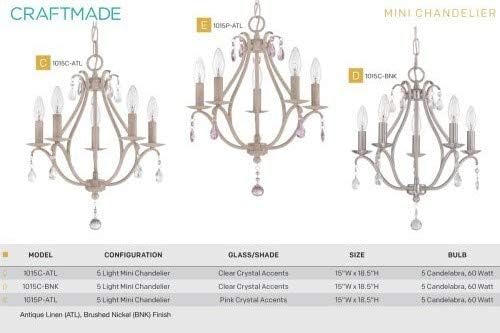
Figure 2: Product Configuration Overview. This image illustrates various mini chandelier models, including the 1015C-BNK, highlighting its design and general appearance.
4. Setup & Installation
Installation should be performed by a qualified electrician or a knowledgeable individual following all local electrical and building codes.
4.1. Preparation
- Turn off power at the main circuit breaker or fuse box.
- Ensure the existing junction box is securely mounted and capable of supporting the fixture's weight (approximately 4 pounds).
- Gather necessary tools: screwdriver, wire strippers, electrical tape, ladder, safety glasses.
4.2. Mounting the Fixture
- Attach the mounting bracket to the junction box using the provided screws.
- Determine the desired hanging length for the chain. Adjust the chain by removing links if necessary.
- Thread the electrical wires through the chain and canopy.
- Connect the fixture's ground wire to the house ground wire (usually bare copper or green) using a wire nut.
- Connect the fixture's neutral wire (usually white) to the house neutral wire (white) using a wire nut.
- Connect the fixture's hot wire (usually black) to the house hot wire (black) using a wire nut.
- Carefully tuck all wires into the junction box.
- Secure the canopy to the mounting bracket, ensuring it sits flush against the ceiling.
4.3. Attaching Crystal Accents and Bulbs
- If not pre-attached, carefully hang the clear crystal accents onto the designated hooks on the chandelier frame. Refer to the product image for placement.
- Install five candelabra-base (E12) bulbs, up to 60 watts each (not included). Do not overtighten.
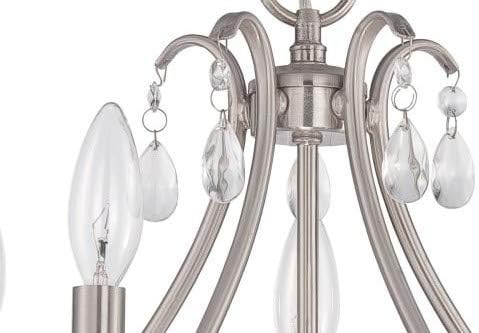
Figure 3: Detail of Light Socket and Crystal. This close-up shows the candelabra-style light socket and the attachment point for the clear crystal accents.
5. Operation
Once installed, your Jeremiah 1015C-BNK Chandelier is ready for use.
- Power On: Restore power at the circuit breaker.
- Control: This chandelier is designed to be controlled by a remote (if supplied with the fixture) or a standard wall switch.
- Lighting Direction: The fixture provides up/down light, illuminating both the ceiling and the area below.
6. Maintenance
Regular maintenance will help preserve the appearance and functionality of your chandelier.
- Cleaning:
- Always turn off the power and allow the fixture to cool before cleaning.
- Wipe the brushed nickel finish with a soft, dry cloth. Do not use abrasive cleaners or solvents, as they may damage the finish.
- For crystal accents, gently wipe with a damp cloth and then dry with a soft, lint-free cloth to maintain their sparkle.
- Bulb Replacement:
- Ensure power is off and bulbs are cool before replacing.
- Unscrew the old bulb and screw in a new candelabra-base (E12) bulb, not exceeding 60 watts.
- Inspection: Periodically check all connections and mounting hardware for tightness.
7. Troubleshooting
If your chandelier is not functioning as expected, consult the following common issues and solutions:
| Problem | Possible Cause | Solution |
|---|---|---|
| Light does not turn on. |
|
|
| Lights flicker. |
|
|
| Humming noise. |
|
|
If the problem persists after trying these solutions, contact customer support or a qualified electrician.
8. Specifications
| Feature | Detail |
|---|---|
| Brand | Craftmade / Jeremiah |
| Model Name | 1015C-BNK |
| Color | Brushed Nickel (Fixture), Clear (Shade) |
| Material | Alloy Steel (Fixture), Crystal (Shade) |
| Style | Traditional |
| Light Fixture Form | Chandelier |
| Specific Uses | Ceiling lighting |
| Indoor/Outdoor Usage | Indoor, Outdoor (Note: "Outdoor" might be a general brand spec, but chandeliers are typically indoor. User should verify for specific installation.) |
| Power Source | Corded Electric |
| Control Method | Remote (or wall switch) |
| Finish Type | Finished |
| Number of Light Sources | 5 |
| Voltage | 120 Volts |
| Included Components | 1015C-BNK (Chandelier unit) |
| Embellishment | Crystal |
| Lighting Method | Up/Down Light |
| Certification | ETL |
| Item Weight | 3.97 pounds (approx. 4 Pounds) |
| Product Dimensions | 18.05 x 15 x 18.5 inches |
| Wattage | 60 watts (per bulb, max) |
| Mounting Type | Protruding, Chain Hung |
| UPC | 647881134693 |
9. Warranty & Support
9.1. Warranty Information
This product is covered by a manufacturer's warranty. Specific details regarding the warranty period and coverage are not provided in this manual. Please refer to the product packaging or contact Craftmade customer support for complete warranty information.
9.2. Customer Support
For technical assistance, missing parts, or warranty inquiries, please contact Craftmade customer support. You can find more information and contact details by visiting the official Craftmade store:
Visit the Craftmade Store on Amazon
When contacting support, please have your model number (1015C-BNK) and purchase information readily available.
