Introduction
This manual provides comprehensive instructions for the installation, operation, and maintenance of your Anlapus 1080P HD 2MP 4-in-1 Hybrid Outdoor Security Camera. Please read this manual thoroughly before using the product to ensure proper setup and functionality. Keep this manual for future reference.
Safety Information
- Ensure the power supply used is compatible with the camera's requirements (12V DC, not included).
- Do not expose the camera to extreme temperatures or humidity beyond its specified operating conditions.
- Avoid direct exposure of the lens to strong light sources for extended periods.
- Installation should be performed by qualified personnel if you are unsure about electrical wiring.
- Secure all cables to prevent tripping hazards or damage.
- Regularly clean the camera lens with a soft, dry cloth.
Package Contents
Please check the package contents upon opening to ensure all items are present:
- 1 x Anlapus 1080P HD 2MP 4-in-1 Hybrid Outdoor Security Camera
- Mounting Screws and Plugs
- Instruction Manual (this document)
Note: Power supply and video extension cable are not included and must be purchased separately.
Product Overview
The Anlapus 4-in-1 security camera is designed for versatile surveillance, offering compatibility with multiple DVR technologies and robust outdoor performance.

Figure 1: Anlapus 4-in-1 Hybrid Outdoor Security Camera
Key Features:
- 4-in-1 Compatibility: Supports TVI, CVI, AHD, and CVBS/960H analog DVRs.
- 1080P HD Resolution: 1920(H)x1080(V) for clear and bright images.
- 80FT Night Vision: Equipped with 24pcs IR LEDs and Dual IR-Cut Filter.
- IP66 Weatherproof: Durable housing for outdoor use.
- 3.6mm Lens: Provides a wider viewing angle.
- 3-Axis Mounting Bracket: Allows flexible adjustment of the camera angle.
- OSD Menu: User-friendly menu for configuration and mode switching.

Figure 2: Camera Components - Features include IP66 weatherproof rating, 3.6mm lens for wider view, IR-Cut filter for crisper images, 24 IR LEDs for up to 80ft night vision, glass cover for protection, OSD Joystick for mode switching, power port (12V input), and video output.
Setup
1. Mounting the Camera
The camera features a 3-axis mounting bracket for flexible installation on walls or ceilings. Choose a location that provides the desired viewing angle and is within reach of power and video cables.
- Mark the drilling points using the camera base as a template.
- Drill holes and insert the provided wall plugs if necessary.
- Secure the camera base to the mounting surface using the screws.
- Adjust the camera angle using the 3-axis bracket to achieve optimal coverage. The bracket allows for 180° tilt and 360° rotation.

Figure 3: 3-Axis Mounting Bracket - Demonstrates ceiling and wall mount options with adjustable angles for optimal positioning and vandal-proof wire protection.
2. Connecting the Camera
Connect the camera to your DVR system. The camera requires a 12V DC power supply and a video extension cable (not included).
- Ensure your DVR supports one of the following formats: TVI, CVI, AHD, or CVBS/960H.
- Connect the camera's video output cable to the corresponding video input on your DVR.
- Connect the camera to a 12V DC power supply.
- If no image is displayed, you may need to switch the camera's video output mode to match your DVR. Refer to the "Operating Instructions" section for details on switching modes.
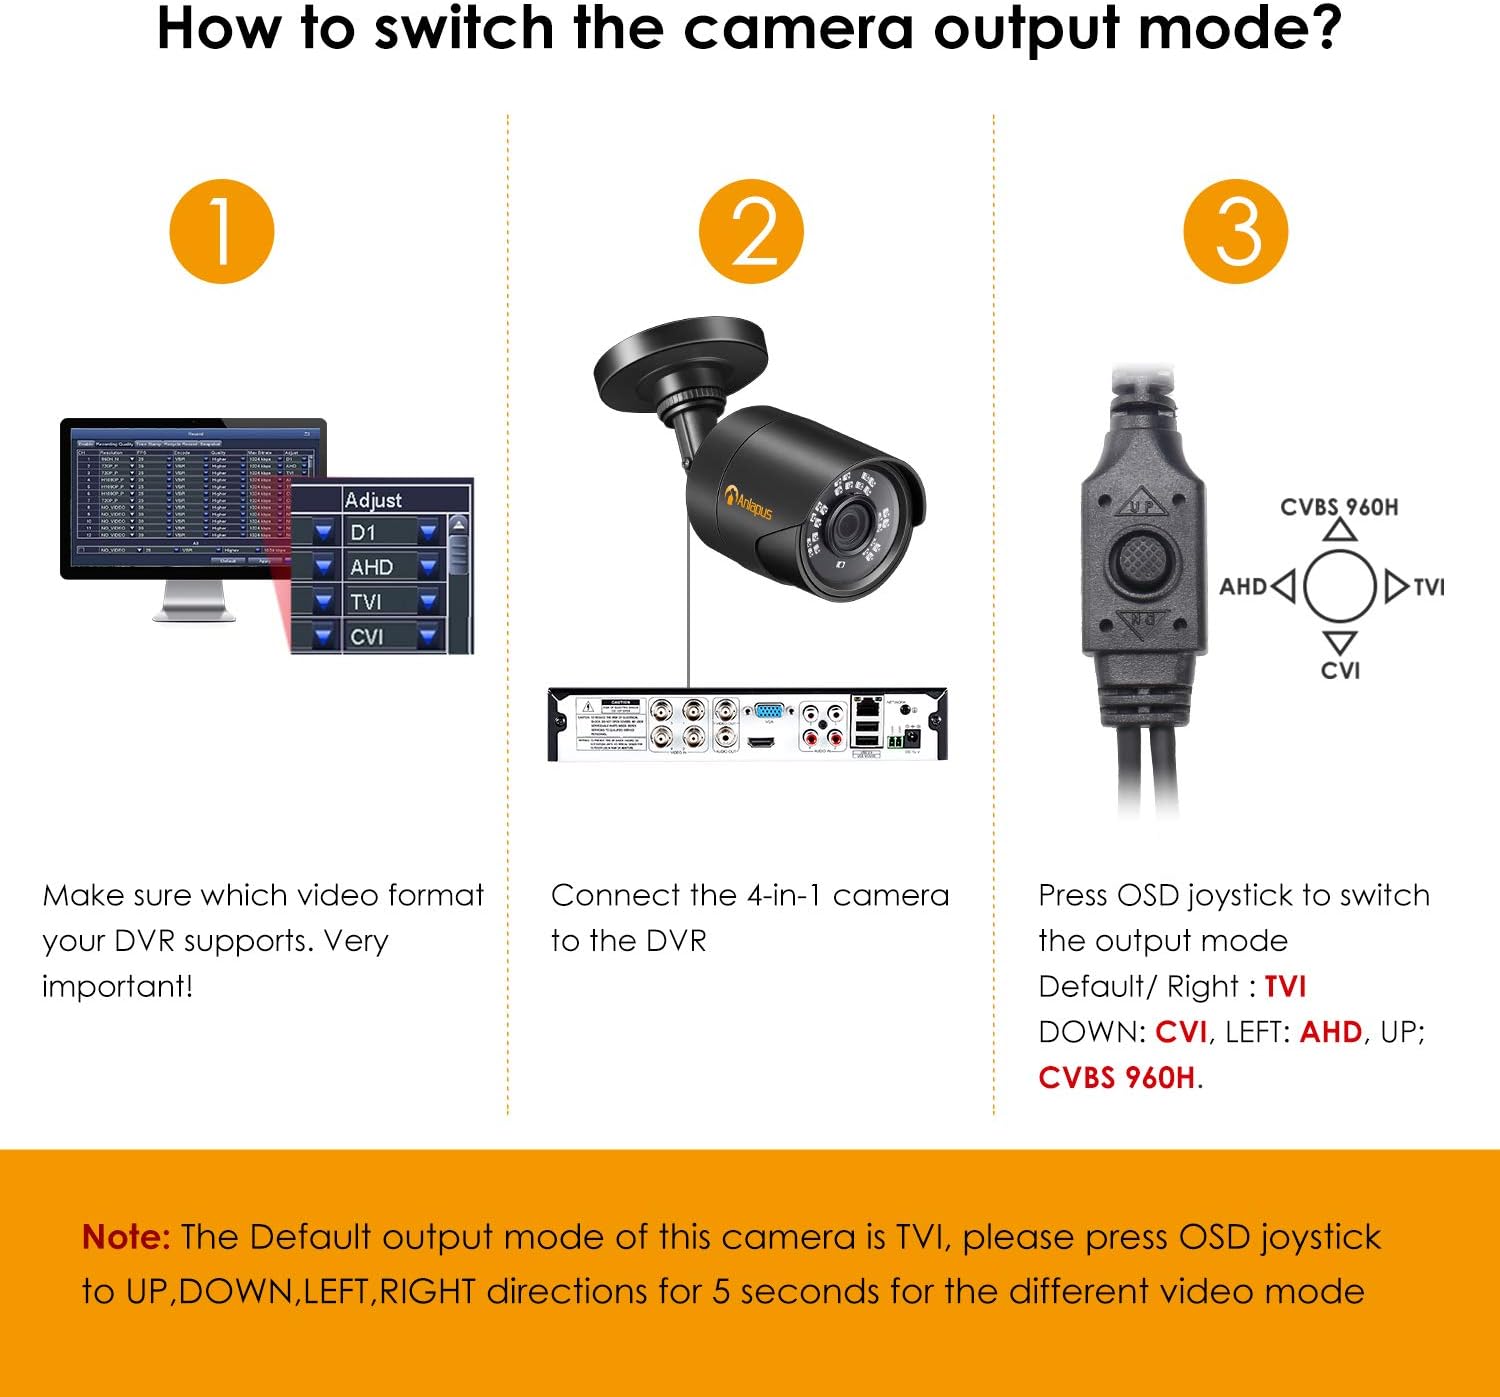
Figure 4: How to Switch Camera Output Mode - This diagram illustrates the three steps: 1. Verify DVR video format, 2. Connect the 4-in-1 camera to the DVR, 3. Press the OSD joystick to switch the output mode (Default/Right: TVI, Down: CVI, Left: AHD, Up: CVBS 960H). A note emphasizes that the default output is TVI and to use the OSD joystick for 5 seconds in UP, DOWN, LEFT, RIGHT directions for different video modes.

Figure 5: Adjusting Camera Mode to Match DVR - This image shows the compatibility of the 4-in-1 camera with different DVR types (TVI, 960H Analog/CVBS, CVI, AHD) and how to use the OSD button (UP for CVBS 960H, DOWN for CVI, LEFT for AHD) to achieve a compatible image. It highlights that if the DVR only supports TVI, the camera will self-adapt, but for other modes, manual switching via the OSD button is required.
Video Tutorial: How to Use Anlapus 4-in-1 Camera
This video demonstrates the process of connecting and switching modes for the Anlapus 4-in-1 camera, providing a visual guide to the OSD button functionality.
Operating Instructions
1. Switching Video Modes
The Anlapus 4-in-1 camera supports TVI, CVI, AHD, and CVBS/960H video formats. The default mode is TVI. To switch between modes, use the OSD joystick located on the camera's short cable.
- To switch to CVBS/960H: Push the OSD joystick UP and hold for 5 seconds, then release.
- To switch to CVI: Push the OSD joystick DOWN and hold for 5 seconds, then release.
- To switch to AHD: Push the OSD joystick LEFT and hold for 5 seconds, then release.
- To switch to TVI: Push the OSD joystick RIGHT and hold for 5 seconds, then release.
If your DVR supports 4-in-1 (or 5-in-1) formats, it is recommended to set the camera to TVI, AHD, or CVI mode for the best image quality.

Figure 6: OSD Menu for Mode Switch Configuration - This image details how to switch between Analog (CVBS), AHD, TVI, and CVI modes using the OSD joystick by pressing and holding for 5 seconds in the indicated directions.
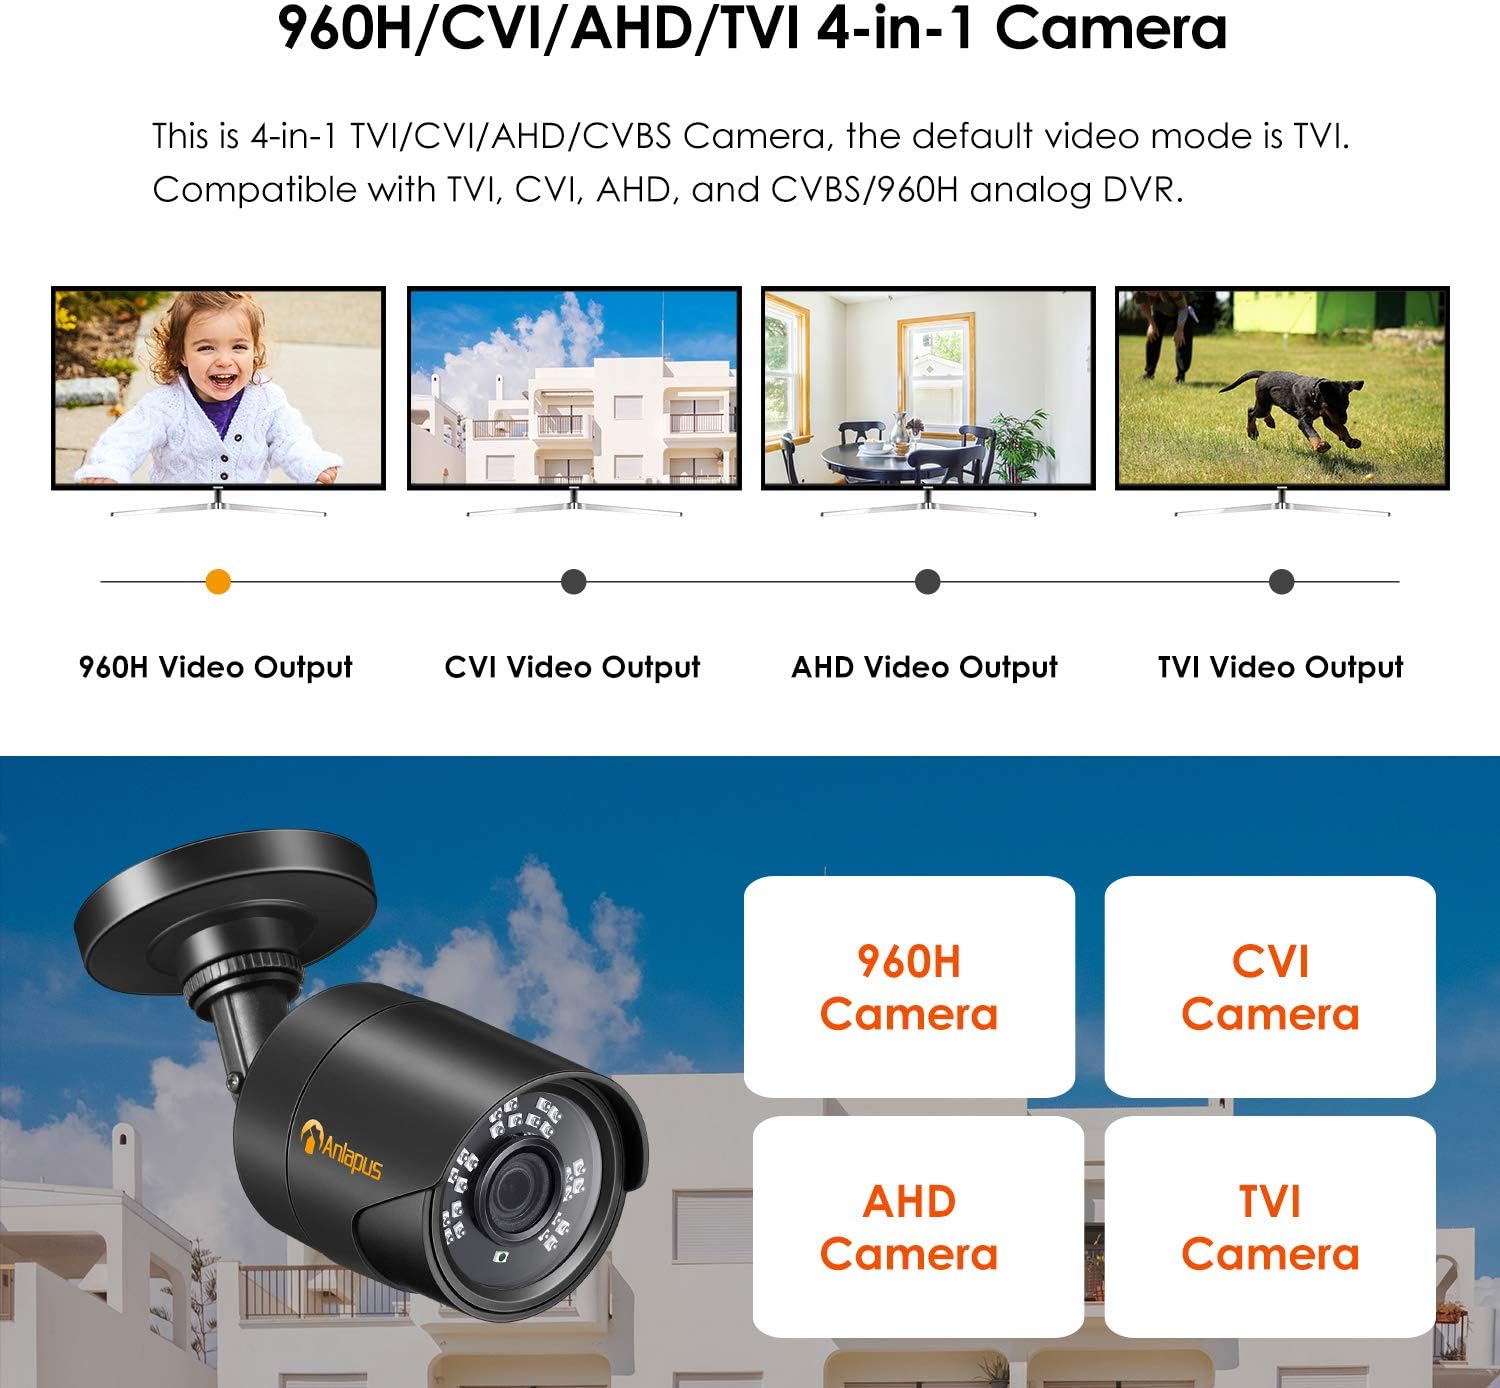
Figure 7: 960H/CVI/AHD/TVI 4-in-1 Camera - Illustrates the camera's compatibility with 960H, CVI, AHD, and TVI video outputs, emphasizing its hybrid nature.
2. Day and Night Vision
The camera automatically switches between day (color) and night (black & white) modes based on ambient light conditions. The 24 IR LEDs provide clear night vision up to 80 feet.
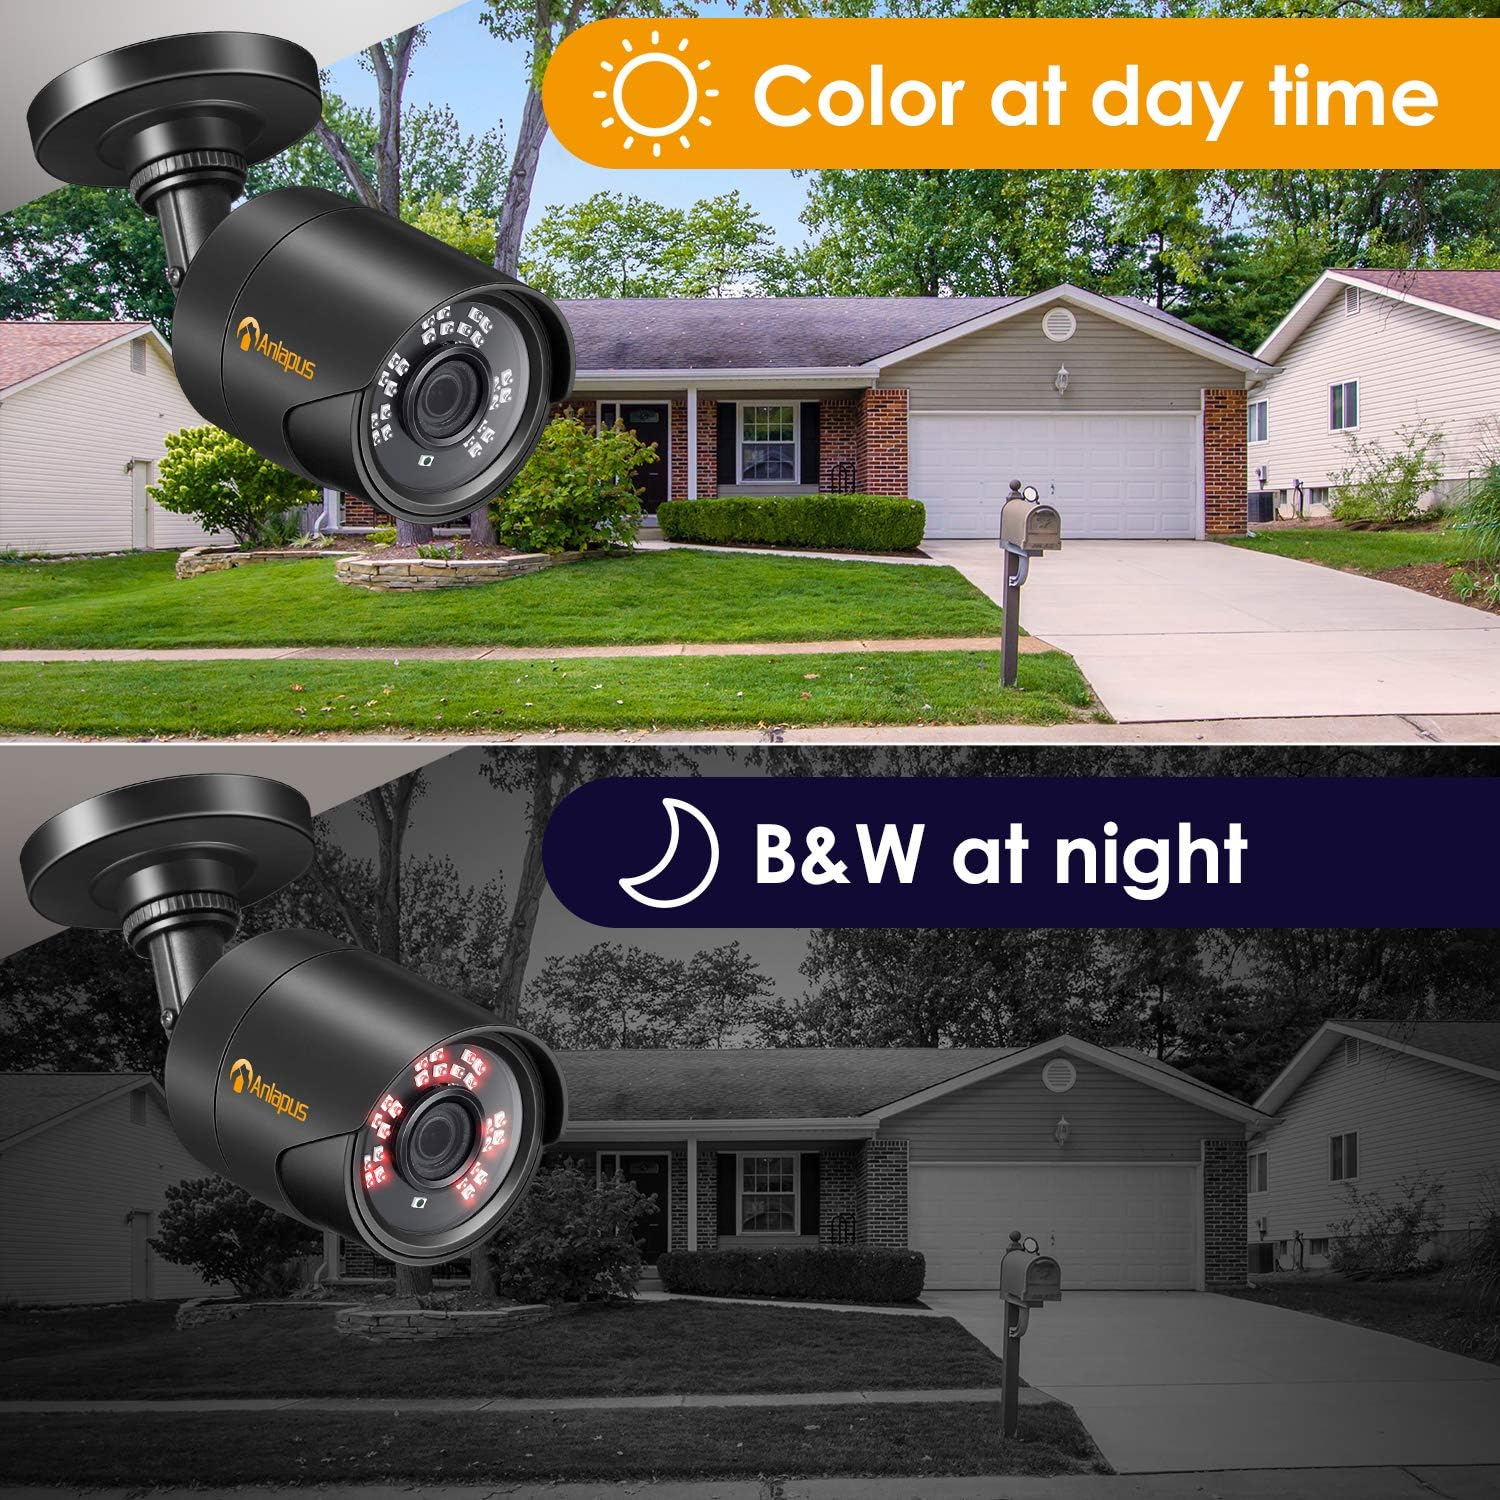
Figure 8: Color at Day Time vs. B&W at Night - Shows a visual comparison of the camera's performance during the day (color image) and at night (black and white image with IR illumination).
3. Indoor and Outdoor Use
Thanks to its IP66 weatherproof rating, the camera is suitable for both indoor and outdoor environments, providing reliable surveillance in various conditions.

Figure 9: Indoors and Outdoors - Highlights the camera's versatility for both indoor and outdoor applications, emphasizing its easy installation and wide applicability for home, office, school, and family care.
Maintenance
- Cleaning: Use a soft, lint-free cloth to clean the camera lens and housing. Do not use harsh chemicals or abrasive cleaners.
- Cable Inspection: Periodically check all cables for signs of wear or damage, especially if installed outdoors.
- Firmware Updates: Check the manufacturer's website for any available firmware updates to ensure optimal performance and security.
Troubleshooting
| Problem | Possible Cause | Solution |
|---|---|---|
| No image on DVR/monitor. | Incorrect video mode selected on camera. | Switch the camera's video output mode using the OSD joystick to match your DVR's input (TVI, CVI, AHD, or CVBS/960H). Refer to the "Operating Instructions" section or the video tutorial for detailed steps. |
| Poor image quality / blurry picture. | Dirty lens; improper focus (if adjustable); incompatible DVR resolution. | Clean the lens. Ensure your DVR supports 1080P resolution. Check cable connections. |
| Night vision not working. | Insufficient power; IR LEDs malfunction. | Ensure adequate power supply. Test with a known good power supply if available. Contact support if IR LEDs are not illuminating in dark conditions. |
| Camera not powering on. | No power supply connected; faulty power supply or cable. | Verify power supply connection and functionality. Test with a known good power supply if available. |
Specifications
| Feature | Detail |
|---|---|
| Model Name | A1C-124C4-BNS |
| Item Model Number | 1AC-1242T-B-N |
| Video Capture Resolution | 1080p (1920x1080) |
| Effective Video Resolution | 1080 Pixels |
| Maximum Webcam Image Resolution | 2 MP |
| Video Capture Format | 4-in-1 (TVI/CVI/AHD/CVBS) |
| Lens | 3.6mm |
| Night Vision Range | Up to 80 Feet (24 IR LEDs) |
| Indoor/Outdoor Usage | Outdoor |
| International Protection Rating | IP66 (Weatherproof) |
| Connectivity Protocol | Wired |
| Power Source | Corded Electric (12V DC, not included) |
| Mounting Type | Wall Mount |
| Dimensions (L x W x H) | 1 x 1 x 1 inches |
| Item Weight | 1.6 ounces |
| Color | Black |
| Photo Sensor Technology | CMOS |
| Special Features | Motion Sensor, Night Vision, Portable |
Warranty and Support
For warranty information and technical support, please refer to the official Anlapus website or contact their customer service directly. Keep your purchase receipt as proof of purchase for warranty claims.
Manufacturer: Nine Star Security & Technology Inc.
Website: www.anlapus.com


