
1. Introduction
The SHARP SMD2470ASY Microwave Drawer Oven is designed for modern kitchens, offering flexible placement and a sleek, integrated appearance. This 24-inch, 1.2 cubic feet, 950-watt appliance features a concealed control panel and an automatic drawer system for convenient operation. Its design allows for installation below an island, peninsula, or standard cabinetry, or even below a wall oven, optimizing kitchen space and aesthetics.
Key Features:
- Automatic Drawer System: Smoothly opens and enables hands-free closing for convenient operation.
- Convenient Kitchen Placement: Allows for easier cooking, saving prep and cleanup time with flexible positioning.
- Concealed Control Panel: Opens to an easy-to-read and operate 45-degree angle for seamless access.
- Spacious Cooking Capacity: Large enough for a 4-quart casserole dish or a 20-ounce beverage with 1.2 cubic feet interior.
2. Important Safety Information
Read all instructions carefully before using the appliance to reduce the risk of fire, electric shock, injury to persons, or exposure to excessive microwave energy.
General Safety Precautions:
- Do not attempt to operate this oven with the door open or if the door is damaged.
- Do not heat liquids or other foods in sealed containers as they are liable to explode.
- Do not use corrosive chemicals or vapors in this appliance.
- Always supervise children when they are using the microwave.
- Ensure proper grounding to avoid electrical shock hazards.
3. Setup & Installation
The SMD2470ASY Microwave Drawer Oven is designed for built-in installation. Proper placement and ventilation are crucial for optimal performance and safety. Refer to the detailed installation manual for complete instructions.
Placement Options:
- Below an island or peninsula.
- Below standard cabinetry.
- Below a wall oven.
Dimensions and Cutout Requirements:
Carefully measure your installation area to ensure proper fit and ventilation. Consult the provided diagrams for precise measurements.
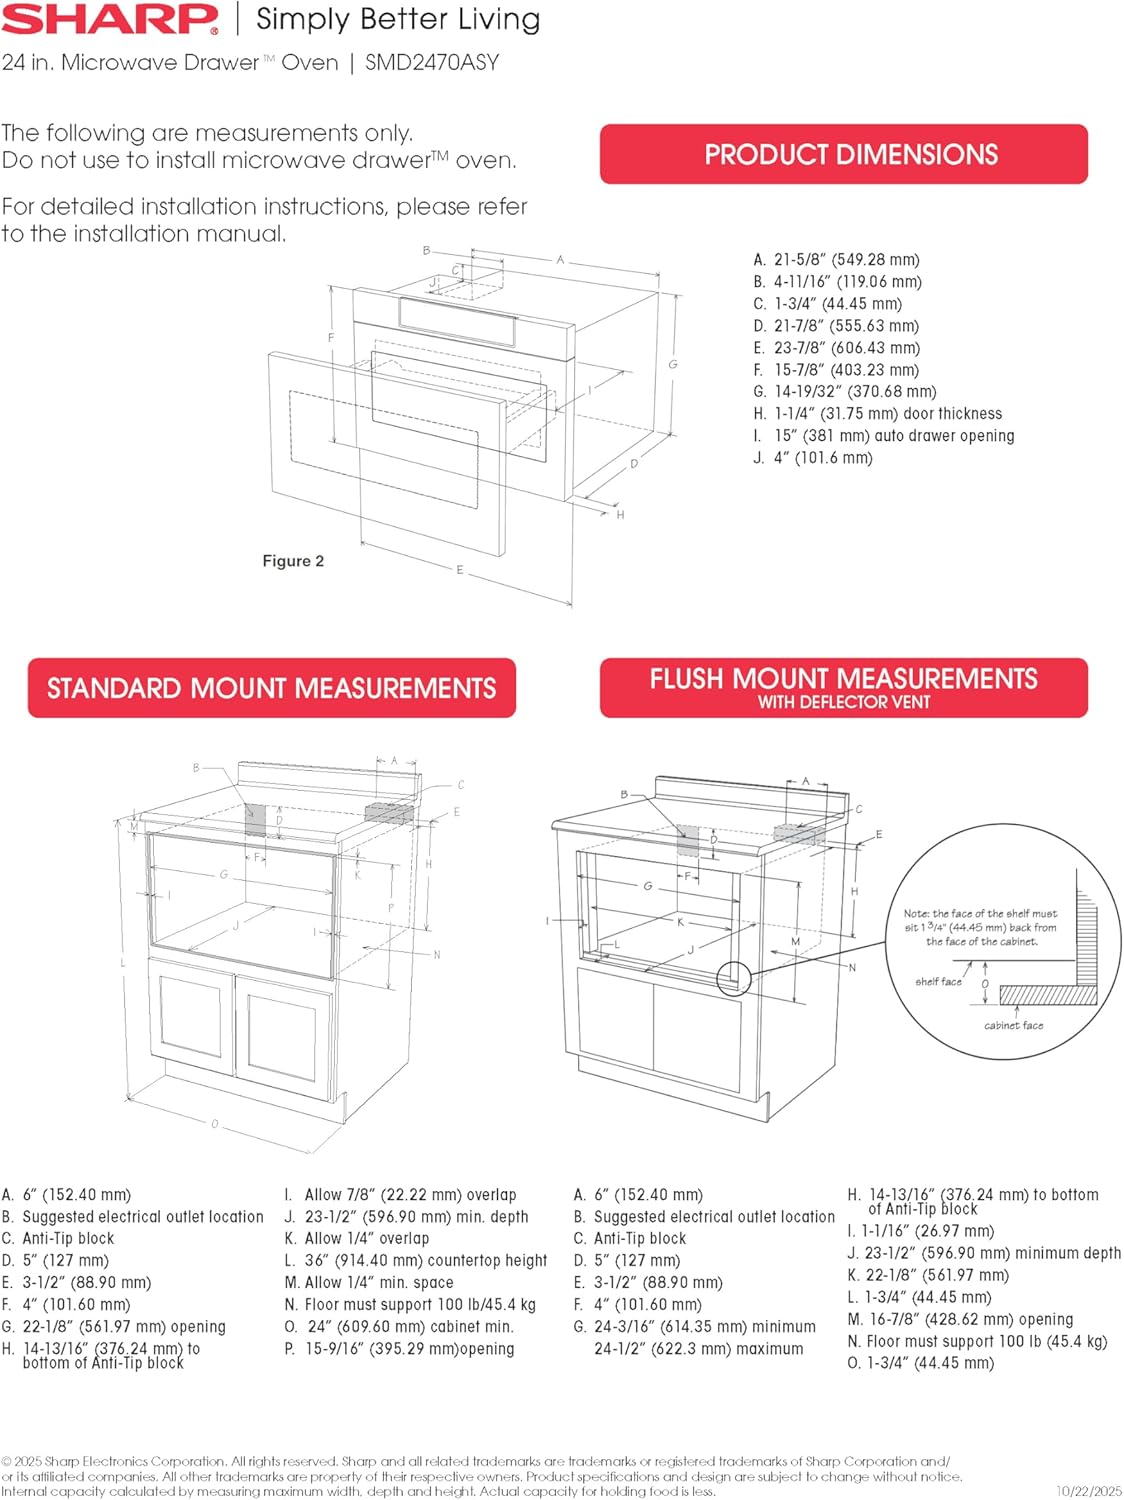
Figure 1: Standard and Flush Mount Installation Measurements. This diagram illustrates the necessary cutout dimensions for both standard and flush mounting options, ensuring proper fit within cabinetry.
- Interior Cavity Dimensions: 17-5/16" x 7-1/8" x 16-9/16" (W x H x D)
- Product Dimensions: 23-7/8" x 15-7/8" x 23" (W x H x D)
- Standard Mount Cutout Dimensions: 22-1/8" x 15-9/16" x 23-1/2" (W x H x D)
- Flush Mount Cutout Dimensions: 24-3/16" x 16-7/8" x 23-1/2" (W x H x D)

Figure 2: Product Dimensions. This image provides a visual representation of the microwave drawer's external dimensions, including width, height, and depth.
4. Operating Instructions
The SMD2470ASY features an intuitive control panel that is concealed when not in use, maintaining a clean kitchen aesthetic. The automatic drawer system ensures smooth and effortless access to the cooking cavity.
Control Panel:
The control panel is located at the top of the drawer and tilts out at a 45-degree angle for easy viewing and operation. It includes a digital LCD display and various function buttons.

Figure 3: Concealed Control Panel. This image shows the digital LCD display and touch controls, which are hidden until activated.
Basic Operation:
- Open the Drawer: Gently pull the control panel forward or press the 'OPEN' button on the control panel. The drawer will slide out automatically.
- Place Food: Place your food or beverage directly onto the ceramic tray inside the drawer.
- Close the Drawer: Press the 'CLOSE' button or gently push the drawer inward. It will close smoothly and automatically.
- Select Cooking Function: Use the touch controls to select desired cooking time, power level, or a preset sensor cooking option.
- Start Cooking: Press the 'START' button.

Figure 4: Easy Touch Automatic Drawer. A finger activates the 'OPEN' button, demonstrating the smooth, hands-free operation of the microwave drawer.
Sensor Cooking:
The oven features advanced Sensor Cook technology for precise defrost and cooking capabilities. Select from various sensor options such as Popcorn, Reheat, Beverage, Defrost, Potatoes, and Vegetables. The sensor automatically adjusts cooking time and power levels for optimal results.

Figure 5: Sensor Cook Technology. This image highlights the microwave's ability to precisely cook and defrost various food items, from roasted potatoes to raw meat patties, using its advanced sensor technology.
Special Functions:
- Melt/Soften: Ideal for melting butter, chocolate, or softening cream cheese.
- Keep Warm: Maintains food at a warm temperature after cooking.
- Help/Settings: Access additional settings and information.

Figure 6: Spacious Interior. A large casserole dish fits comfortably inside the microwave drawer, showcasing its generous 1.2 cubic feet capacity.
5. Care & Maintenance
Regular cleaning and maintenance will ensure the longevity and optimal performance of your microwave drawer oven.
Cleaning the Interior:
- Wipe the interior with a soft, damp cloth and mild soap after each use.
- For stubborn stains, use a microwave-safe cleaner.
- Ensure the ceramic tray is clean and free of food debris.
Cleaning the Exterior:
- Clean the stainless steel exterior with a soft cloth and a stainless steel cleaner.
- Avoid abrasive cleaners or scouring pads that can scratch the surface.
- Wipe the control panel gently with a damp cloth.
6. Troubleshooting
If you encounter any issues with your microwave drawer oven, refer to the following common troubleshooting tips before contacting customer support.
Common Issues:
- Oven Not Operating: Check if the appliance is properly plugged in. Ensure the circuit breaker has not tripped. Make sure the drawer is fully closed.
- Food Not Heating: Verify that the cooking time and power level are set correctly. Ensure the door is securely closed.
- Unusual Noises: Minor operational noises are normal. If loud or unusual noises occur, ensure no foreign objects are obstructing the drawer mechanism.
- Control Panel Unresponsive: Try resetting the appliance by unplugging it for a few minutes and then plugging it back in.
For persistent issues, please contact Sharp customer support.
7. Specifications
Detailed technical specifications for the SHARP SMD2470ASY Microwave Drawer Oven.
| Feature | Specification |
|---|---|
| Brand Name | Sharp |
| Model Info | SMD2470ASY |
| Item Weight | 74 pounds |
| Product Dimensions | 23-7/8"D x 15-7/8"W x 23"H |
| Item Model Number | SMD2470ASY |
| Energy Use | 950 Watts |
| Capacity | 1.2 Cubic Feet |
| Installation Type | Built-In |
| Part Number | SMD2470AS |
| Special Features | Defrost |
| Oven Cooking Mode | Electric |
| Color | Stainless Steel |
| Voltage | 120 Volts |
| Material Type | Stainless Steel |
| Inner Material Type | Stainless Steel |
| Included Components | Microwave |

Figure 7: Product Feature and Specification Sheet. This document provides a comprehensive overview of the microwave's features, control panel options, and additional specifications.
8. Warranty and Support
Sharp provides a limited warranty for this product. Please refer to the warranty card included with your purchase for specific terms and conditions. For technical assistance, service, or to order replacement parts, please contact Sharp customer support through their official website or the contact information provided in your product documentation.
Warranty Period: 1 Year (Home Limited) for parts and labor, 4 Years Additional (Parts Only) for Magnetron Tube.


