1. Introduction
This manual provides detailed instructions for the assembly, operation, and maintenance of your Palram Canopia Rion Sun Room. This 8 ft. x 12 ft. lean-to structure is designed to attach to an existing house, porch, or patio, offering a versatile space that can function as a solarium or greenhouse. It features twin-wall polycarbonate roof panels for UV protection and diffused light, and clear acrylic side walls for high light transmission and clear views.

Image 1.1: Overview of the Palram Canopia Rion Sun Room.

Image 1.2: The Sun Room installed as a lean-to structure against a brick house.
2. Safety Information
Read all instructions carefully before assembly and use. Failure to follow these instructions may result in injury or damage to the product. Keep this manual for future reference.
- Site Preparation: Ensure the installation site is level and clear of obstructions. A solid, square foundation is crucial for proper assembly and structural integrity.
- Tools: Use appropriate tools for assembly. Wear protective gloves and eyewear as needed.
- Assembly: Assembly typically requires two or more people. Do not attempt to assemble alone. Follow the step-by-step instructions precisely.
- Weather Conditions: Avoid assembly during strong winds, rain, or extreme temperatures.
- Anchoring: Securely anchor the structure to the ground or an existing wall as instructed to prevent wind damage.
- Weight Limits: Do not hang heavy objects from the frame or roof. Be aware of snow load limits in your region.
3. Package Contents
Verify all components are present and undamaged before beginning assembly. Refer to the detailed parts list provided in the packaging. The kit includes:
- Aluminum frame profiles
- Twin-wall polycarbonate roof panels
- Clear acrylic side wall panels
- Hinged door assembly
- Roof vent assembly
- Fasteners and connectors (screws, bolts, plastic T-pins)
- Gaskets and sealing strips
- Instruction manual (this document and potentially a more detailed printed version)
If any parts are missing or damaged, contact customer support before proceeding with assembly.
4. Setup and Assembly
The Palram Canopia Rion Sun Room utilizes a sliding panel assembly system. Careful adherence to the instructions is essential for successful construction.
4.1 Site Preparation
- Choose a flat, level surface for installation. The base must be perfectly square to ensure proper panel and door alignment.
- Clear the area of any debris, vegetation, or uneven ground.
- Ensure adequate clearance around the structure for assembly and future access.
4.2 Assembly Steps
Refer to the detailed graphical instructions provided with your kit for specific step-by-step guidance. The general process involves:
- Base Assembly: Construct the base frame, ensuring it is square and level. This is critical for the entire structure.
- Wall Frame Construction: Assemble the vertical and horizontal aluminum profiles for the side and front walls.
- Panel Insertion: Carefully slide the clear acrylic side wall panels into the designated channels in the frame.
- Roof Frame Assembly: Construct the roof frame, incorporating the roof vent opening.
- Roof Panel Insertion: Slide the twin-wall polycarbonate roof panels into the roof frame channels.
- Door Installation: Attach the hinged door assembly, ensuring it opens and closes smoothly and seals properly. The door can typically be installed to open from either the left or right side.
- Vent Installation: Install the roof vent mechanism.
- Anchoring: Securely anchor the completed structure to the ground and the adjacent wall of your house using appropriate hardware.
Important Note: Some customer feedback indicates that drilling out certain holes may be necessary for proper fit. Proceed with caution and verify alignment before making modifications. Pay close attention to the placement of plastic T-pins; not all holes require them.
5. Operating Instructions
5.1 Door Operation
The Sun Room features a hinged door for access. To open, turn the handle and pull. To close, push the door firmly until it latches. Ensure the door is securely closed to maintain internal temperature and prevent entry of pests.

Image 5.1: Detail of the door handle and lock mechanism.
5.2 Ventilation
The included roof vent allows for air circulation, which is crucial for regulating temperature and humidity, especially when used as a greenhouse. Open the vent manually to allow hot air to escape and fresh air to enter. Consider installing an automatic vent opener (sold separately) for passive temperature control.

Image 5.2: The adjustable roof vent for air circulation.

Image 5.3: The Sun Room provides an environment suitable for plant growth.
6. Maintenance
Regular maintenance ensures the longevity and optimal performance of your Sun Room.
- Cleaning: Clean the polycarbonate and acrylic panels periodically with mild soap and water. Avoid abrasive cleaners or tools that could scratch the surfaces. Rinse thoroughly with clean water.
- Frame Inspection: Annually inspect the aluminum frame for any loose fasteners or signs of corrosion. Tighten as necessary.
- Panel Inspection: Check panels for cracks or damage. Replace damaged panels promptly to maintain insulation and weather resistance.
- Seals: Inspect door and vent seals for wear or damage. Ensure they provide a tight seal to prevent drafts and water ingress.
- Snow Removal: In areas with heavy snowfall, regularly remove accumulated snow from the roof to prevent excessive load. The structure is tested for a snow load of 75 kg/m² (15.4 lb/ft²).

Image 6.1: The Sun Room is designed to withstand moderate snow loads, but regular removal is recommended in heavy snowfall areas.
7. Troubleshooting
This section addresses common issues you might encounter with your Sun Room.
- Water Leaks:
- Cause: Improperly sealed panels, damaged gaskets, or insufficient caulking at the base or where it meets the house.
- Solution: Inspect all panel edges and seals. Apply silicone sealant where panels meet the frame and along the base. Ensure the connection to the house wall is properly flashed and sealed.
- Door Not Closing/Latching Properly:
- Cause: Base not perfectly square, frame distortion, or incorrect door installation.
- Solution: Verify the base is square and level. Check door hinges and alignment. Adjust as needed. If the issue persists, re-examine the assembly steps for the door and surrounding frame.
- Panels Flexing/Coming Out in Wind:
- Cause: Insufficient anchoring, loose panel retention clips, or extreme wind conditions exceeding design limits.
- Solution: Ensure the structure is securely anchored to the ground and house. Verify all panel retention clips and T-pins are correctly installed and secure. Consider additional bracing in very windy locations if the issue persists.
- Condensation Inside:
- Cause: High humidity inside and lower temperatures outside, common in greenhouses.
- Solution: Increase ventilation by opening the roof vent more frequently or for longer durations. Ensure proper air circulation.
8. Specifications
Key technical details for the Palram Canopia Rion Sun Room (Model HG7612):
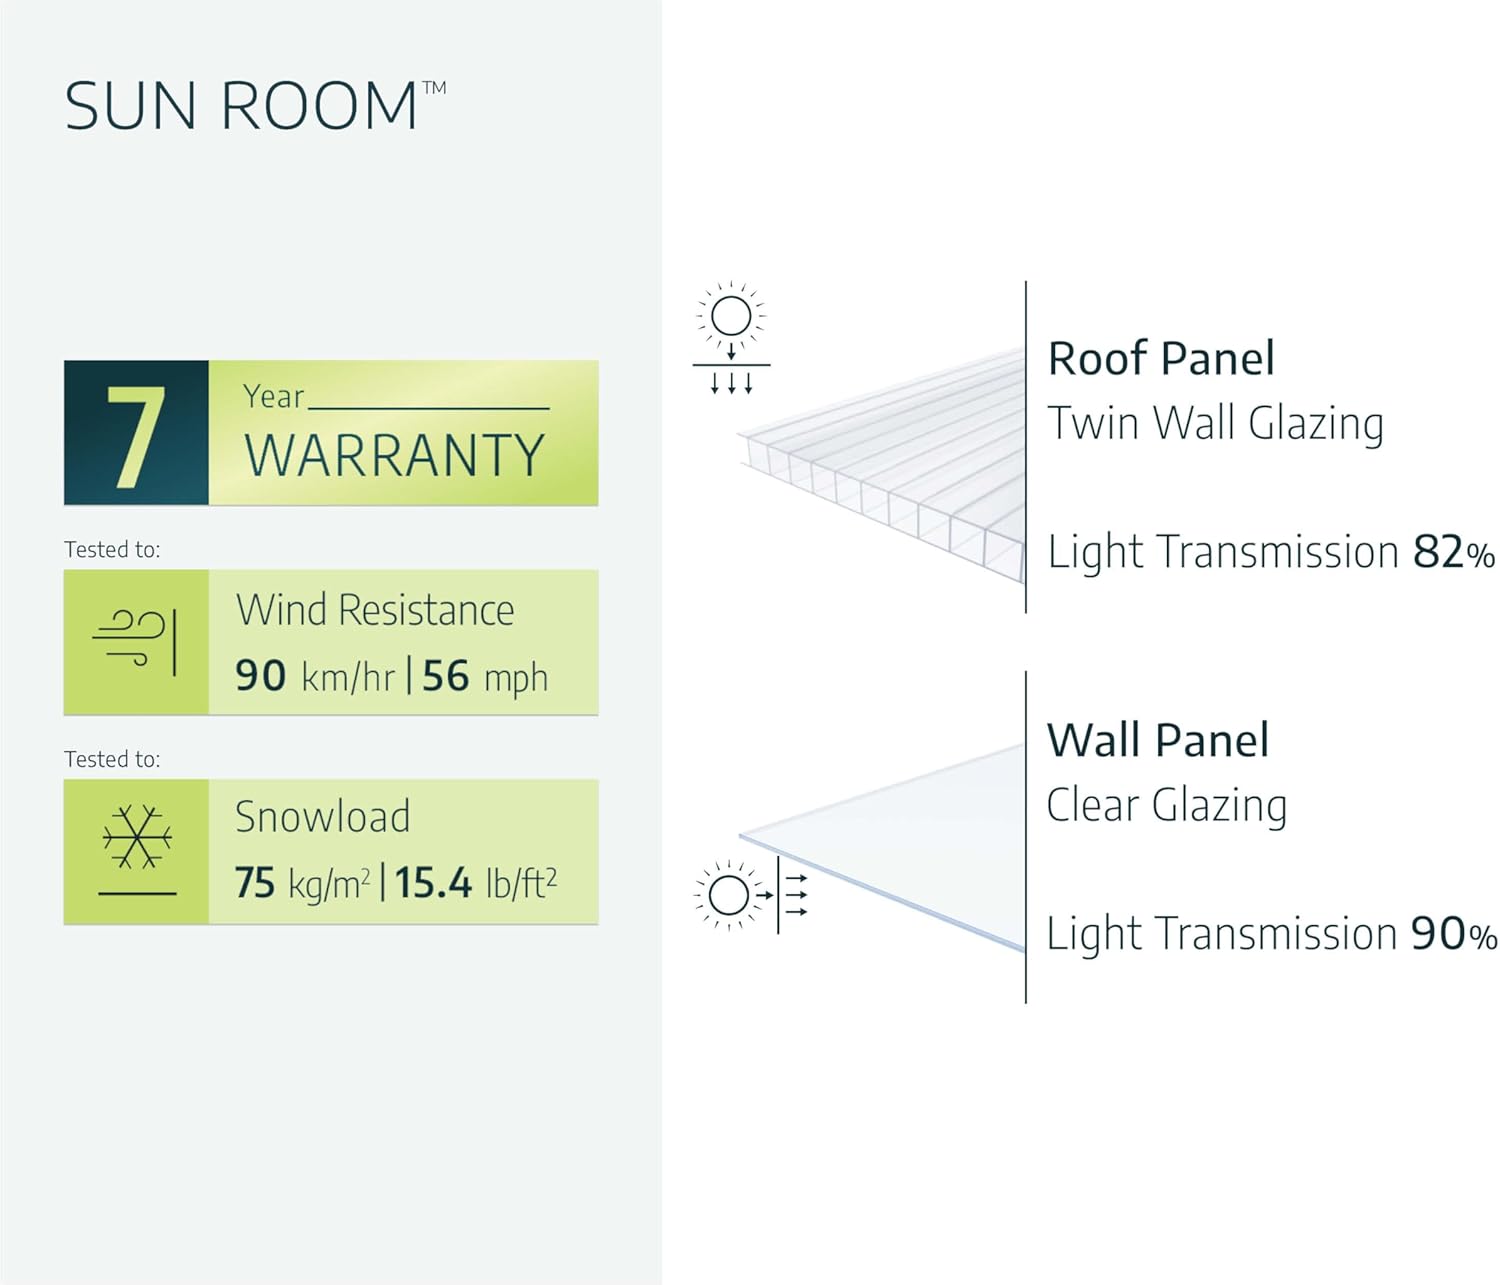
Image 8.1: Dimensional diagram of the Sun Room.
| Feature | Detail |
|---|---|
| Model Number | HG7612 |
| Dimensions (L x W x H) | 151.2 x 101.6 x 104.7 inches (8' x 12' nominal size) |
| Item Weight | 386 pounds |
| Frame Material | Aluminum |
| Roof Panel Material | 4mm Twin-wall Polycarbonate |
| Wall Panel Material | Crystal Clear Acrylic |
| Nominal Wall Thickness | 5 millimeters |
| Number of Doors | 1 (Hinged) |
| Number of Vents | 1 (Roof Vent) |
| UV Protection | 100% on panels |
| Light Transmission (Roof) | 82% |
| Light Transmission (Walls) | 90% |
| Wind Resistance | 90 km/hr (56 mph) |
| Snow Load | 75 kg/m² (15.4 lb/ft²) |
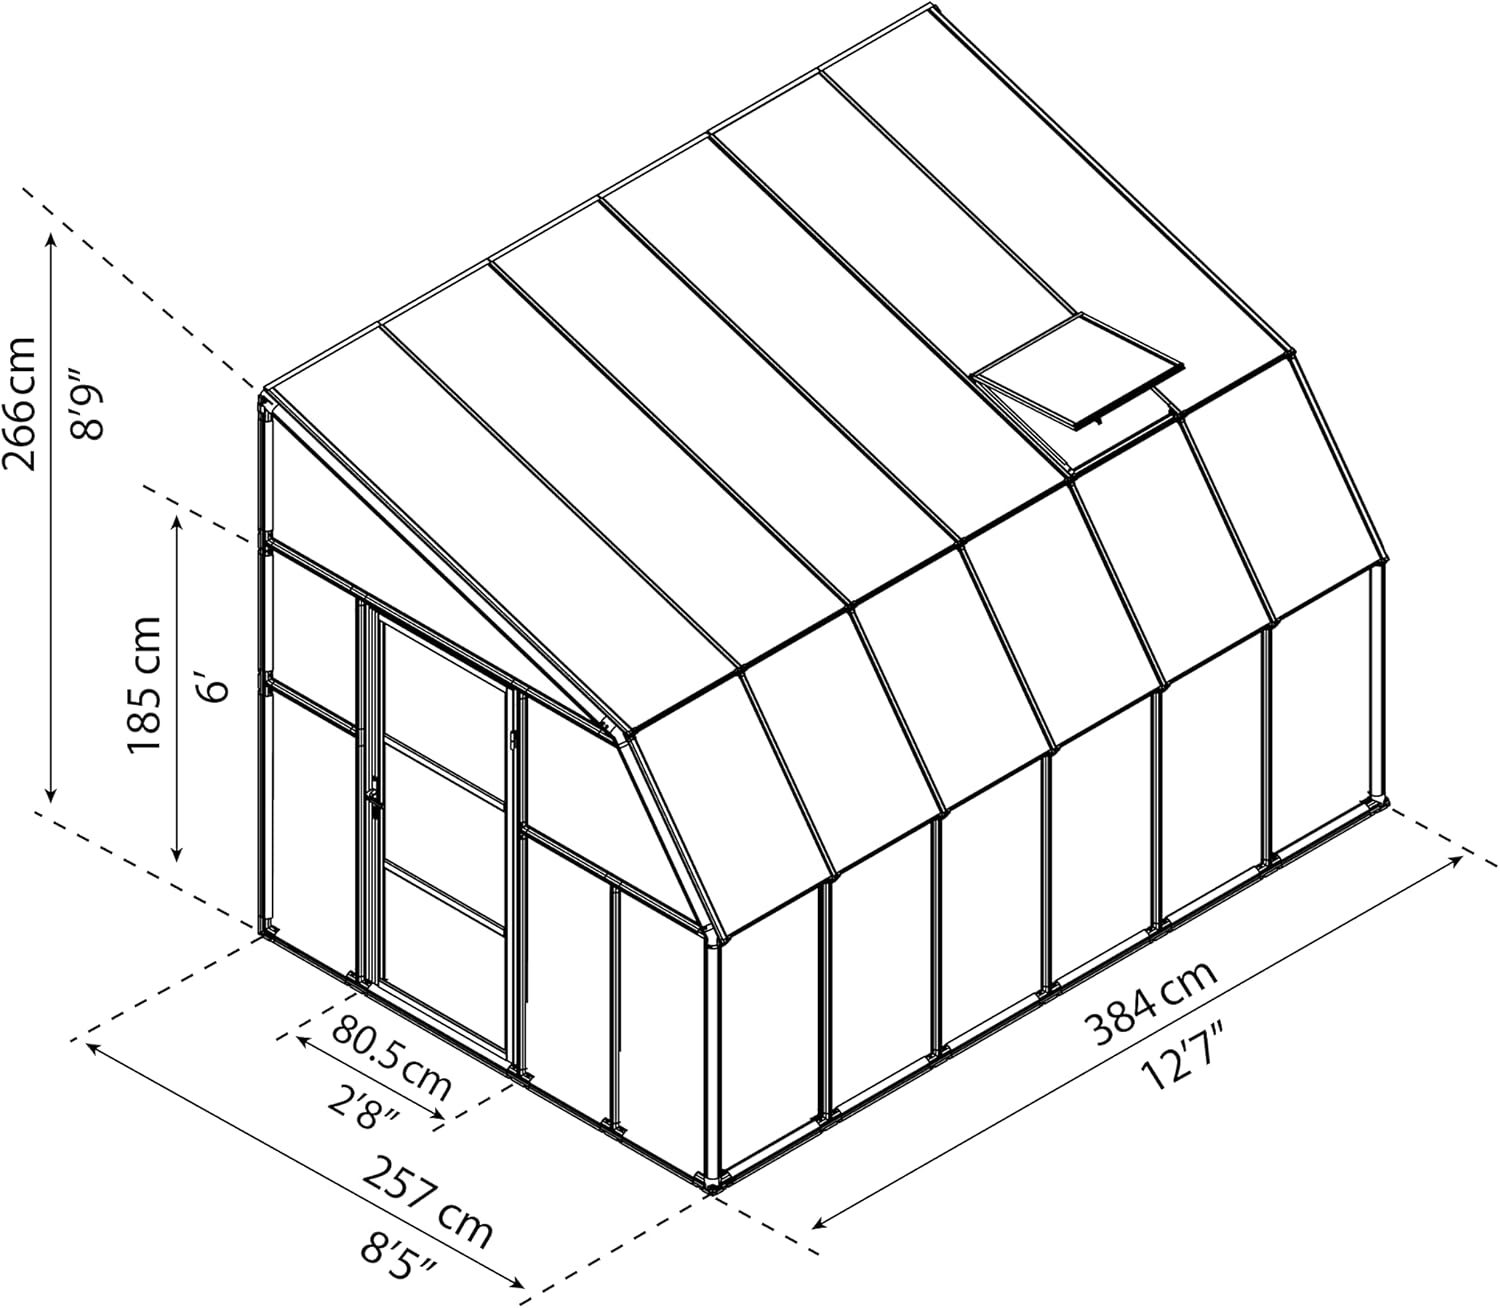
Image 8.2: Performance specifications and warranty details.
9. Warranty
The Palram Canopia Rion Sun Room is backed by a 7-year limited warranty. This warranty covers defects in materials and workmanship under normal use and service. For specific terms, conditions, and claim procedures, please refer to the warranty documentation included with your product or contact Palram customer support.
10. Support and Contact Information
For technical assistance, missing parts, or warranty claims, please contact Palram customer support:
- Phone: 877-627-8476
- Online Resources: For additional information and support, you may visit the official Palram website or refer to the digital installation manual available at https://manuals.plus/m/7b9fabaa379e3d739c3b4df405d645e4942517487775bd2c4d3e0ebf4cb26fd5.


