
1. Introduction
This manual provides comprehensive instructions for the safe and efficient operation, setup, and maintenance of your JANOME 5519 Electro-mechanical Sewing Machine. Please read this manual thoroughly before using the machine to ensure proper function and to prevent damage or injury. Keep this manual in a safe place for future reference.
2. Safety Instructions
- Always unplug the machine from the electrical outlet when cleaning, lubricating, or when the machine is not in use.
- Keep fingers away from all moving parts, especially the needle, presser foot, and handwheel.
- Use only the accessories recommended by the manufacturer.
- Never operate the machine with any air openings blocked. Keep ventilation openings of the sewing machine and foot controller free from the accumulation of lint, dust, and loose cloth.
- Do not operate where aerosol (spray) products are being used or where oxygen is being administered.
- This appliance is not intended for use by persons (including children) with reduced physical, sensory or mental capabilities, or lack of experience and knowledge, unless they have been given supervision or instruction concerning use of the appliance by a person responsible for their safety.
3. Product Overview
The JANOME 5519 is an electro-mechanical sewing machine designed for various sewing tasks. Familiarize yourself with its components for optimal use.
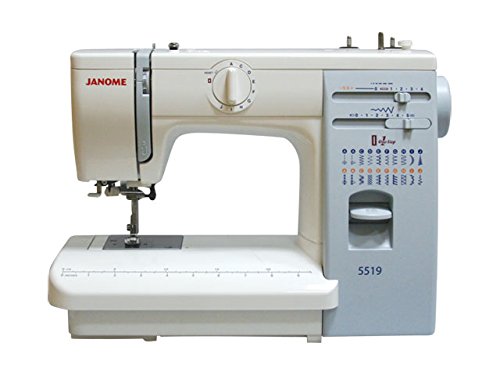
Figure 1: Front view of the JANOME 5519 Electro-mechanical Sewing Machine. This image displays the machine's main body, including the needle area, presser foot, stitch selection dial, stitch pattern display, and the JANOME branding on the left arm. The model number '5519' is visible on the right side panel.
Key Components:
- Stitch Selector Dial: Located on the front panel, used to choose desired stitch patterns.
- Stitch Pattern Display: Shows available stitch types and their corresponding settings.
- Tension Dial: Adjusts the tension of the upper thread.
- Presser Foot Lifter: Raises and lowers the presser foot.
- Needle Clamp Screw: Secures the needle in place.
- Bobbin Winder: For winding thread onto the bobbin.
- Handwheel: Manually raises and lowers the needle.
- Foot Pedal Connector: Port for connecting the foot controller.
- Power Switch: Turns the machine on and off.
4. Setup
4.1 Unpacking
Carefully remove the machine from its packaging. Retain all packaging materials for storage or transport. Ensure all accessories listed in the packing list are present.
4.2 Power Connection
- Place the machine on a stable, flat surface.
- Connect the foot controller plug to the machine's foot controller jack.
- Insert the machine's power plug into a suitable electrical outlet.
- Turn on the power switch, usually located on the side or back of the machine.
4.3 Needle Installation
- Ensure the machine is unplugged.
- Raise the needle to its highest position by turning the handwheel towards you.
- Loosen the needle clamp screw.
- Insert a new needle with the flat side facing the back of the machine, pushing it up as far as it will go.
- Tighten the needle clamp screw securely.
4.4 Bobbin Winding
- Place a spool of thread on the spool pin.
- Guide the thread through the bobbin winding tension disc.
- Place an empty bobbin onto the bobbin winder spindle.
- Wrap the thread around the bobbin a few times, then push the bobbin winder spindle to the right.
- Press the foot controller gently to start winding. Stop when the bobbin is full.
- Cut the thread and push the bobbin winder spindle back to the left.
5. Operating Instructions
5.1 Threading the Upper Thread
- Raise the presser foot and the needle to its highest position.
- Place a spool of thread on the spool pin.
- Guide the thread through the upper thread guide.
- Follow the numbered threading path down through the tension discs and up to the take-up lever.
- Bring the thread down through the needle bar thread guide.
- Thread the needle from front to back. Pull about 6 inches of thread through the needle eye.
5.2 Inserting the Bobbin (Lower Thread)
- Open the bobbin cover plate.
- Insert the wound bobbin into the bobbin case, ensuring the thread unwinds in the correct direction (usually counter-clockwise).
- Guide the bobbin thread through the tension spring of the bobbin case.
- Close the bobbin cover plate.
- Hold the upper thread lightly, turn the handwheel towards you to lower and raise the needle, catching the bobbin thread. Pull both threads under the presser foot and towards the back.
5.3 Selecting Stitches
Turn the Stitch Selector Dial on the front of the machine to choose your desired stitch pattern. Refer to the stitch pattern display for available options. The machine offers various utility and decorative stitches.
5.4 Adjusting Stitch Length and Width
The JANOME 5519 features controls for adjusting stitch length and width. These are typically located near the stitch selector dial. Adjust these settings according to your fabric type and desired stitch appearance. For most straight stitches, a length of 2.5-3.0mm is standard. For zigzag stitches, adjust both length and width as needed.
5.5 Basic Sewing
- Place your fabric under the presser foot.
- Lower the presser foot.
- Gently press the foot controller to start sewing. Guide the fabric smoothly.
- To reverse stitch (for securing seams), press and hold the reverse lever/button.
- When finished, raise the needle to its highest position, lift the presser foot, and pull the fabric away. Cut the threads using the thread cutter or scissors.
6. Maintenance
6.1 Cleaning
Regular cleaning ensures smooth operation. Always unplug the machine before cleaning.
- Lint Removal: Use a small brush to remove lint and dust from the bobbin area, feed dogs, and needle plate.
- Surface Cleaning: Wipe the exterior of the machine with a soft, damp cloth. Avoid harsh chemicals.
6.2 Lubrication
Refer to your machine's specific lubrication points, usually indicated in a diagram within the full printed manual. Use only sewing machine oil. Over-oiling can attract lint.
6.3 Needle Replacement
Replace needles frequently, especially when sewing different fabric types or if the needle becomes bent or dull. A dull needle can cause skipped stitches or fabric damage. Follow the instructions in section 4.3.
7. Troubleshooting
| Problem | Possible Cause | Solution |
|---|---|---|
| Skipped Stitches | Incorrect needle, bent needle, improper threading, wrong needle size for fabric. | Replace needle with correct type/size, re-thread machine, ensure needle is inserted correctly. |
| Thread Breakage (Upper) | Improper threading, tension too tight, poor quality thread, bent needle, burr on needle plate. | Re-thread machine, adjust upper tension, use good quality thread, replace needle, check for burrs. |
| Thread Breakage (Lower) | Improperly wound bobbin, bobbin inserted incorrectly, lint in bobbin case, tension too tight. | Re-wind bobbin, re-insert bobbin correctly, clean bobbin case, adjust bobbin tension. |
| Uneven Stitches | Incorrect tension, improper threading, inconsistent fabric feeding. | Adjust tension, re-thread, ensure even fabric feeding without pulling or pushing excessively. |
| Machine Not Starting | Not plugged in, power switch off, foot controller not connected, safety mechanism engaged. | Check power connections, ensure switch is on, verify foot controller connection, check for jammed thread. |
8. Specifications
| Feature | Detail |
|---|---|
| Brand | JANOME |
| Model Number | 5519 |
| Product Dimensions (L x W x H) | 24 x 69 x 2.5 cm |
| Item Weight | 8 Kilograms (8000 Grams) |
| Material | Plastic |
| Power Source | Corded Electric |
| Electrical | Yes |
| Manufacturer | Janome |
9. Warranty and Support
Warranty information for your JANOME 5519 sewing machine is typically provided with the product at the time of purchase. Please refer to the warranty card or documentation included in your product packaging for specific terms, conditions, and duration.
For technical support, service, or to inquire about replacement parts, please contact your authorized JANOME dealer or visit the official JANOME website for customer service contact information in your region. Ensure you have your model number (5519) and proof of purchase available when seeking support.