
AUTONICS BX700-DDT
AUTONICS BX700-DDT Photoelectric Sensor Instruction Manual
Diffuse Reflective Sensor with 700mm Sensing Distance
1. Introduction
This instruction manual provides essential information for the safe and effective use of the AUTONICS BX700-DDT Photoelectric Sensor. Please read this manual thoroughly before installation and operation to ensure proper functionality and to prevent potential hazards. Keep this manual in a safe place for future reference.
2. Safety Precautions
Observe all safety warnings and instructions to prevent electric shock, fire, or product damage.
- Ensure the power supply is disconnected before wiring, installation, or maintenance.
- Do not use this unit in environments with flammable or explosive gases.
- Verify the power supply voltage is within the specified range (12-24 VDC).
- Avoid installing the sensor in locations subject to direct sunlight, strong vibrations, or excessive dust and moisture.
- Do not disassemble or modify the unit.
3. Product Overview
The AUTONICS BX700-DDT is a diffuse reflective photoelectric sensor designed for reliable object detection. It operates by emitting light and detecting the reflected light from the target object. This model features a 700mm sensing distance and offers both NPN and PNP output types with selectable Light ON/Dark ON operation.

Figure 1: Front and side view of two AUTONICS BX700-DDT sensors. These sensors are compact, black, and feature connection terminals on one side.
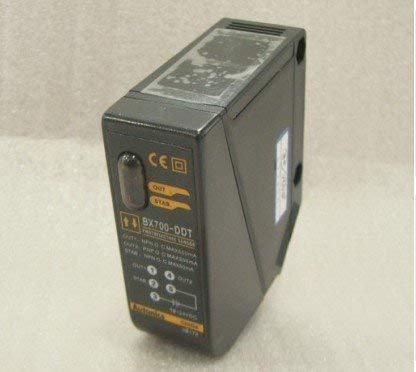
Figure 2: Detailed view of the AUTONICS BX700-DDT sensor's label, indicating the model number, output specifications (NPN/PNP), and power input (12-24VDC). It also shows the 'OUT' and 'STAB' indicators and adjustment buttons.
4. Specifications
| Model | BX700-DDT |
| Sensing Method | Diffuse Reflective |
| Sensing Distance | 700 mm |
| Power Supply | 12-24 VDC |
| Output Type | NPN & PNP Open Collector |
| Operation Mode | Light ON / Dark ON (Selectable) |
| Manufacturer | AUTONICS |
5. Installation and Setup
5.1 Mounting
Mount the sensor securely using appropriate brackets and fasteners. Ensure the sensing surface is clear of obstructions and positioned correctly relative to the target object. Avoid mounting the sensor where it may be exposed to excessive vibration or impact.
5.2 Environmental Considerations
- Temperature: Operate within the specified temperature range to ensure optimal performance.
- Humidity: Avoid environments with high humidity or condensation.
- Light Interference: Minimize exposure to strong ambient light sources, such as direct sunlight or high-intensity lamps, which can interfere with sensing.
- Dust and Dirt: Keep the sensing surface clean to maintain reliable detection.
6. Wiring
Proper wiring is crucial for the sensor's functionality and safety. Refer to the wiring diagram typically found on the product label or in the full technical datasheet. The BX700-DDT supports both NPN and PNP output configurations.
General Wiring Guide:
- Brown Wire: Connect to +VDC (12-24 VDC).
- Blue Wire: Connect to 0V / GND.
- Black Wire: NPN Output.
- White Wire: PNP Output.
Important: Ensure correct polarity and voltage. Incorrect wiring can damage the sensor or connected equipment. Always disconnect power before making or changing wiring connections.
7. Operation
7.1 Power On
After completing installation and wiring, apply power to the sensor. The power indicator (if present) should illuminate.
7.2 Light ON / Dark ON Selection
The BX700-DDT allows selection between Light ON and Dark ON operation modes. This selection is typically made via a switch or button on the sensor body. Refer to Figure 2 for potential switch locations.
- Light ON (NO - Normally Open): The output turns ON when light is received (object detected).
- Dark ON (NC - Normally Closed): The output turns ON when light is NOT received (no object detected, or object blocks light).
7.3 Sensitivity Adjustment
For diffuse reflective sensors, sensitivity adjustment may be necessary to optimize detection for specific target objects and distances. This is often done via a potentiometer or push-button on the sensor. Adjust the sensitivity while observing the output indicator (OUT) to ensure reliable detection of the target and non-detection of background objects.
8. Maintenance
Regular maintenance ensures consistent performance and extends the lifespan of your sensor.
- Cleaning: Periodically clean the sensing surface with a soft, dry cloth. Do not use abrasive cleaners or solvents.
- Inspection: Check wiring connections for looseness or damage. Inspect the sensor body for any physical damage.
- Environmental Check: Ensure the operating environment remains within specified conditions (temperature, humidity, dust).
9. Troubleshooting
| Problem | Possible Cause | Solution |
|---|---|---|
| Sensor not powering on | No power supply, incorrect wiring, faulty power supply. | Check power connections and voltage. Verify power supply functionality. |
| No detection / Unreliable detection | Incorrect sensing distance, dirty lens, ambient light interference, incorrect sensitivity setting, target material/color. | Adjust sensing distance. Clean lens. Reduce ambient light. Adjust sensitivity. Consider target properties. |
| Constant ON/OFF output | Incorrect Light ON/Dark ON setting, background interference, sensor misalignment. | Verify Light ON/Dark ON mode. Remove background interference. Realign sensor. |
10. Warranty and Support
This AUTONICS BX700-DDT sensor comes with a 1-year warranty from the date of purchase, covering manufacturing defects. Please retain your proof of purchase for warranty claims.
For technical support, service, or warranty inquiries, please contact your authorized AUTONICS distributor or the seller. Do not attempt to repair the unit yourself, as this may void the warranty.
Related documentsBX700-DDT


Ask a question about this manual
Ask about setup, troubleshooting, compatibility, parts, safety, or missing instructions. Manuals+ will review the question and use this page’s manual context to help answer it.