1. Introduction
Thank you for choosing the Orion HCCA5000.1DSPLX High Performance Class-D Monoblock Amplifier. This amplifier is engineered for exceptional power and sound quality in car audio systems, designed to drive low impedances with high output levels. This manual provides essential information for proper installation, operation, and maintenance to ensure optimal performance and longevity of your amplifier.
2. Safety Information
Please read all safety instructions carefully before installing and operating the amplifier. Failure to follow these guidelines may result in injury or damage to the amplifier or vehicle.
- Professional Installation Recommended: Installation of car audio equipment can be complex. If you are unsure about any part of the installation process, seek assistance from a qualified professional.
- Power Disconnection: Always disconnect the vehicle's battery negative terminal before starting any electrical work to prevent short circuits and electrical shock.
- Proper Wiring: Use appropriate gauge wiring for power, ground, and speaker connections as specified in this manual. Incorrect wiring can lead to overheating, fire, or damage to components.
- Ventilation: Ensure the amplifier is mounted in a location with adequate ventilation to prevent overheating. Do not block cooling fins or air vents.
- Moisture Exposure: Avoid mounting the amplifier in locations where it may be exposed to moisture or excessive humidity.
- Secure Mounting: Mount the amplifier securely to prevent it from coming loose during vehicle operation, which could cause injury or damage.
- Hearing Protection: Prolonged exposure to high sound pressure levels can cause permanent hearing damage. Use caution when adjusting volume levels.
3. Product Features
The Orion HCCA5000.1DSPLX amplifier incorporates advanced features for superior audio performance and system protection:
- High Power Output: Delivers 5000W RMS, designed for competition-level sound pressure.
- Class-D Topology: Ensures high efficiency and powerful output with minimal heat generation.
- 1 Ohm Stable: Capable of driving low impedance loads for maximum power delivery to subwoofers.
- Low Pass Filter (LPF): Adjustable 40Hz - 300Hz for precise subwoofer frequency control.
- Bass Boost Control: Enhances low-frequency response.
- MOSFET Power Supply: Provides stable and efficient power delivery.
- Fault and Protection Monitoring: Safeguards the amplifier and connected components from electrical issues.
- Remote Bass Knob: Allows convenient adjustment of bass levels from the driver's seat.
4. Package Contents
Verify that all items are present in the package:
- Orion HCCA5000.1DSPLX Monoblock Amplifier
- Remote Bass Control Knob with Cable
- User Manual (this document)
- Mounting Hardware (screws, etc.) - (Typically included, verify upon unboxing)
5. Installation and Setup
Proper installation is crucial for the performance and safety of your amplifier. Follow these steps carefully.
5.1. Mounting Location
Choose a mounting location that provides:
- Adequate ventilation for heat dissipation.
- Protection from moisture and direct sunlight.
- Secure attachment to a solid surface.
- Accessibility for wiring and adjustments.
Common locations include the trunk, under seats, or behind rear seats.
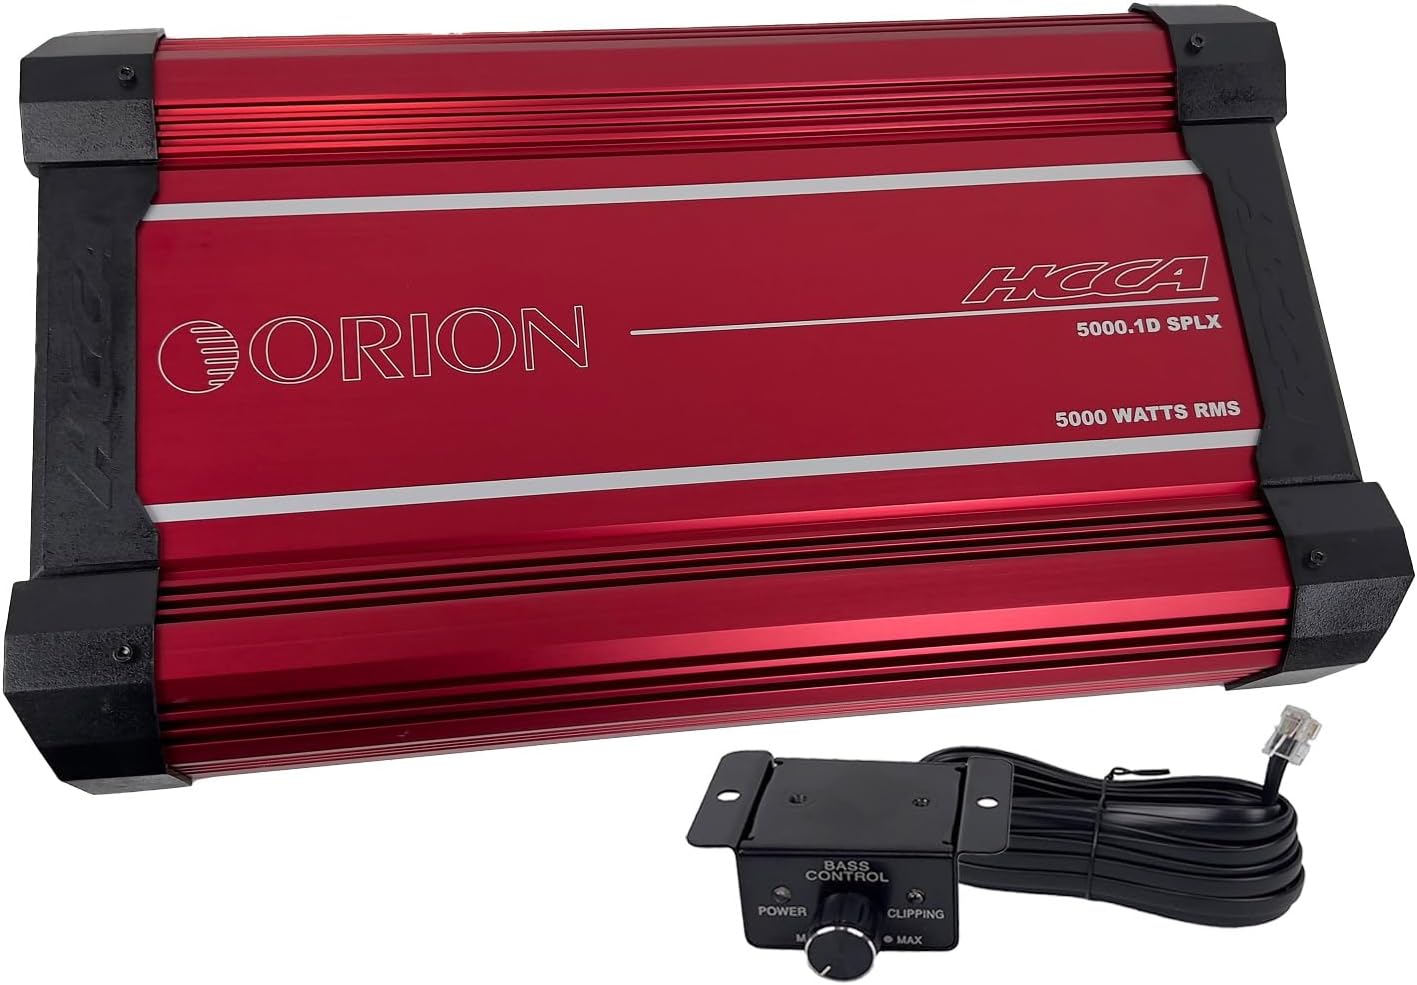
This image displays the top view of the red Orion HCCA5000.1DSPLX amplifier along with its wired remote bass control knob. The amplifier features the "ORION" logo and "HCCA 5000.1D SPLX 5000 WATTS RMS" text. The remote knob has "BASS CONTROL" and "POWER" and "CLIPPING" indicators.
5.2. Wiring Connections
Ensure all connections are secure and properly insulated.
5.2.1. Power and Ground Wiring
- Power (B+): Connect a heavy-gauge power cable (e.g., 0-gauge or 4-gauge, depending on total system power requirements) directly from the positive terminal of the vehicle's battery to the amplifier's B+ terminal. Install an appropriate fuse holder (ANL or Mini-ANL) within 18 inches (45 cm) of the battery.
- Ground (GND): Connect a heavy-gauge ground cable of the same size as the power cable from the amplifier's GND terminal to a clean, unpainted metal surface of the vehicle chassis. Ensure a solid electrical connection. The ground cable should be as short as possible, ideally less than 3 feet (1 meter).
- Remote (REM): Connect a smaller gauge wire (e.g., 18-gauge) from the amplifier's REM terminal to the remote turn-on output of your head unit. This wire turns the amplifier on and off with your stereo.

This image shows the power and speaker connection side of the Orion HCCA5000.1DSPLX amplifier. Clearly visible are the large terminals labeled "POWER" for battery positive, ground, and remote, and "SPEAKERS" for connecting subwoofers.
5.2.2. Audio Input and Output
- RCA Input: Connect RCA cables from the subwoofer pre-out of your head unit to the amplifier's RCA input terminals (L-CH Input, R-CH Input).
- RCA Output (Optional): If daisy-chaining multiple amplifiers, connect RCA cables from the amplifier's RCA output terminals (L-CH Output, R-CH Output) to the input of the next amplifier.

This image displays the audio input and control panel side of the Orion HCCA5000.1DSPLX amplifier. It features RCA input and output jacks, along with various control knobs for gain, low pass filter, bass boost, and phase adjustment.
5.2.3. Speaker Connections
Connect your subwoofer(s) to the amplifier's speaker terminals. Ensure the total impedance of the connected speakers is within the amplifier's stable operating range (1 Ohm minimum for this model).
- For a single subwoofer, connect its positive terminal to the amplifier's positive speaker terminal and its negative terminal to the amplifier's negative speaker terminal.
- For multiple subwoofers, refer to a wiring diagram to achieve the desired impedance (series, parallel, or series-parallel).
5.3. Remote Bass Knob Connection
Connect the provided remote bass control knob to the "Remote Gain" port on the amplifier using the supplied cable. Mount the knob in a convenient location for easy access.

This image shows the remote bass control knob with its attached cable. The knob allows for convenient adjustment of bass levels and includes power and clipping indicator lights.
6. Operating Instructions
Once the amplifier is installed and wired, follow these steps to configure and operate it.
6.1. Initial Power-Up
- Ensure all connections are correct and secure.
- Turn the gain control on the amplifier to its minimum setting (fully counter-clockwise).
- Reconnect the vehicle's battery negative terminal.
- Turn on your head unit. The amplifier should power on, indicated by its power LED.
6.2. Adjusting Controls
The amplifier features several controls to fine-tune its performance:
- Gain (Level): This control matches the amplifier's input sensitivity to the output voltage of your head unit. Start with the gain at minimum. Play a familiar track at about 75% of your head unit's maximum volume. Slowly increase the amplifier's gain until you hear distortion, then back off slightly. The remote bass knob also has a clipping indicator to assist in setting the gain.
- Low Pass Filter (LPF): This filter allows only frequencies below the set point to pass through to the subwoofer. Adjust the LPF (40Hz - 300Hz) to blend the subwoofer's output seamlessly with your main speakers. A common starting point is 80Hz-100Hz.
- Bass Boost: This control provides an increase in output at a specific low frequency. Use sparingly, as excessive bass boost can lead to distortion and potential damage to subwoofers.
- Phase: The phase control (0°/180°) helps to align the subwoofer's output with the main speakers. Experiment with both settings to find the one that provides the most impactful and coherent bass response.
7. Maintenance
Regular maintenance ensures the longevity and optimal performance of your amplifier.
- Cleaning: Periodically clean the amplifier's exterior with a soft, dry cloth. Do not use harsh chemicals or abrasive cleaners. Ensure cooling fins are free of dust and debris.
- Connection Checks: Annually, inspect all power, ground, remote, and speaker connections for tightness and corrosion. Loose connections can cause power loss, overheating, or intermittent operation.
- Ventilation: Ensure that the amplifier's mounting location remains clear of obstructions to maintain proper airflow.
8. Troubleshooting
If you experience issues with your amplifier, consult the following table before contacting technical support.
| Problem | Possible Cause | Solution |
|---|---|---|
| No Power / Amplifier does not turn on |
|
|
| No Sound Output |
|
|
| Distorted Sound |
|
|
| Amplifier Overheats / Goes into Protection |
|
|
9. Specifications
Key technical specifications for the Orion HCCA5000.1DSPLX Monoblock Amplifier:
| Feature | Specification |
|---|---|
| Model Number | HCCA5000.1D |
| Brand | ORION |
| Number of Channels | 1 (Monoblock) |
| Output Power (RMS) | 5000 Watts |
| Minimum Stable Impedance | 1 Ohm |
| Frequency Response | 15Hz - 250Hz |
| Low Pass Filter (LPF) | 40Hz - 300Hz |
| Voltage | 12 Volts (Operating) |
| Maximum Supply Voltage | 16 Volts |
| Dimensions (L x W x H) | 21.3 x 11.7 x 2.8 inches (541.02mm x 297.18mm x 71.12mm) |
| Item Weight | 31.2 pounds |
| Material | Aluminum, MOSFET |
| Mounting Type | Surface Mount |
| Operating Temperature | 660 Degrees Celsius (Note: This value seems unusually high and likely refers to a component's maximum junction temperature, not ambient operating temperature. Operate within reasonable vehicle interior temperatures.) |
| Certification | FCC |
10. Warranty and Support
Orion products are designed for reliability and performance. For specific warranty terms and conditions, please refer to the warranty card included with your product or visit the official Orion Car Audio website. Keep your proof of purchase for warranty claims.
For technical assistance, troubleshooting beyond this manual, or warranty inquiries, please contact Orion Car Audio customer support through their official channels. Contact information can typically be found on their website or product packaging.
Website: www.orioncaraudio.com (Example link, verify actual website)


