
Zamp solar ZS-8AW
Zamp Solar 8-Amp Waterproof/Weatherproof Solar Charge Controller User Manual
Model: ZS-8AW
1. Introduction
This manual provides essential information for the safe and effective operation of your Zamp Solar 8-Amp Waterproof/Weatherproof Solar Charge Controller, model ZS-8AW. This 5-stage PWM charge controller is designed to protect and optimize the charging of 12-volt AGM, Conventional lead-acid (Wet), Gel, and Calcium batteries from solar panels up to 135 watts. It prevents battery overcharge, improves charge quality, and prevents discharge in low or no light conditions, extending battery life.
2. Safety Information
Read all instructions carefully before installation and operation. Failure to follow these instructions may result in electric shock, fire, or serious injury.
- Always disconnect the solar panel from the charge controller before connecting or disconnecting the battery.
- Ensure all wiring is correctly polarized (positive to positive, negative to negative). Incorrect wiring can damage the controller and battery.
- Install the controller in a well-ventilated area, away from flammable materials.
- Do not attempt to disassemble or repair the controller. Refer all servicing to qualified personnel.
- This controller is designed for 12-volt battery systems only. Do not connect to 24-volt or higher systems.
- Ensure the solar panel's open circuit voltage (Voc) does not exceed 25 volts.
3. Package Contents
Verify that all components are present:
- Zamp Solar 8-Amp Waterproof/Weatherproof Solar Charge Controller (ZS-8AW)
- User Manual (this document)
4. Features
- Safely charges 12-volt battery banks, preventing overcharge.
- Compatible with solar panels up to 135 watts.
- Easy installation with clearly marked positive and negative terminals for battery and solar input.
- LED indicators for charging status (fast, slow), battery full, and system fault.
- Supports four battery types: AGM, WET (Conventional lead-acid), GEL, and Calcium, selectable via DIP switch settings.
- Waterproof/Weatherproof design for outdoor use.
- 5-Stage PWM (Pulse Width Modulation) charging for optimal battery health.
5. Setup and Installation
Follow these steps for proper installation:
- Mounting: The ZS-8AW is designed for surface mounting. Choose a location that is accessible, well-ventilated, and protected from direct sunlight if possible, although the unit is weatherproof.
-
Battery Type Selection: Before connecting any wires, set the DIP switches on the back of the controller to match your battery type. Refer to the diagram below for switch settings.
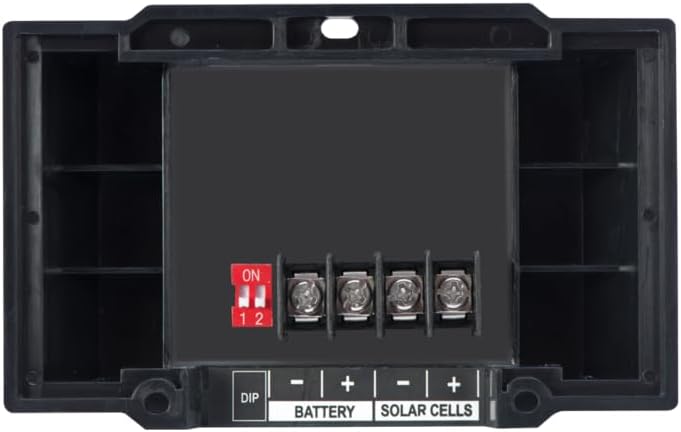
Figure 1: Rear view of the ZS-8AW controller, showing the DIP switches (red, labeled ON 1 2) and the battery and solar cell terminals.
DIP Switch Settings for Battery Type Battery Type DIP Switch 1 DIP Switch 2 AGM OFF OFF WET (Lead-Acid) ON OFF GEL OFF ON Calcium ON ON -
Wiring Connections:
Connect wires in the following order to prevent damage:
- Connect to Battery: Connect the positive (+) battery cable to the "BATTERY +" terminal on the controller. Then, connect the negative (-) battery cable to the "BATTERY -" terminal. The controller's LEDs should illuminate, indicating it has power.
- Connect to Solar Panel: Connect the positive (+) solar panel cable to the "SOLAR CELLS +" terminal on the controller. Then, connect the negative (-) solar panel cable to the "SOLAR CELLS -" terminal.
Ensure all connections are secure and free from corrosion.
6. Operating Instructions
The ZS-8AW controller operates automatically once connected. Its LED indicators provide real-time status information:

Figure 2: Front view of the ZS-8AW controller with LED indicators.
-
FAULT LED:
- OFF: No fault detected.
- ON (Red): Indicates a system fault, such as reverse polarity, over-voltage, or short circuit. Disconnect all power and check connections.
-
CHARGING LED:
- OFF: No charging occurring (e.g., no solar input, battery full, or fault).
- SLOW FLASH (Green): Indicates the battery is in a "float" or maintenance charge stage.
- FAST FLASH (Green): Indicates the battery is in a "bulk" or "absorption" charge stage, receiving a significant charge.
-
FULL LED:
- OFF: Battery is not yet full.
- ON (Green): Battery is fully charged. The controller will maintain the battery at this level.
The controller automatically adjusts charging based on battery state and solar input, ensuring optimal battery health and preventing overcharging.
7. Maintenance
The ZS-8AW controller requires minimal maintenance due to its weatherproof design. However, periodic checks are recommended:
- Connections: Periodically inspect all wiring connections for tightness and corrosion. Ensure terminals are clean.
- Cleanliness: Keep the controller's exterior clean. Wipe off any dust or debris with a soft, damp cloth. Do not use harsh chemicals or abrasive cleaners.
- Environment: Ensure the mounting area remains free of obstructions that could impede airflow around the unit, although passive cooling is sufficient for this low-power controller.
8. Troubleshooting
| Problem | Possible Cause | Solution |
|---|---|---|
| No LEDs illuminated. | No power from battery or reverse polarity. | Check battery connections. Ensure positive and negative terminals are correctly connected. Verify battery voltage is above 8V. |
| FAULT LED is ON (Red). | Reverse polarity, over-voltage, or short circuit. | Immediately disconnect all power. Check all wiring for correct polarity and ensure no short circuits. Verify solar panel voltage is below 25V. |
| CHARGING LED is OFF, but solar panel is in sunlight. | Battery is full, insufficient solar input, or faulty connection. | Check if FULL LED is ON. Ensure solar panel is clean and receiving direct sunlight. Verify solar panel connections are secure. Check solar panel output voltage. |
| Battery not charging or charging slowly. | Incorrect battery type setting, low solar input, or undersized solar panel. | Verify DIP switch settings match battery type. Ensure solar panel is clean and in full sun. Confirm solar panel wattage is sufficient for your battery bank. |
9. Specifications
| Specification | Value |
|---|---|
| Model Number | ZS-8AW (Z6F-ZS8AW) |
| Max Solar Input Power | 135 Watts |
| Max Charge Current | 8 Amps |
| System Voltage | 12 Volts DC |
| Battery Compatibility | AGM, WET (Lead-Acid), GEL, Calcium |
| Charge Type | 5-Stage PWM |
| Operating Temperature | -4°F to 122°F (-20°C to 50°C) |
| Dimensions | 4 x 4 x 2 inches (10.16 x 10.16 x 5.08 cm) |
| Weight | 2.56 ounces (72.57 grams) |
| Waterproof Rating | Weatherproof |
10. Warranty and Support
For warranty information or technical support, please contact Zamp Solar directly. Keep your purchase receipt as proof of purchase.
For further assistance, visit the official Zamp Solar website or contact their customer service department. Contact details are typically found on the product packaging or the manufacturer's website.
Related documentsZS-8AW


Ask a question about this manual
Ask about setup, troubleshooting, compatibility, parts, safety, or missing instructions. Manuals+ will review the question and use this page’s manual context to help answer it.