1. Introduction
The Visonic Power Max Express Wireless Burglar Alarm PME (433) Kit is a comprehensive wireless security system designed to protect your home or office. This system features 28 wireless zones, allowing for extensive coverage with various detectors. It includes capabilities for remote access, multiple arming modes, and a built-in siren, providing a robust security solution.
2. Safety Information
- Read all instructions carefully before installation and operation.
- Ensure the main control unit is connected to a stable power source.
- Do not expose the system components to extreme temperatures, humidity, or direct water.
- Only use specified batteries for sensors and the backup battery.
- Keep the system away from children and pets.
- Do not attempt to repair or modify the system components yourself. Refer to qualified service personnel.
3. Package Contents
Verify that all the following components are included in your package:
- Main Control Unit (with built-in siren and backup battery)
- Wireless Sensors (e.g., PIR motion sensors, door/window contacts)
- Remote KeyFob(s)
- Power Adapter for Main Control Unit
- Telephone Line Cable (for PSTN communicator)
- Installation Manual
4. Setup and Installation
The Visonic Power Max Express system is designed for DIY wireless installation, requiring minimal wiring for the main control unit's power and telephone line connection.
4.1 Main Control Unit Placement
Place the main control unit in a central location within your premises, ensuring it is within wireless range of all sensors (up to 100 meters). Connect the power adapter to the unit and plug it into a wall outlet. If using the PSTN communicator, connect a standard telephone line to the designated port on the unit.
4.2 Sensor Installation
Install wireless sensors in strategic locations such as entry points (doors, windows) and high-traffic areas. Each sensor operates wirelessly and requires batteries (included). Follow the individual sensor's instructions for mounting and battery insertion. The system supports up to 28 wireless zones.

Image 1: Example of a Visonic Wireless PIR Motion Sensor. This sensor detects movement within its field of view and transmits an alert to the main control unit.

Image 2: Example of a Visonic Wireless Door/Window Contact Sensor. This sensor consists of two parts that separate when a door or window is opened, triggering an alarm.
4.3 KeyFob Pairing
Pair the remote keyfob(s) with the main control unit according to the instructions provided in the main installation manual. The keyfob allows for convenient arming and disarming of the system.
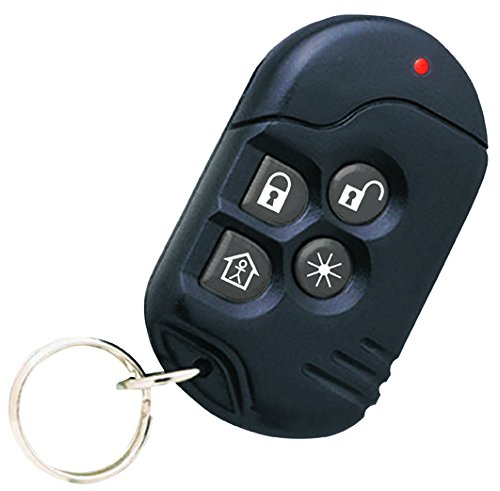
Image 3: Example of a Visonic Remote KeyFob. This device allows users to arm, disarm, and control other functions of the alarm system remotely.
5. Operating Instructions
5.1 Arming and Disarming
- Using the KeyFob: Press the designated arm button (e.g., locked padlock icon) on your keyfob to arm the system. Press the disarm button (e.g., unlocked padlock icon) to disarm.
- Using the Control Panel: Enter your user code on the keypad and select the desired arming mode (e.g., Full Arm, Home Arm). Enter your user code and press the disarm button to disarm.
- Remote Telephone Access: Dial your landline number connected to the system. Follow the voice prompts to arm, disarm, or check system status remotely.
- Disarming Under Duress: If forced to disarm the system, use a pre-programmed duress code. This will disarm the system normally but silently alert pre-defined telephone numbers.
5.2 Arming Modes
The system supports multiple arming modes, such as:
- Full Arm: All sensors are active. Suitable when no one is present in the protected area.
- Home Arm (Stay Arm): Activates perimeter sensors (e.g., door/window contacts) while allowing movement within the premises.
- Partition Arming: The system can control up to 3 separate partitions, allowing different areas to be armed or disarmed independently.
5.3 Latch Key Function
The latch key function can be programmed to call the owner when the panel is disarmed by an authorized user, providing notification of entry.
5.4 Activity Monitoring
The system can be programmed to monitor activity within the protected area, which is useful for looking after elderly, physically handicapped, or infirm individuals.
6. Maintenance
6.1 Battery Supervision
The system features battery supervision for all wireless sensors. The main control unit will indicate when a sensor battery is low. Sensor batteries typically have a life of at least 1 year under optimal conditions. Replace batteries promptly when indicated.
6.2 Cleaning
Clean the exterior of the control unit and sensors with a soft, dry cloth. Do not use abrasive cleaners or solvents, as these can damage the components.
7. Troubleshooting
| Problem | Possible Cause | Solution |
|---|---|---|
| System does not arm. | A zone may be open (e.g., door/window ajar) or a sensor battery is low. | Check all doors and windows. Verify sensor status on the control panel and replace any low batteries. |
| Siren does not sound during alarm. | Siren volume set too low or internal siren disabled. | Check system settings for siren volume. Ensure the internal siren is enabled. |
| Remote keyfob not responding. | Keyfob battery is low or out of range. | Replace keyfob battery. Move closer to the main control unit. Re-pair if necessary. |
| Remote telephone access not working. | Telephone line issue or incorrect dialing sequence. | Verify telephone line connection. Ensure correct dialing and access codes are used. |
8. Specifications
- Model: 0-103156
- Wireless Zones: 28
- Siren: 90 dB (built-in to main panel)
- Wireless Range: Up to 100 meters (line of sight)
- Communicator: Built-in PSTN (Telephone Line)
- Backup Battery: 12 hours operation
- Sensor Battery Life: Minimum 1 year (under optimal conditions)
- Operating Frequency: 433.9 MHz
- Control Method: Remote KeyFob, Control Panel, Remote Telephone
- Installation Type: Wireless DIY
- Manufacturer: Tyco International Ltd
9. Warranty and Support
For specific warranty details, please refer to the documentation provided with your purchase or contact your retailer. In case of technical issues or questions not covered in this manual, please contact Visonic customer support.
Professional installation services are available for an additional charge. Please inquire with your vendor if professional installation is desired.


