Cuddeback LLC-H
Cuddeback CuddeLink Cell Home (LLC-H) User Manual
Model: LLC-H
Introduction
The Cuddeback CuddeLink Cell Home (Model LLC-H) serves as the central hub for your CuddeLink camera network. This innovative system utilizes patented wireless network technology, enabling the Home unit to transmit images from up to 23 connected remote cameras via a single cellular network connection. This manual provides comprehensive instructions for setting up, operating, maintaining, and troubleshooting your CuddeLink Cell Home unit.
Setup
What's in the Box
- CuddeLink Cell Home Unit (Model C21-007)
- 2 Paddle Cell Antennas
- Mounting Straps
- Mounting Brackets
- Manuals

Figure 1: Included components of the CuddeLink Cell Home kit, showing the main unit, two paddle antennas, mounting straps, and mounting brackets.
Battery Installation
The CuddeLink Cell Home requires 4 D-Cell batteries for operation. For extended usage, external battery packs are available and can be connected via the dedicated port.
- Locate the battery compartment on the back of the unit.
- Open the back door to access the battery slots.
- Insert 4 D-Cell batteries, ensuring correct polarity.
- Close the back door securely.
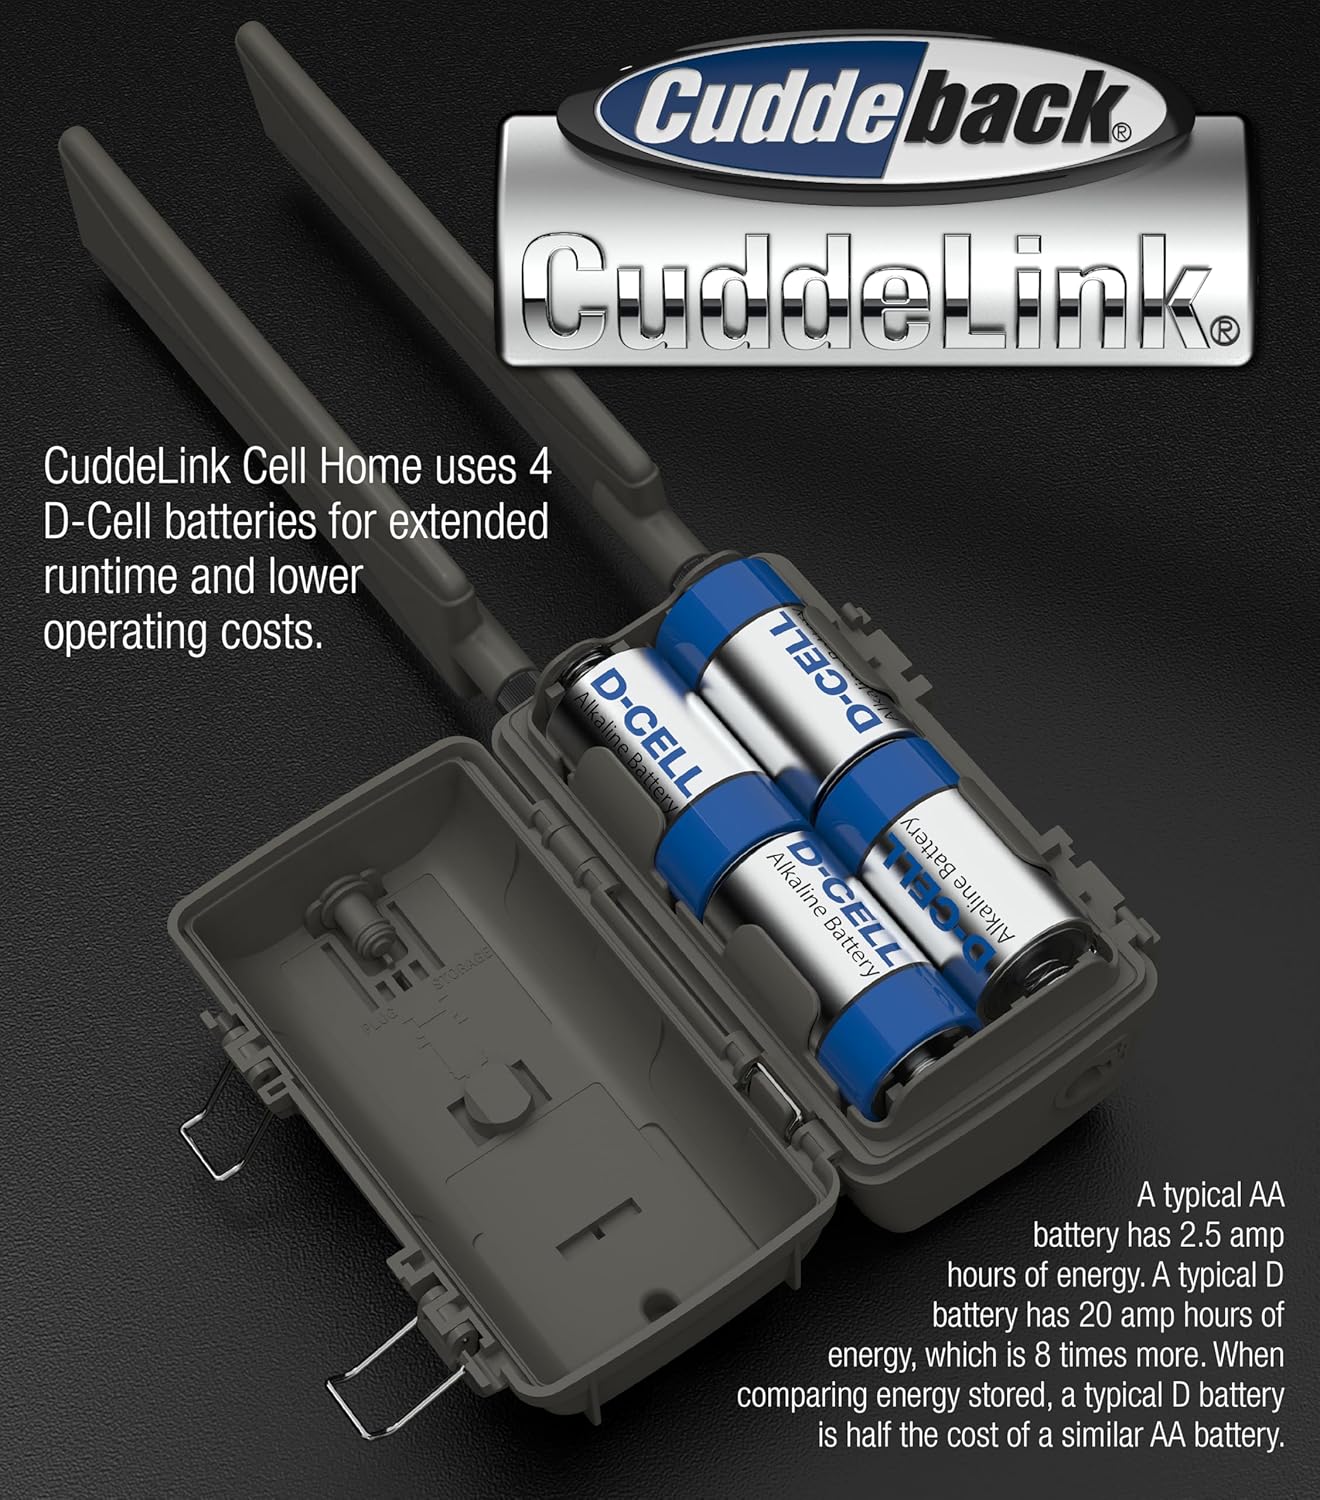
Figure 2: The battery compartment of the CuddeLink Cell Home, illustrating the placement of four D-Cell batteries for power.
Antenna and SD Card Installation
- Screw the two paddle cell antennas into the designated ports on the top of the unit.
- Open the front latching door to reveal the control panel and SD card slot.
- Insert a compatible SD card into the SD card slot. The unit supports SD cards up to 256 GB.
- Close the SD card slot cover and the front latching door to ensure weather sealing.

Figure 3: The CuddeLink Cell Home with its front panel open, displaying the control panel and the slot for inserting an SD card.
Mounting the Unit
The CuddeLink Cell Home is designed for outdoor usage and can be mounted using the provided mounting bracket and strap.
- Attach the mounting bracket to a tree or pole at the desired height.
- Secure the unit to the mounting bracket using the provided strap.
- Ensure the unit is stable and positioned to maximize cellular signal reception.

Figure 4: Side view of the CuddeLink Cell Home, illustrating its compact design and suitability for tree mounting.
Operating the CuddeLink Cell Home
Powering On and Initial Configuration
Once batteries and SD card are installed, the unit will power on. Use the control panel behind the front latching door to navigate menus and configure settings.
- Select your preferred cellular service (Verizon or AT&T) based on local coverage.
- Establish a data plan for sending photos.
- Configure basic settings such as date, time, and unit name.
Connecting Remote Cameras
The CuddeLink Cell Home acts as the central receiver for up to 23 CuddeLink Remote cameras. Remote cameras send their images back to the Home unit for transmission.
- Ensure remote cameras are set to communicate with a Home unit.
- Assign a unique channel and number to each remote camera for proper communication within the network.
- The Home unit will automatically receive reduced-size images from connected remote cameras, saving them to its SD card.

Figure 5: Front view of the CuddeLink Cell Home unit, ready for deployment as the central hub of a camera network.
Remote Settings Adjustment
Cuddeback allows for remote adjustment of camera settings via an online platform. This feature minimizes the need for physical interaction with deployed cameras.
- Adjust delay times between captures.
- Modify flash distance settings.
- Rename cameras within your network.
- Manage SD card content remotely.
Maintenance
Battery Life and Replacement
Battery life for the 4 D-Cell batteries typically ranges from 1 to 3 months, depending on camera activity and environmental conditions. For extended periods, consider using Cuddeback's external battery packs.
- Regularly check battery levels via the unit's display or the online platform.
- Replace all 4 D-Cell batteries simultaneously to ensure consistent power.
- When using external battery packs, monitor their charge and replace/recharge as needed.
SD Card Management
The SD card stores images received from remote cameras. Regular management is crucial to prevent storage issues.
- Periodically download images from the SD card to a computer or cloud storage.
- Format the SD card regularly (after backing up images) to maintain optimal performance and prevent data corruption.
- Use high-speed SanDisk SD cards for best performance.
Cleaning and Care
To ensure longevity and optimal performance, keep the unit clean and free from debris.
- Wipe the exterior of the unit with a soft, damp cloth.
- Ensure the lens and sensors are clear of dirt, dust, or spiderwebs.
- Verify that all latches and seals are secure to maintain water resistance.
Troubleshooting
No Images Received
- Check Cellular Signal: Ensure the Home unit has adequate cellular signal strength. Relocate if necessary.
- Verify Data Plan: Confirm your cellular data plan is active and has sufficient data.
- Remote Camera Connection: Check that remote cameras are properly linked to the Home unit and are transmitting. Verify their battery levels and SD card status.
- SD Card Issues: Ensure the SD card is correctly inserted, not full, and not corrupted. Try formatting the card (after backing up data) or using a different compatible SD card.
Short Battery Life
- Battery Type: Ensure you are using fresh, high-quality D-Cell batteries.
- Activity Level: High activity in the camera's detection zone will consume more power. Adjust delay settings if frequent captures are not needed.
- External Power: Consider connecting an external battery pack for extended operation, especially in high-traffic areas.
Remote Settings Not Applying
- Network Connectivity: Ensure the Home unit has a stable cellular connection to receive remote commands.
- Sync Cycle: Allow time for the unit to sync with the online platform and apply new settings.
- Firmware: Check for and install any available firmware updates for the unit.
Specifications
| Feature | Detail |
|---|---|
| Model | LLC-H (C21-007) |
| Brand | Cuddeback |
| Connectivity | Cellular (Verizon & AT&T built-in) |
| Compatible Devices | Laptop, Desktop, Tablet, Smartphone (for app/online control) |
| Power Source | 4 D-Cell Batteries (external battery pack compatible) |
| Indoor/Outdoor Usage | Outdoor |
| Mounting Type | Tree Mount |
| Dimensions (L x W x H) | 3.5 x 3.5 x 6 inches (approx. 8.9 x 8.9 x 15.2 cm) |
| Weight | 1.62 pounds (approx. 0.73 kg) |
| Water Resistance Level | Water Resistant |
| Max Remote Cameras | Up to 23 |
| SD Card Support | Up to 256 GB |
Warranty Information
Cuddeback products typically come with a manufacturer's warranty. For specific details regarding your CuddeLink Cell Home (Model LLC-H) warranty period, coverage, and claims process, please refer to the warranty card included with your product or visit the official Cuddeback website. Keep your proof of purchase for warranty claims.
Note: The product's return policy from the retailer may differ from the manufacturer's warranty. For example, Amazon's return policy for this product is 30 days for refund/replacement.
Support
For technical assistance, product inquiries, or further support, please contact Cuddeback customer service. You may find additional resources, FAQs, and firmware updates on the official Cuddeback website.
- Official Website: www.cuddeback.com
- Customer Service: Refer to the contact information provided in your product manual or on the official website.
Ask a question about this manual
Ask about setup, troubleshooting, compatibility, parts, safety, or missing instructions. Manuals+ will review the question and use this page’s manual context to help answer it.