Introduction
This manual provides detailed instructions for the installation, operation, and maintenance of your Moen 87066 One-Handle High Arc Pulldown Kitchen Faucet. Please read this manual thoroughly before beginning installation or use to ensure proper function and longevity of your product. Keep this manual for future reference.

Image: The Moen 87066 Chrome One-Handle High Arc Pulldown Kitchen Faucet, showcasing its sleek design and integrated soap dispenser.
Safety Information
- Always turn off the main water supply before installing or servicing the faucet.
- Wear appropriate personal protective equipment, such as safety glasses, during installation.
- Ensure all connections are secure to prevent leaks.
- If you are unsure about any part of the installation process, consult a qualified plumber.
- Do not use abrasive cleaners or harsh chemicals on the chrome finish, as this may damage the surface.
Package Contents
Verify that all components are present before beginning installation:
- Moen 87066 One-Handle High Arc Pulldown Kitchen Faucet (Chrome)
- Mounting hardware
- Hot and cold water supply lines
- Deck plate (if required for multi-hole sinks)
- Installation instructions
Specifications
| Feature | Detail |
|---|---|
| Brand | Moen |
| Model Name | Moen 87066 One-Handle High |
| Finish Type | Chrome |
| Material | Plastic (Handle: Chrome) |
| Mounting Type | Deck Mount |
| Number of Handles | 1 |
| Hole Count | 1 |
| Spout Design | High Arc |
| Special Features | Pull Down Sprayer, Easy to Install, Power Clean Spray Technology |
| Maximum Flow Rate | 1.5 Gallons Per Minute |
| Hose Length | 68 Inches |
| Item Weight | 3.06 pounds |
| Product Dimensions | 30.98"D x 7.87"W x 62.23"H |
| ADA Compliant | Yes |
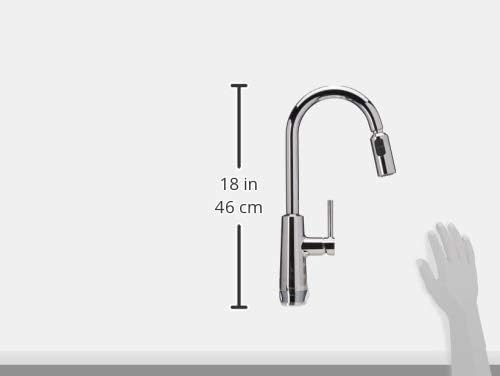
Image: A diagram illustrating the dimensions of the Moen 87066 faucet, indicating an 18-inch (46 cm) height from the base to the top of the arc.
Setup and Installation
The Moen 87066 faucet features the Duralock quick connect system for simplified installation. Follow these general steps:
- Prepare the Sink: Ensure the sink hole is clean and free of debris. If replacing an old faucet, remove it and clean the area thoroughly.
- Install Deck Plate (Optional): If your sink has multiple holes and you are using the included deck plate, place it over the sink holes.
- Mount the Faucet: Insert the faucet body through the sink hole(s) and secure it from underneath the sink using the provided mounting hardware. Tighten securely but do not overtighten.
- Connect Water Supply Lines: Connect the hot and cold water supply lines to the corresponding valves. The Duralock system allows for a quick and secure connection. Ensure a tight seal to prevent leaks.
- Connect Sprayer Hose: Connect the pulldown sprayer hose to the faucet's main body using the quick connect fitting.
- Install Weight: Attach the hose weight to the pulldown hose at the specified location to ensure proper retraction of the sprayer.
- Test for Leaks: Slowly turn on the main water supply and check all connections for leaks. Operate the faucet to ensure proper water flow and sprayer function.

Image: The Moen 87066 faucet installed in a modern kitchen setting, demonstrating its high arc design over a stainless steel sink.
Operating Instructions
- Water Flow and Temperature: The single lever handle controls both water flow and temperature. Move the handle up to increase flow and down to decrease. Move the handle left for hot water and right for cold water.
- Pulldown Sprayer: Grasp the sprayer head and pull it down from the spout. The Reflex system ensures smooth operation and secure docking when not in use.
- Spray Modes: The sprayer head typically features a button or switch to toggle between aerated stream and powerful spray (Power Clean Spray Technology). Press the button to switch modes.
- Docking: When finished, gently guide the sprayer head back into the spout. The Reflex system will securely dock it in place.
Maintenance
Proper care will help maintain the finish and performance of your Moen faucet.
- Cleaning the Finish: Clean the chrome finish regularly with a soft, damp cloth. For stubborn spots, use a mild soap and water solution, then rinse thoroughly and dry with a soft cloth. Avoid abrasive cleaners, harsh chemicals, or scouring pads, as these can damage the finish.
- Aerator Maintenance: If water flow decreases, the aerator may be clogged. Unscrew the aerator from the sprayer head, clean any debris, and rinse it before reattaching.
- Hose Inspection: Periodically inspect the pulldown hose for any signs of wear or damage.
Troubleshooting
| Problem | Possible Cause | Solution |
|---|---|---|
| Low Water Flow | Clogged aerator; partially closed shut-off valves; kinked supply line. | Clean the aerator. Ensure shut-off valves are fully open. Check supply lines for kinks. |
| Leaks from Faucet Base | Loose mounting nut; damaged O-rings. | Tighten the mounting nut underneath the sink. If leaks persist, contact customer support for replacement parts. |
| Sprayer Does Not Retract Fully | Hose weight improperly positioned or obstructed; debris in hose path. | Adjust the hose weight. Clear any obstructions around the hose under the sink. |
| Water Temperature Issues | Incorrect hot/cold supply line connection; water heater issues. | Verify hot and cold lines are connected correctly. Check water heater settings. |
Warranty Information
Moen faucets are backed by a limited lifetime warranty against leaks, drips, and finish defects to the original homeowner. Other components are warranted for a specific period. For complete warranty details and terms, please refer to the official Moen website or contact Moen customer service.
Note: Proof of purchase may be required for warranty claims.
Customer Support
For further assistance, technical support, or to order replacement parts, please contact Moen customer service:
- Website: www.moen.com
- Phone: Refer to the Moen website for regional contact numbers.
When contacting support, please have your faucet model number (87066) and date of purchase readily available.


