Introduction
The GPX BCA209R Portable AM/FM Boombox with CD and Cassette Player is designed to provide versatile audio entertainment. This unit allows you to enjoy music from various sources including AM/FM radio, audio CDs, and cassette tapes. It also features an auxiliary input for connecting external audio devices and the ability to record radio or CD content directly to cassette tapes. Its portable design, complete with a convenient carry handle, makes it ideal for use at home or on the go.
Package Contents
- GPX BCA209R Portable AM/FM Boombox
- AC Power Cable
- User Manual (this document)
Please inspect the package contents carefully to ensure all items are present and undamaged.
Controls and Features
Familiarize yourself with the various controls and features of your boombox for optimal use.

Figure 1: Front View of the Boombox. This image displays the main controls and audio components, including the top-loading CD player, front-loading cassette deck, and integrated stereo speakers. The control buttons for playback, radio tuning, and mode selection are visible above the cassette deck.
Front Panel Controls:
- POWER Button: Turns the unit on or off.
- FUNCTION Selector: Switches between CD, Radio (AM/FM), and Cassette/AUX modes.
- VOLUME Control: Adjusts the audio output level.
- TUNING Knob: Used to tune into AM or FM radio stations.
- CD Controls: Play/Pause, Stop, Skip Forward, Skip Backward, Program, Repeat.
- Cassette Controls: Play, Stop/Eject, Fast Forward, Rewind, Record.
- LCD Display: Shows track number, radio frequency, and mode.
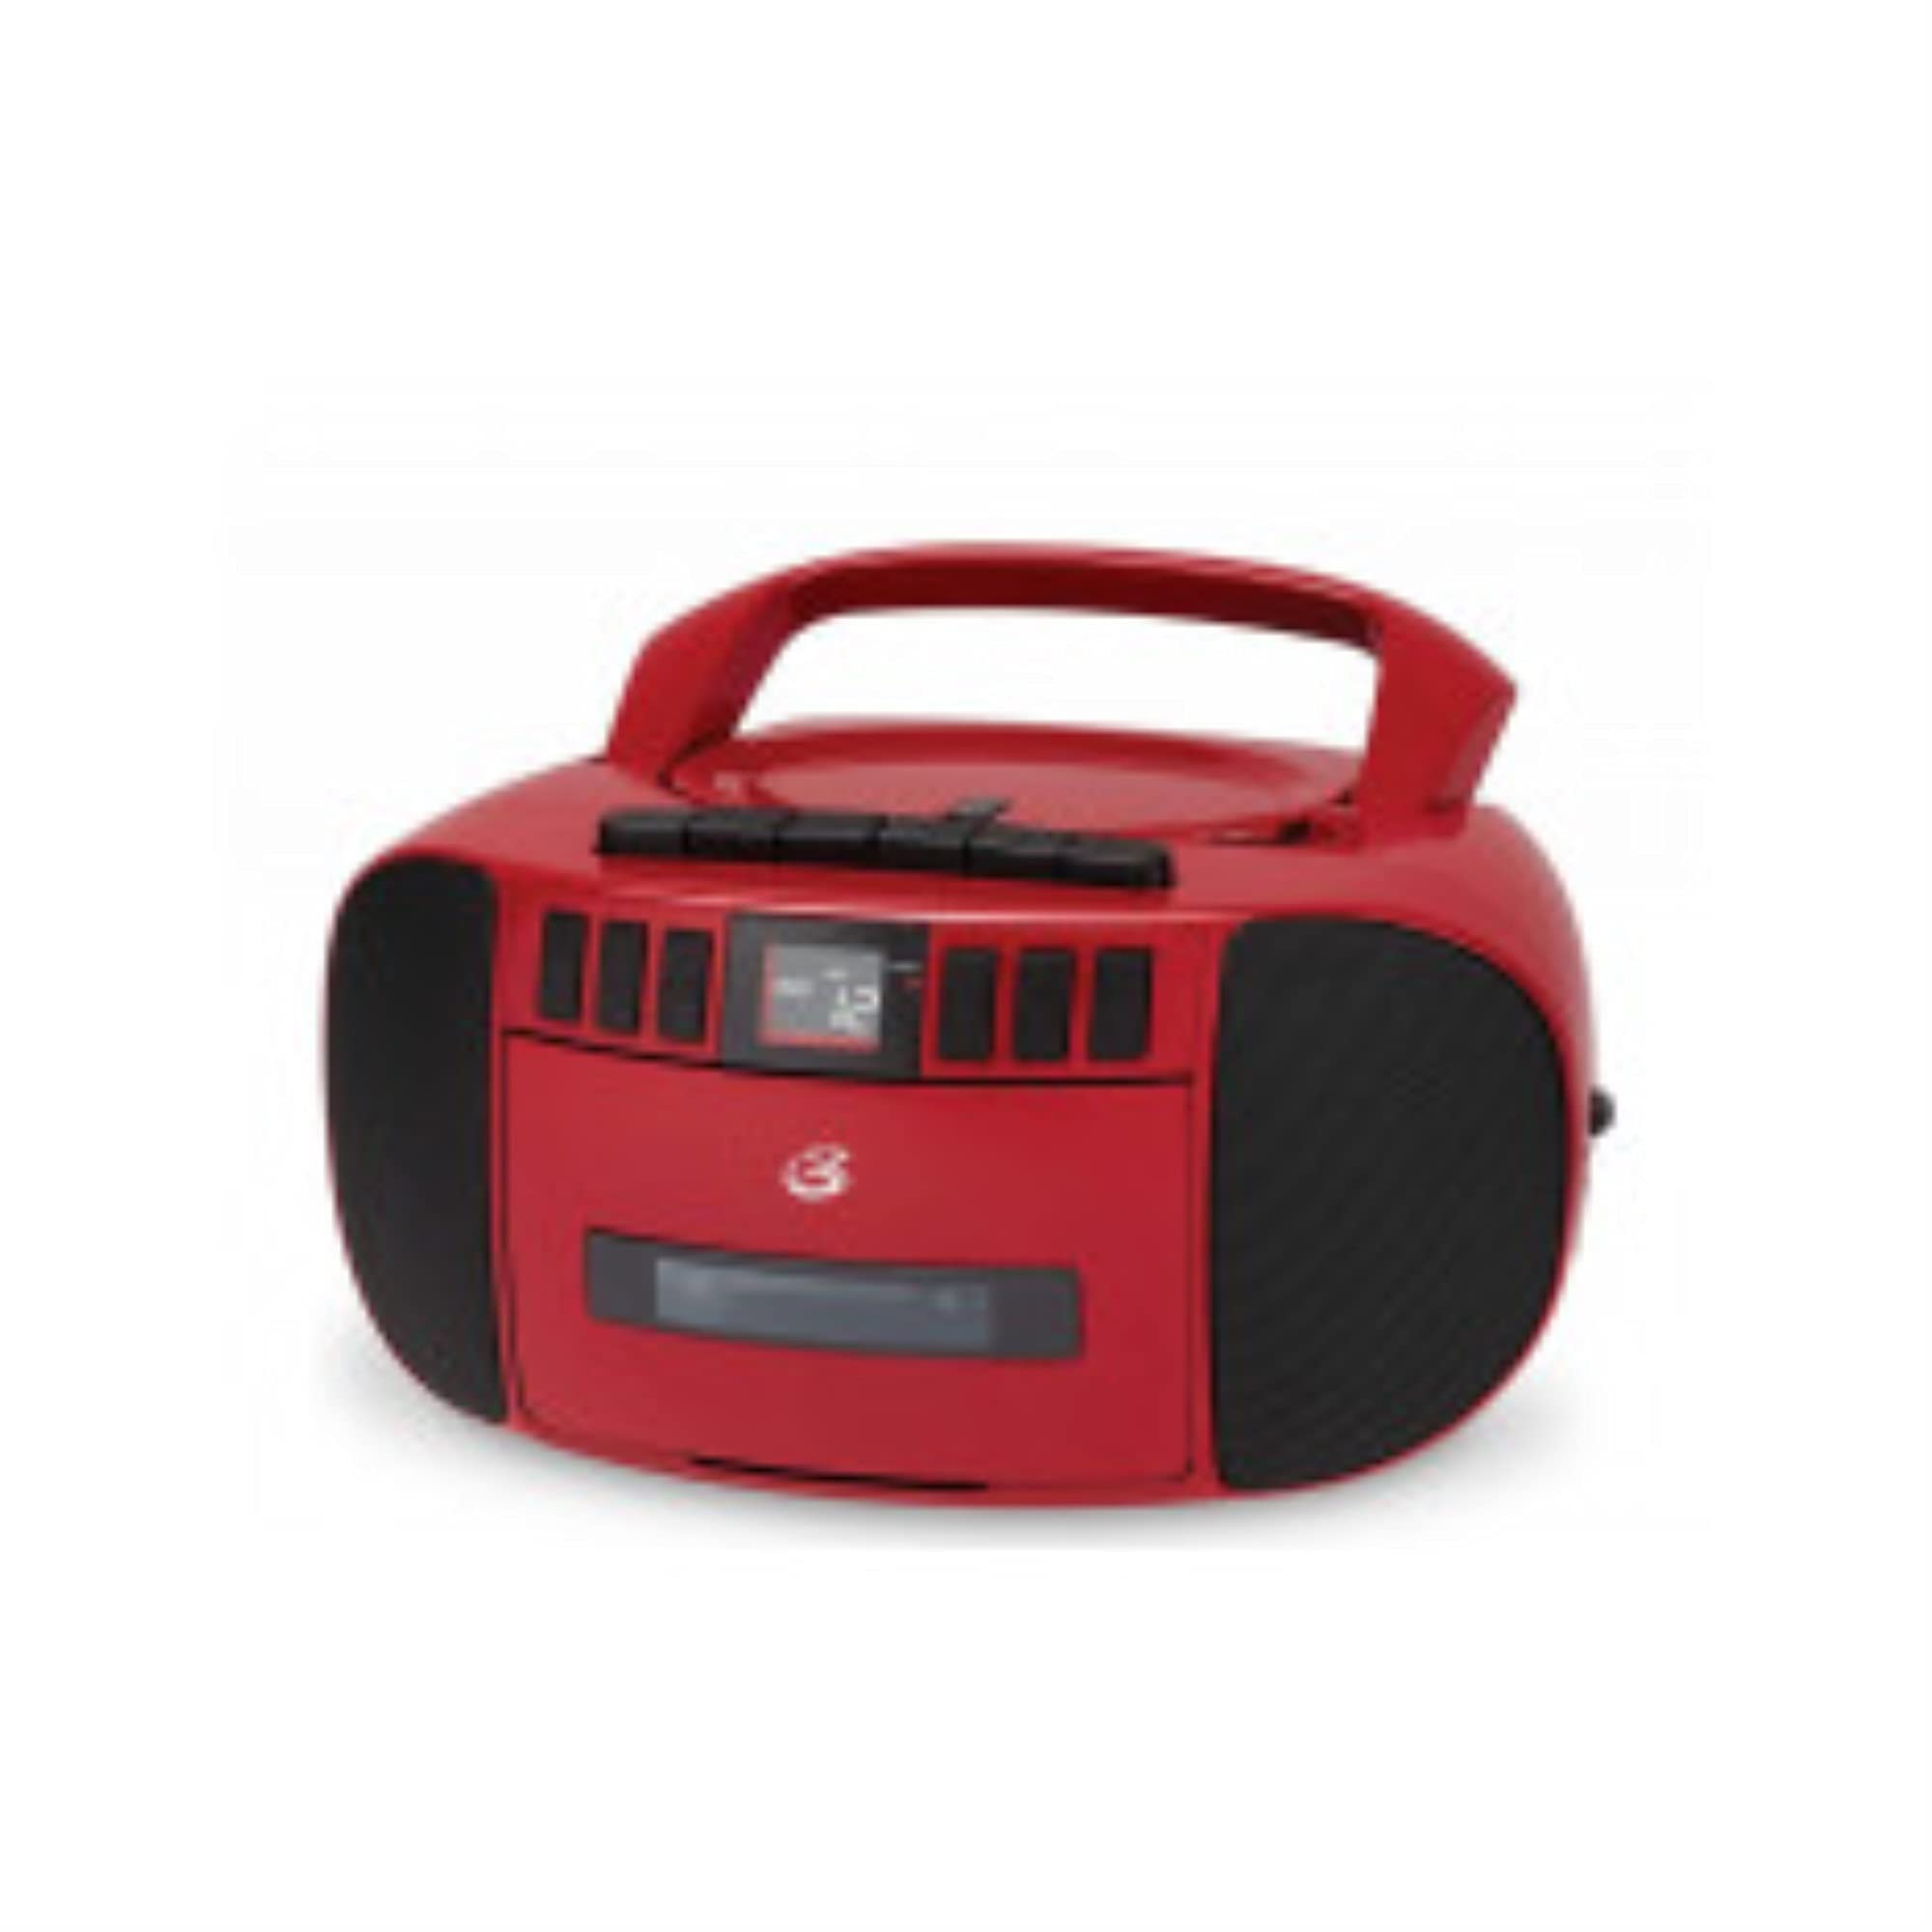
Figure 2: Side View of the Boombox. This image shows the side of the unit, featuring the extendable telescopic antenna for radio reception and the auxiliary input jack for connecting external audio devices.
Rear/Side Panel Features:
- AC Power Input: Connects the included AC power cable.
- Battery Compartment: Holds 6 "C" size batteries (not included) for portable operation.
- Telescopic Antenna: Extends for improved FM radio reception.
- AUX IN Jack: Connects external audio devices using a 3.5mm audio cable.
Setup
Powering the Unit:
Your boombox can be powered by either AC power or batteries.
AC Power:
- Ensure the unit is turned off.
- Insert the small end of the AC power cable into the AC power input jack on the back of the boombox.
- Plug the other end of the AC power cable into a standard wall outlet (AC 120V ~ 60Hz).
Battery Power:
- Ensure the unit is turned off and disconnected from AC power.
- Open the battery compartment cover located on the bottom of the unit.
- Insert 6 "C" size batteries (not included), ensuring correct polarity (+/-) as indicated inside the compartment.
- Close the battery compartment cover securely.
Note: Remove batteries if the unit will not be used for an extended period to prevent leakage.
Antenna Adjustment:
For optimal FM radio reception, fully extend the telescopic antenna. For AM reception, the unit has a built-in antenna, and you may need to rotate the entire unit for best signal.
Operating Instructions
Radio Operation:
- Press the POWER button to turn on the unit.
- Set the FUNCTION selector to "RADIO".
- Select the desired band (AM or FM) using the AM/FM switch (if present, otherwise it's usually part of the function selector or a separate switch).
- Rotate the TUNING knob to find your desired radio station.
- Adjust the VOLUME control to a comfortable listening level.
- For FM, extend and adjust the telescopic antenna for best reception. For AM, rotate the unit for best reception.
CD Playback:
- Press the POWER button to turn on the unit.
- Set the FUNCTION selector to "CD".
- Open the CD compartment door by gently lifting it.
- Place a CD with the label side facing up onto the spindle.
- Close the CD compartment door securely. The display will show the total number of tracks.
- Press the PLAY/PAUSE button to start playback.
- Use the SKIP FORWARD or SKIP BACKWARD buttons to navigate between tracks.
- Press PLAY/PAUSE again to pause playback, and press it once more to resume.
- Press the STOP button to stop playback.
- Use the REPEAT button to repeat the current track (Repeat One) or all tracks (Repeat All).
- Use the PROGRAM button to create a custom playback order for tracks.
Cassette Playback:
- Press the POWER button to turn on the unit.
- Set the FUNCTION selector to "CASSETTE" or "TAPE".
- Press the STOP/EJECT button to open the cassette deck door.
- Insert a cassette tape with the open edge facing forward.
- Close the cassette deck door securely.
- Press the PLAY button to start playback.
- Use the FAST FORWARD or REWIND buttons to quickly move through the tape. Press PLAY or STOP/EJECT to disengage.
- Press the STOP/EJECT button to stop playback and eject the tape.
Recording to Cassette:
You can record from the radio or CD player directly to a cassette tape.
- Insert a blank or recordable cassette tape into the cassette deck.
- Select the source you wish to record from (RADIO or CD) using the FUNCTION selector.
- If recording from Radio, tune to the desired station. If recording from CD, ensure the CD is loaded and ready to play from the desired starting point.
- Press the RECORD button on the cassette deck. The PLAY button will also engage automatically.
- If recording from CD, press the PLAY button on the CD player simultaneously or immediately after pressing RECORD.
- To stop recording, press the STOP/EJECT button on the cassette deck.
Using the AUX Input:
- Press the POWER button to turn on the unit.
- Set the FUNCTION selector to "AUX" or "CASSETTE/AUX" (if combined).
- Connect one end of a 3.5mm audio cable (not included) to the AUX IN jack on the boombox.
- Connect the other end of the audio cable to the headphone jack or audio output of your external device (e.g., smartphone, MP3 player).
- Start playback on your external device.
- Adjust the volume on both the boombox and your external device for optimal sound.
Maintenance
Cleaning the Unit:
- Wipe the exterior of the unit with a soft, slightly damp cloth. Do not use abrasive cleaners or solvents.
- For the CD lens, use a specialized CD lens cleaner disc.
- For the cassette deck, periodically clean the tape heads, pinch rollers, and capstan with a cotton swab lightly dampened with isopropyl alcohol.
Care of CDs and Cassettes:
- Handle CDs by the edges to avoid fingerprints on the playing surface.
- Store CDs in their cases when not in use.
- Keep cassette tapes away from strong magnetic fields and direct sunlight.
- Do not touch the tape surface.
Troubleshooting
| Problem | Possible Cause | Solution |
|---|---|---|
| Unit does not power on. | No AC power or dead batteries. | Check AC power connection or replace batteries. |
| No sound. | Volume too low, incorrect function mode, or headphones connected. | Increase volume, select correct function (CD/Radio/Cassette/AUX), ensure no headphones are connected. |
| CD skips or does not play. | CD is dirty, scratched, or inserted incorrectly. | Clean CD, try another CD, ensure CD is inserted label-side up. |
| Poor radio reception. | Antenna not extended/adjusted, or weak signal. | Fully extend and adjust FM antenna. Rotate unit for AM reception. Try a different location. |
| Cassette tape not playing or recording properly. | Tape heads dirty, tape tangled, or incorrect function mode. | Clean tape heads. Check tape for damage. Ensure function is set to CASSETTE. |
Specifications
| Model Number | BCA209R |
| Power Source | AC 120V ~ 60Hz or 6 x "C" Batteries (not included) |
| Radio Frequency | AM: 530 - 1710 kHz, FM: 88 - 108 MHz |
| CD Compatibility | CD, CD-R/RW |
| Speaker Type | Stereo |
| Connectivity | Auxiliary Input (3.5mm) |
| Dimensions (Approx.) | 10.94 x 10.39 x 6.14 inches (Package Dimensions) |
| Weight (Approx.) | 4 pounds |
Warranty and Support
For warranty information and technical support, please refer to the warranty card included with your product or visit the official GPX website. Keep your purchase receipt as proof of purchase for any warranty claims.
Online Resources:
- Official GPX Website: www.gpx.com (Note: This is a placeholder URL, please refer to actual manufacturer website for support.)
- Product Support Page: Check the GPX website for a dedicated support page for model BCA209R.


